How To Get This Shot – Alaskan Backlit Bear
To be a photographer often means to be a planner. You’ve planned out the trip, packed the right equipment, selected your locations, figured out sunrise & sunset, and there’s a good chance you’ve even planned out the kind of images that you’re hoping to make when you get there. Sound like you?
So, what do you do when you get to the location after all that planning, and the sun is in the wrong spot? Of course, the best advice is simply move. Change up where you’re standing and find a new composition with the sun more favorably located to better light up your subject. You’re not exercising, you’re “recomposing the scene.”
However, there are plenty of situations where moving just isn’t an option. Take Alaska for example: in front of you is a 500lb Brown Bear actively fishing with the setting sun behind it (backlit…not what you had planned); to your left is a swift-moving river, and to your right is a bear guide telling you to stay put. What shot can you take?
Embrace the Silhouette
While it may not have been what you had pictured in your head, if the sun is behind your subject, your best chance at still making great images will come from embracing the silhouette. To get this shot successfully, there are several aspects of composition that will make this type of image work. First, wait for your subject to move in front of a plain background, such as a grassy field (see what I did there?). An open sky, or in this case, a wide river mouth works well too. If the subject is standing still, can you stand up or get low to change your angle & reveal a better background? (There’s that “just move” advice again) This will ensure that your darkened subject is not hidden amongst equally dark background elements like trees or mountains.
Next, wait for the subject to move into perfect silhouette position. What does that mean? Ideally, your subject should be perpendicular to you (or close to it) so that when you take the shot, your subject is recognizable (wildlife photography isn’t modern art, it shouldn’t require an explanation).
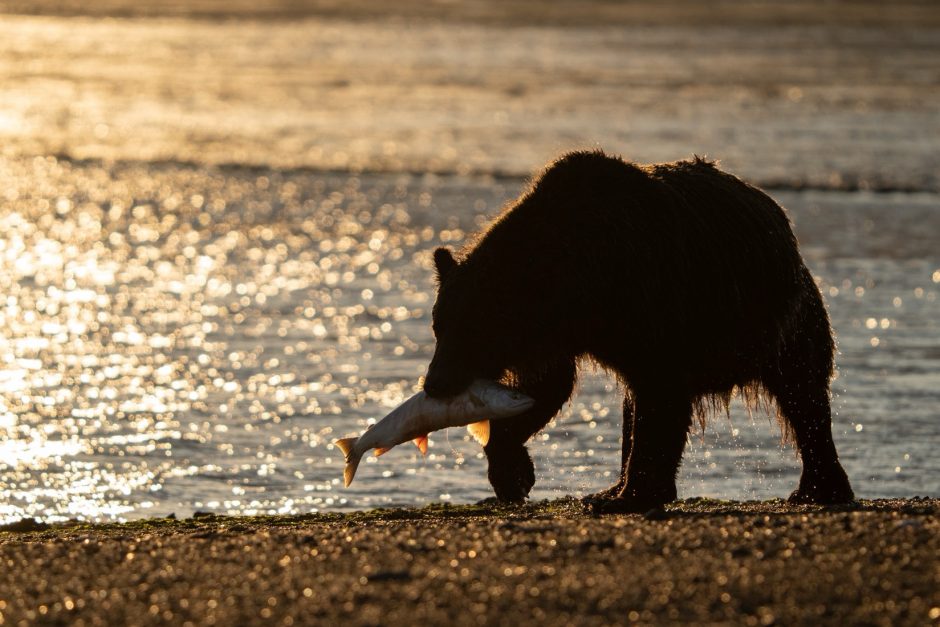
In this case study, if I had taken the photo of the bear head on, it would simply look like a dark furry blob to the viewer. By waiting for the bear to walk further alongside me, you can make out the limbs, head, and ear and it’s much easier to tell that it’s a bear. This will be helpful to remember when you are looking through a series of photos to determine which image of your moving subject is best. Can you make out the head? Are the limbs separated from each other? Does the subject strike a cool pose?

Camera Settings
This is the best part about shooting silhouettes. Unlike most low-light wildlife photography, where you’re often having to fight your camera settings to get the best exposure, with silhouettes, you’re purposely trying to make the subject darker to better sell your silhouette. This gives you a lot of freedom to choose more favorable ISO, shutter speeds, and apertures for your situation.
These were my settings even though it was late in the evening with the sun about to set.
- Camera: Sony Alpha 1 Mirrorless
- Lens: Sony FE 200-600mm f/5.6-6.3 G OSS
- Focal Length: 359mm
- Aperture: f/6.3
- Shutter Speed: 1/2000 sec
- ISO 320
My ISO is quite low, but I was still able to shoot at a high shutter speed. This is super important for moving subjects (like flying birds or walking bears) as you’ll want to freeze the action to give a sharp, recognizable silhouette. Next, make sure your ISO and/or aperture are where they need to be to fully darken your subject and not overexpose the background and blow out your highlights. If your subject has a fuzzy edge to its silhouette like my bear, then you’ll want to ensure your exposure is just bright enough for the edge fur to catch the backlight & essentially draw an outline around your subject without being blown out and white.
Finally, your camera’s focus point shouldn’t be on your subject’s head or eye (again, breaking the rules of traditional wildlife photography). Instead, you should focus on the edges of the subject. This will help your silhouette stand out sharply from the blurred background.
Post-processing
Exactly how you edit this photograph will depend on your starting photo (a profound statement). You want to end up with a mostly black subject, showing little to no detail in the body, a clear outline, and a blurred background with darker colors to liven up the image. Though, silhouettes can still look great in the right black & white.
If you are using Lightroom or Photoshop, you can select the subject and darken it until you lose most of the detail with only some highlights in the high spots and outline of the subject. You can also use this feature to turn regular daytime photos into silhouettes. Just be sure to darken the background as well, so it doesn’t look like noon on a Thursday with a bear ‘s shadow walking through the frame.
You’ll want to make sure the background is bright enough to provide an obvious contrast between the subject and the background. (Not too dark, not too light. Think Goldilocks & the Three Bears) You may also look to sharpen the edges of the subject to help with this contrast. For this image, I also brightened up the salmon just a little, so it was more obvious what the bear had in its mouth. Finally, depending on your artistic vision, you can adjust the white balance to make the shot warmer or cooler.
In summary, if the sun isn’t lighting up your subject like you’d hoped, there’s no reason to throw in the towel. Embrace the silhouette and get your own iconic Alaskan Brown Bear image; you’ll be happy with the results.
Happy Photographing,

Mike Hillman
Leave a reply