How to get this shot – Towering Glacier in Alaska
Glaciers can be all sizes, but some of the most impressive can be found in the Kenai Fjords of Alaska. However, glaciers can be challenging for photography because of the high level of brightness in the shot (basically shooting a mostly white scene) and the need to show scale.
While I have other articles that offer general tips for photographing glaciers, we’ll use this one here to focus on this image specifically and dissect the steps needed to get it.
First, you’ll need to get yourself into the right position.
While there are a number of ways to get into Kenai Fjords, I recommend going on a dedicated photo tour to ensure that you are with fellow photographers, have a photo guide, and are on a small, maneuverable boat (instead of a massive multi-hundred person one).
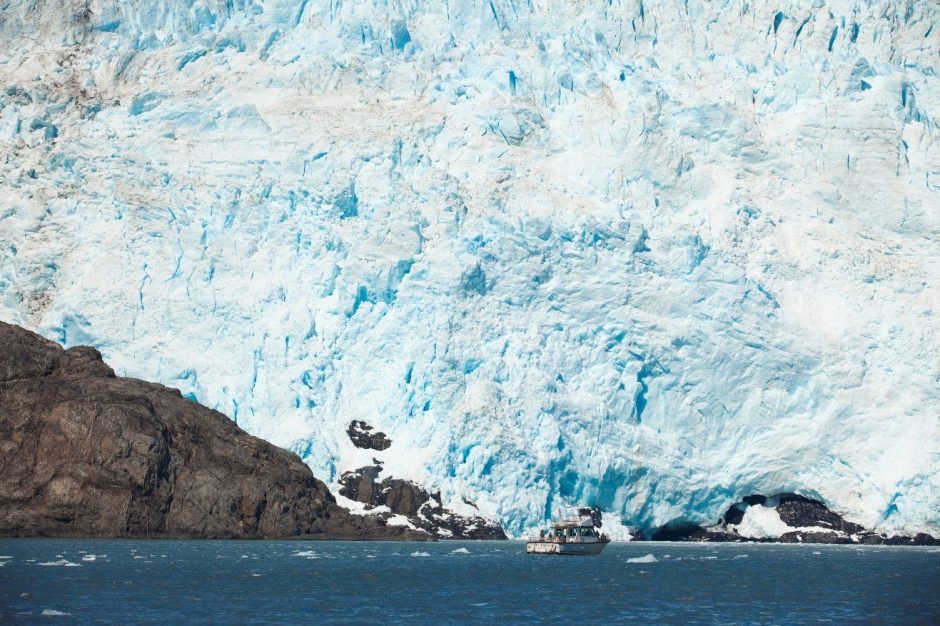
Once you’re in position, start sizing up your scene. This is critical to finding those specific elements to provide for scale and good composition. In this case, there happens to be another boat just at the base of the glacier. Considering this was the same make and model as OUR boat, it was perfect for both showing scale as well as telling the story of where we were and what we were doing.
However, other things to look out for include large icebergs, rocks at the base of the glacier, the glacier “foot” that extends into the water sometimes, or surrounding forests.
Just as always, proper composition is key, so start with the classic rules of composition. If you must deviate away from the classic rules, be able to justify why you did so. For instance, in this photo, I did purposely ignore the “rule of thirds” by dividing the scene more into fifths. That is, the lower fifth is the water and boat, while the upper four fifths is the ice. I did so to emphasize the extent of the glacier and how amazingly tall it was compared to the waterline and boat.
Once you’ve got your scene, proper composition, and any foreground elements to help show scale, now it’s time to think about your settings.
Fortunately, proper camera settings aren’t likely to be too complex. A moderate aperture (f/5.6 or f/8) and reasonably fast shutter speed (>1/250) is all that’s needed, and neither should be difficult to achieve during the day. Even if it’s cloudy, there will be enough light.
However, there are a few considerations…
First, how much is your boat moving that YOU’RE on? That is, do you need to increase the shutter speed to stop your motion? If so, consider increasing your ISO to allow for a faster shutter speed of at least 1/500th of a second.
Second, you’ll want to take a test shot to see how the glacier turns out. One of the biggest issues with glacier photography is that your camera will likely artificially darken the shot because of how much white is coming through. Recall that all cameras want to expose for about 18% gray. That is, even if the scene is meant to be all white, the camera will think it ought to darken a little. Thus, you may need to artificially brighten your photo, either in post-processing or by adjusting the exposure meter on your camera

Shoot, shoot away!
Now it’s time to get lots of shots, and to experiment with settings. Sure, your starting point is something around f/8, but try going up to f/11 or maybe even f/16. Or, perhaps your subject is closer to you (e.g., another boat) and you want to try and blur the background. For this, try to drop down to f/4 or even f/2.8 if you can, focus on the subject, and thus get a nicely blurred glacier. Maybe it will be good, or maybe not—but worth experimenting!
So by now you’re an EXPERT on glacier photography, right!? Well, maybe this will be your first time to Alaska or your first time photographing glaciers. Be sure to check out my other articles on landscape photography in Alaska and you’ll be fully prepped for your photo trip in no time!
Cheers,

Court
Leave a reply