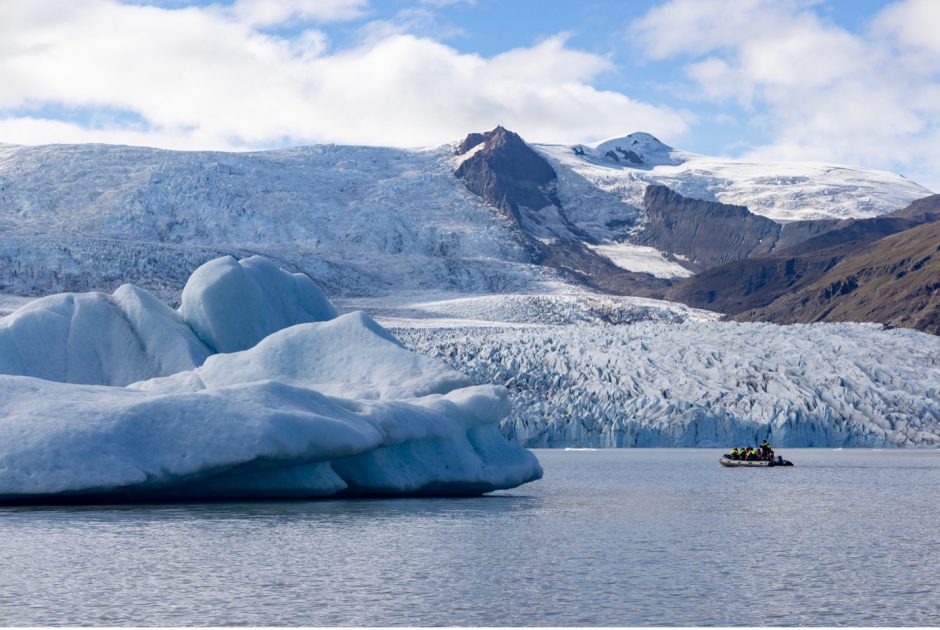
How to Get This Shot: Iceland Iceberg and Glacier
What’s more iconic than the ice of Iceland? Although this mysterious island nation isn’t entirely covered in ice, as the name would suggest, it is home to some of the largest glaciers and glacial lagoons in the world. If you are headed to this land of fire and ice and aim to capture the intense beauty of its namesake, follow these steps to really nail the shot.
Getting in Front of “The Right” Ice
While any sort of ice can be photographed, there are specific aspects to the setup of this shot. First of all, we’re at one of the splendid glacial lagoons on Iceland’s southern coast—an area of intense beauty and teeming with fresh icebergs, all with a towering glacier in the background. In fact, ice calves off the glacier throughout the summer, so these bergs are nearly always present.
So, we’ve got a glacier and we’ve got an iceberg. The key thing in this shot, in my humble opinion, is the relativity you see when comparing the iceberg with the boat of fellow photographers. Although this iceberg, and the glacier, are impressive on their own, it’s their size when compared to the small boat that makes this a “wow” shot.
Get yourself in one of these glacier lagoons and pay particular attention to any other boats out on the water. While others in your group are fixated on the glacier, be patient. Track the other boat and wait for just the right moment when all three are nicely in frame.
The Best Camera Settings
For a shot like this, you’ll want nearly everything in focus. Yes, you could argue otherwise, and I’d love to see examples where a shallow depth of field really works with this framing, but by default, you want all three elements in tack-sharp focus.
That is, you want the foreground (iceberg), background (glacier) and subject (boat) all in focus.
To achieve this, you’ll want a relatively deep depth of field and a relatively big f/number.
While f/8 will do, you may want to take at least some shots with f/11 and perhaps even f/13 or f/16 so that you can review for sharpness later. The only trick with this is whether you can shoot fast enough to freeze motion. It’s vital that you take the photograph at the specific moment everything comes into frame, so you will likely be moving and the other boat will likely be moving. Thus, you need to shoot quite fast—like 1/800 (this shot was indeed at 1/800) or even 1/1600. The exact speed will be dependent on the angle and speed your two boats are going, but be prepared for fast.
If you must make a compromise, shoot faster even if that means you can only get to f/8 or f/11. And be ready with a high ISO as part of the compromise, too. Although high ISOs like 1600 and above will likely inject some grain or noise into your scene, daylight scenes with lots of color and texture do decently well with high noise, so be sure to employ your ISO to get the shot.
All the Other Details
While framing your shot and getting the right camera settings are the most important, there are definitely some other smaller details to help make this photo really pop.
First is the color. Be mindful of your camera’s white balance, as “auto white balance” isn’t always the right choice. Depending on your camera, this may cause the photo to come out too blue or even too yellow (recall, white balance is a spectrum from blue to yellow…cool to warm). There is no “perfect” white balance for this photo, as color is very much in the eye of the beholder…the artist behind the lens. But the point is that white balance is a big deal, so if you aren’t familiar with it yet, it’s worth reading up on it and experimenting a bit.
Next is the processing. What you do on the computer can often be as important as what you do in the camera. This is especially true if you are shooting in raw format, as your photo will come out of the camera slightly desaturated and perhaps not even as sharp as it should be.
For big landscapes, Photoshop’s/Lightroom’s dehaze slider is a game-changer for fast, dramatic processing. However, be sure to experiment with exposure, contrast, vibrancy, and sharpness, too. If you want to boost the blues in the sky, reduce blue luminance and you can mimic the effects of a polarizer when it comes to blue skies and dramatic clouds!
Finally, you’ll want to fine-tune your composition. You may nail it perfectly in-camera, but for me, it’s unlikely. This is because I am in a moving Zodiac, so I’ll almost always shoot a bit wider than I need. This will allow me to crop and straighten in post-processing to get the composition exactly as I want. If you were to shoot too narrow (with zoom) you risk not having any room for cropping and straightening without losing features like the boat or part of the iceberg. Always shoot a bit wider than you need when shooting from a moving vehicle/boat.
And there you go! A step-by-step guide for getting this shot—iconic ice in Iceland. I hope you are indeed headed to this extraordinary place, as it’s a treasure trove of landscape beauty. The ice is really just, well, the tip of the iceberg!
Cheers,

Court

Leave a reply