
Tutorial for Photographing Wild Coastal Grizzly Bears
If you ask any wildlife photographer in North America what is top of their bucket list, it’s often Alaska’s Coastal Grizzlies, which are found in a relatively specific region of Alaska’s south central coast. Recorded as some of the largest bears in the world (yes, even compared to the mighty polar bear!), they are infinitely photogenic, considering their behaviors, the landscapes they are in, and just their sheer beauty as individual animals.
If you have a chance, exploring this area in search of these mighty brown bears is truly a dream trip for any nature photographer. I can’t recommend it enough!
If you are planning a trip there and prepping for the best photos possible, read on for a deep dive into the strategies, tips, and tutorials for capturing these denizens of Alaska in all their glory.
Be deliberate and calculated about background
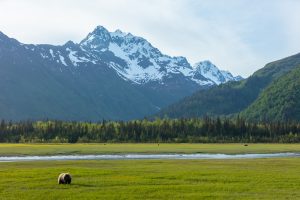
The only thing as good as the bears in this region of Alaska is the phenomenal scenery. This is a key reason why bear photography is so spectacular here—you can get wonderful photos of bears amidst one of the more impressive wild sceneries on earth.
For this reason, actively think about each photo and whether the photo would be better as a close-in photo, with the bear filling the frame, or more of a landscape shot with the bear in it.
And then for those photos that you do decide to include ample scenery and background, pay special attention to which parts of the scenery are the most spectacular and either orient yourself (if possible) or wait for the bear to cross within that sweet spot of scenery.
This strategy could mean that you need to wait with patience at times, but being extra-ready for that single moment when the bear or bears are in the perfect position will pay off in a big, big way.
Force yourself to zoom out and embrace the space!
Get the right aperture
Perfect focus is a hallmark of great photography and aperture is directly related to the amount of focus you have in your photo. In other words, having a clear command of aperture is also a hallmark of great photography!
But it’s not as simple as setting your camera to one specific aperture the entire time and expecting perfection. Oftentimes photographers think that a big f/number, which correlates to most of the scene being in focus, is ideal—and you just need to ensure you have the light to make it possible.
While there are certainly times when a wide depth of field, achieved by a big f/number like f/8, f/11 or even f/16, yields the best bear photo, there are an equal number of times where smaller f/numbers will give you the best photo.
This is particularly the case with animal portraiture.
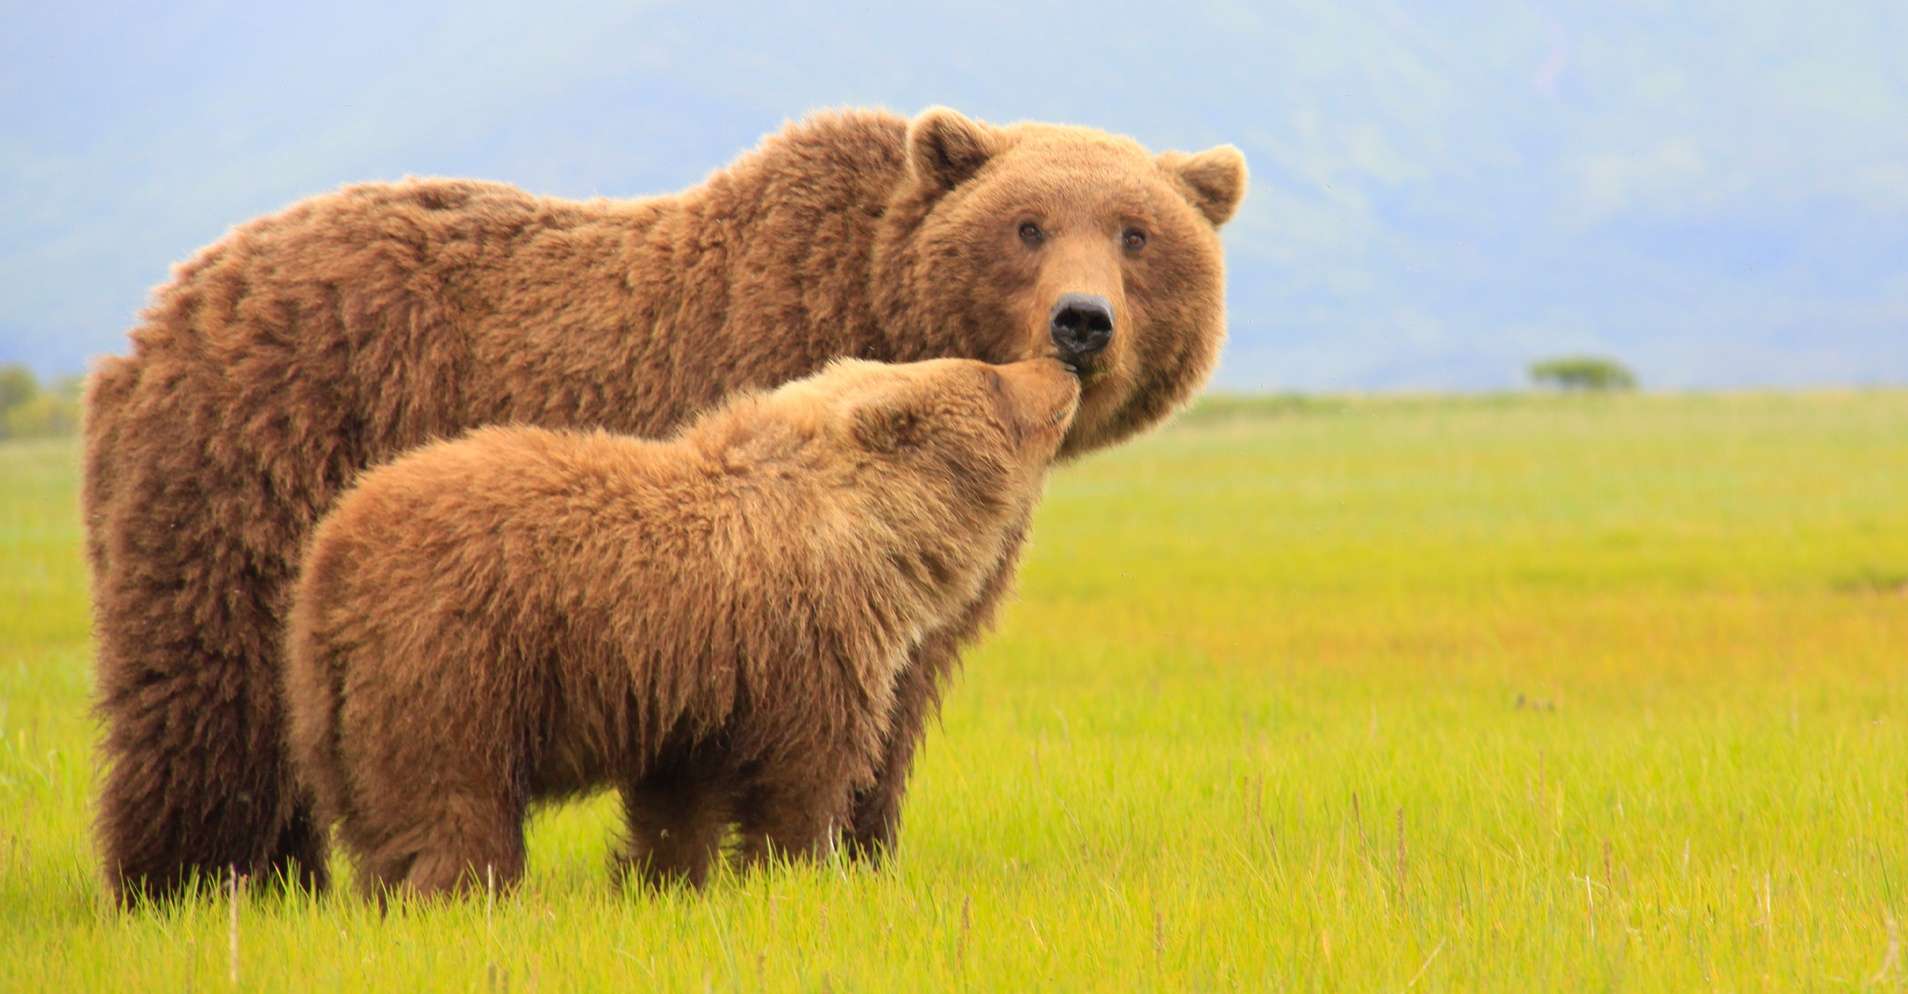
Traditionally, portraiture is considered something reserved for human subjects. You can picture it– a person prominently centered with a very shallow depth of field, to isolate the subject and bring attention to the individual you’re photographing.
Well, wildlife portraiture is basically the same—just replace the person with your wildlife subject and all the other principles are nearly the same!
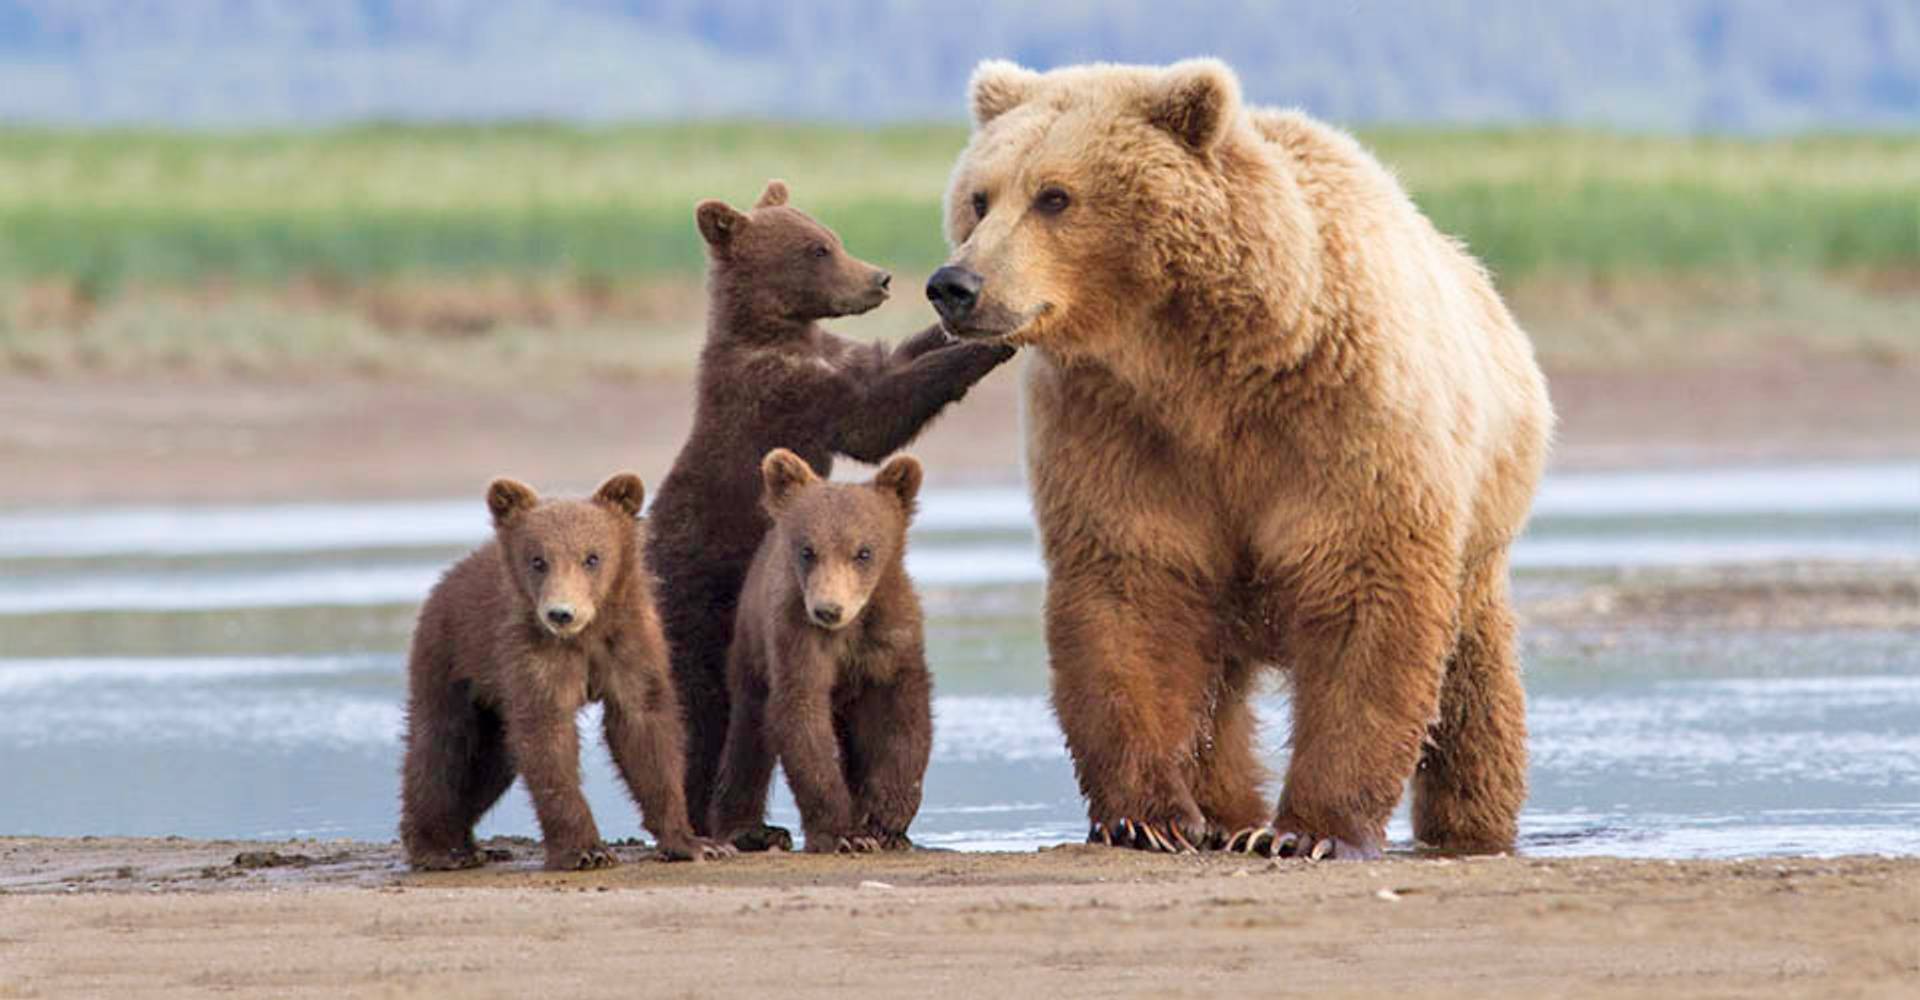
With wildlife portraiture, you are zeroing in on the animal, placing them largely and prominently in the frame, and shooting on a small f/number (aka a large aperture, aka shallow depth of field) to have the background “melt away” and produce an even sharper-looking animal.
Take a look at the above photo. Notice how the bears are strikingly sharp, while the background is pleasingly blurred? This is the ideal.
For this technique, I recommend apertures somewhere around f/4. If you have capabilities in the f/2.8 or f/3.5 realm, that’s even better, but that’s typically a rarity and only possible on the highest level professional lenses.
Many lenses won’t allow an f/number lower than f/5.6 at any big telephoto range. This will be ok, and I have the same issue with my Canon 100-400mm f/4.5-5.6 lens. You’ll notice that it just won’t have quite the same blur as if you could shoot with a smaller f/number. This is just a classic limiting factor of some lenses and shouldn’t be regarded as “bad.” But this is the reason you see lots of pro photographers with big bazooka lenses…for wildlife portraiture.
Before we continue on, you’ll also want to think about one final dimension to setting a custom aperture…
In those cases when you’re close enough to massive grizzlies (which can definitely happen when you’re at a place like Bear Camp) you will have the opportunity to fill the frame with the bear or even just the bear’s face.
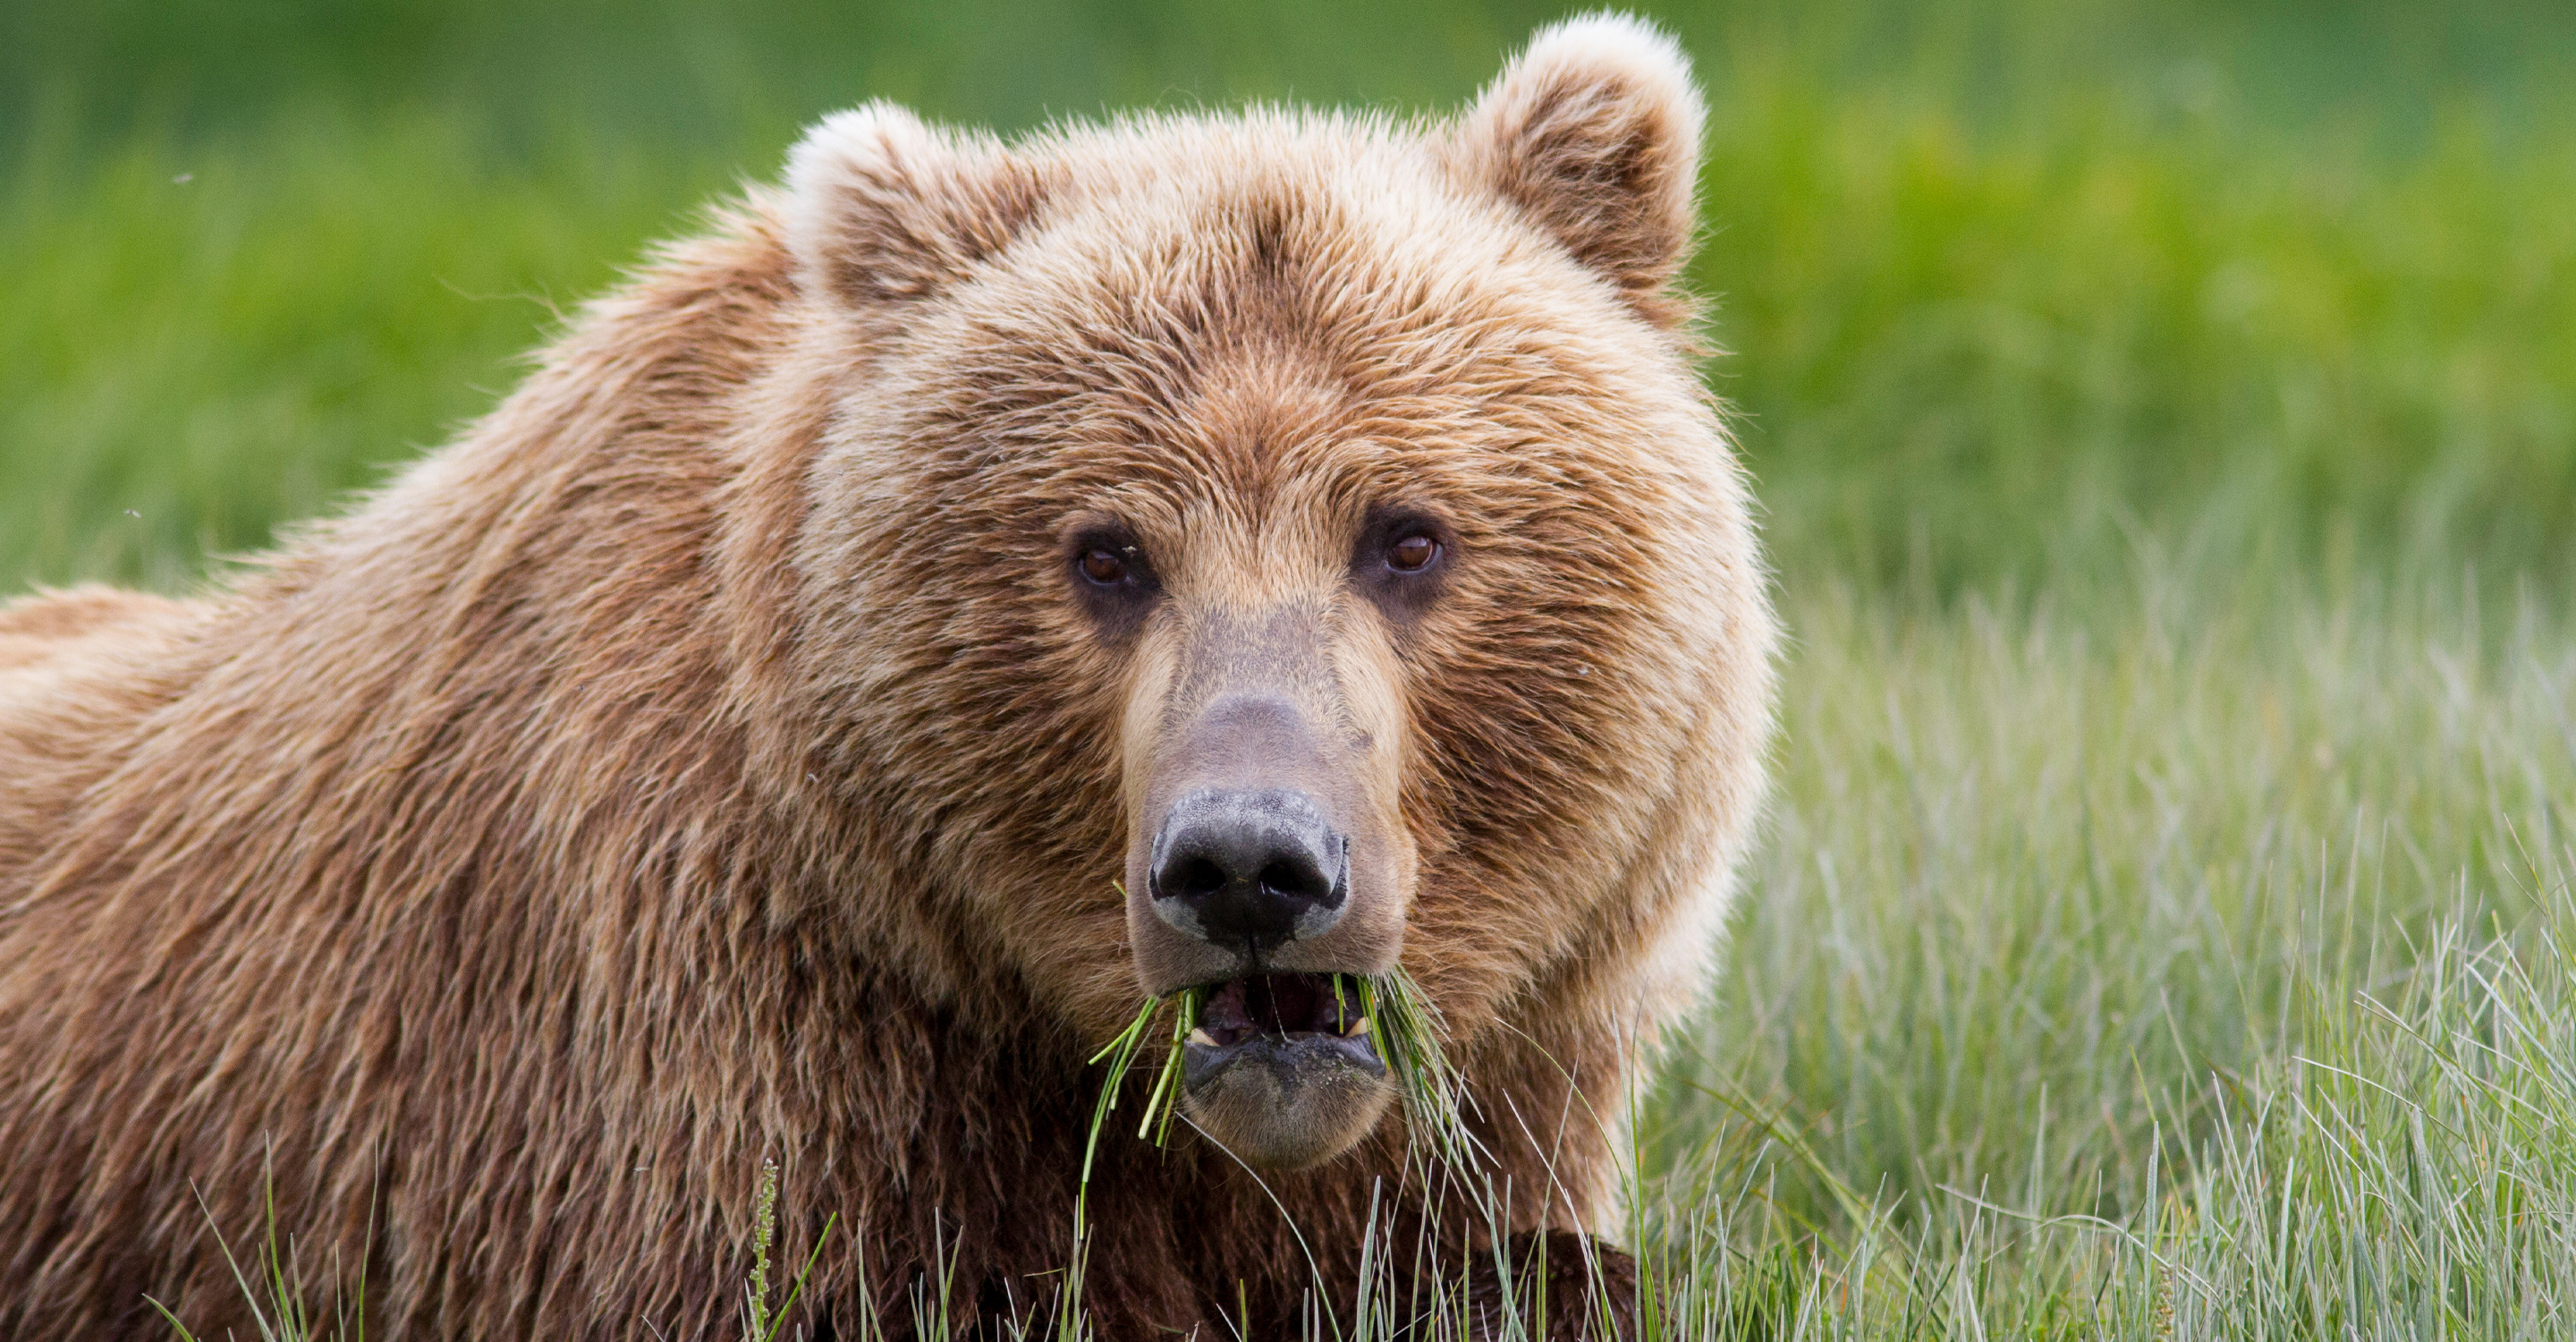
These will no doubt make for extraordinary photographs, but keep in mind that if you do so, you actually should use a higher aperture than you might use for portraiture, because you do not have any background and the bear’s face is the entire scene. Thus, to get the whole face in focus, think of it like a traditional landscape photo and use an f/8 or even f/11 if conditions allow.
Have burst mode ready
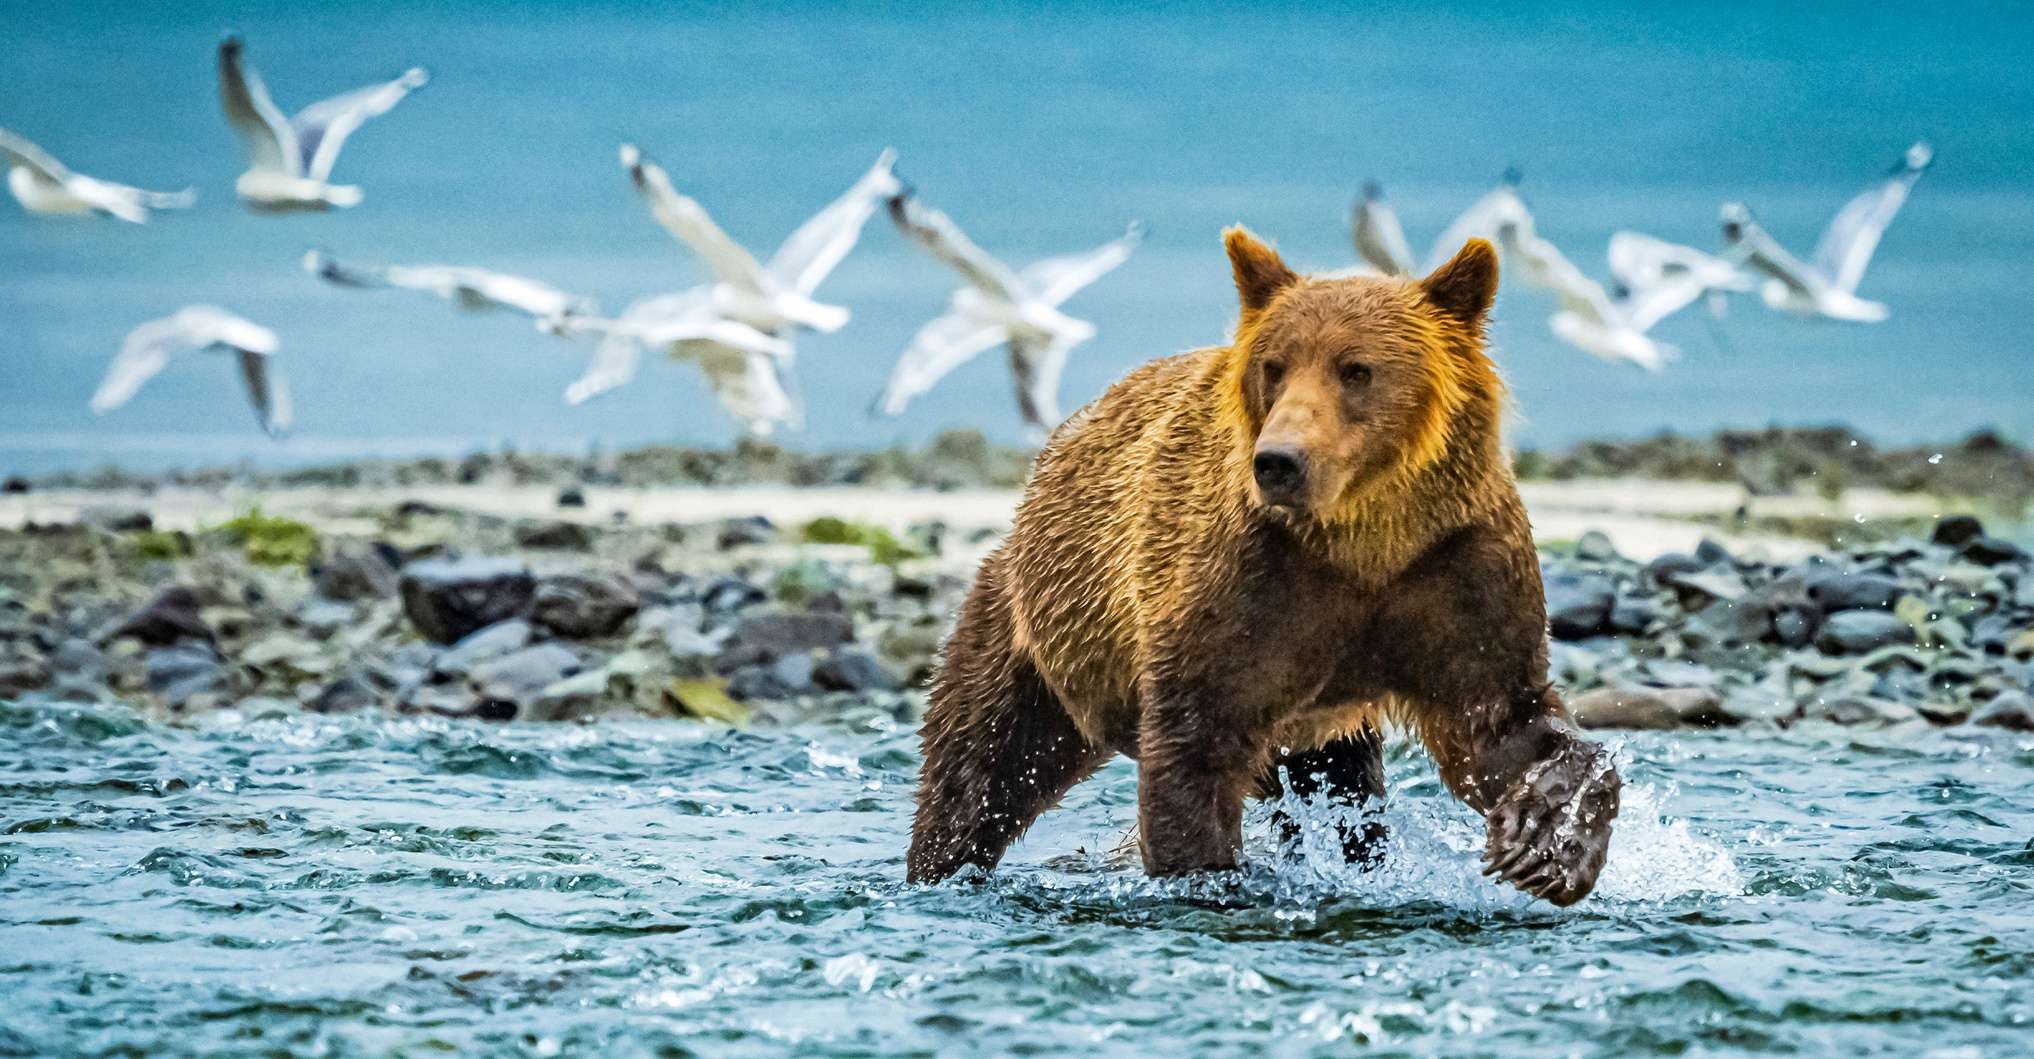
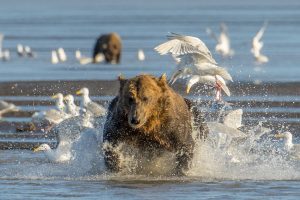
This one is simple and straightforward. When it comes to big grizzlies, their behaviors can be absolutely captivating. And capturing their behaviors is something you definitely want to do!
In order to capture the range of behaviors and get the perfect shot in a sequence of, say, two male bears sparring, or the perfect pose as a bear stomps through water, you’ll want to have your camera on “burst mode” to allow for maximum frame rates.
Oftentimes measured in frames per second (or FPS), the average camera nowadays can produce around 4 or 5 photos per second. However, the better and newer ones are clocking in at 7, 8, 12, or even 20 frames a second.
These faster frame rates are incredibly valuable for bear photography, so make sure your camera is set for maximum frame rate before embarking on a grizzly photo adventure this summer.
Where and how to focus
Having sharp focus is one of the most important things in photography. If the shot is blurred or “soft” it is usually the first thing a viewer notices and dashes your hopes of printing a prized photo for your wall, or submitting to a contest, or magazine, etc.
Thus, ensuring you have sharp focus is key. The above section on aperture helps a lot, but let’s take a different direction below.
With a big bear, you are likely to have the flexibility to focus on different parts of the bear. For instance, with smaller wildlife, your focus point may itself cover the entire animal. Thus, you don’t really have the flexibility to choose where on the animal to focus.
However, for a creature as large as a brown bear, you do have that flexibility—especially when you are at relatively close range, which is common in coastal Alaska.
As a result, we must once again go to the rule of “always focus on the eyes.”
Simply put, when you are photographing bears in Alaska (or any wildlife, for that matter), you should focus on the eyes each and every time. Or, if the eyes are too small for your camera’s focal point to discern, at least focus on where the eyes are on the bear—the head.
There are always exceptions to every rule, but this is one that has very, very few exceptions. You can certainly experiment with it and see how it goes, but most of the time a well-focused head or well-focused eyes are key to success.
Continuing further with focus, it’s worth thinking about how your camera focuses, as there are usually many ways, including single-shot, continuous, and active tracking.
I’ll admit, I don’t yet have a camera with an advanced active tracking system for animal focus, but I have heard from friends and colleagues that they are wildly successful. Mirrorless cameras have become a game-changer for this technology and may serve you well for your bear photography.

However, if you don’t yet have active tracking, or simply aren’t ready to trust the tech that much and wish to do it “the old fashioned way” here are the steps I use for focusing on wildlife.
- First, I make sure my camera is on center-point autofocus. I do not let my autofocus box move around based on my camera’s wishes—I like to be in control here and always have the center of the frame be my focus point.
- Next, when I’m ready to focus I put the animal (particularly it’s head or eye) in that center point and push my shutter button halfway. Some people prefer to use their camera’s alternate focus button, which is usually located on the back of the camera, but I have just gotten really used to the shutter button over the years.
- With the shutter button pushed half-way I then recompose the shot, using some traditional composition techniques like rule-of-thirds or golden ratio or leading lines. Keeping the shutter half-way pressed locks focus.
- Then finally, with the scene how I want it and my wildlife focused, I push the shutter the whole way and take the shot. And if you have your burst mode on for maximum frame rate, as you hold this button it should take 5+ photos all at once while you continue to hold the button. Caveat here is that if it’s more of a landscape photo with minimal wildlife action, I will just take one or two photos…no need for 5 or 10 of nearly similar-looking shots.
Get the right shutter speed
Is there such thing as a “right” shutter speed? Well, kinda…
In general, the proper shutter speed is one that freezes motion, so that your animal or person isn’t blurred because of its own movement, OR the movement you may inject into the scene because of your own hand movement.
When it comes to minimizing what we call “hand shake” there is something called the inverse focal length rule that says you should be shooting at least as fast as 1/focal length of your lens. Thus, if you are using a 300mm, you should be shooting at 1/300th of a second.
However, and it’s a big however, this doesn’t take into account image stabilization. Image stabilization these days typically adds at least 3-stops of stability into your photo. What that means is that you can drop your shutter speed by 3-stops of that inverse rule, such that 1/300 can actually be a 1/40th of a shutter speed (because three stops from 1/300 would be 1) 1/150, 2) 1/75, 3) 1/40).
But this brings us to the other, perhaps more important part of shutter speeds and wildlife, which is how to do you freeze the motion of the animal. As you may learn, there is no way a moving bear will be frozen in the frame at 1/40thof a shutter speed.
In reality, you’re probably talking more like 1/300, 1/500 or even 1/1500 for quick movements.
In general, I aim for the following in a very approximate, trial-and-error sort of way.
- Walking animal – 1/250 to 1/500
- Fast walking animal – 1/500+
- Really fast or nearly running – 1/1000+
- Rapid movements like sparring or full running – 1/1500 to 1/2000
But even still, these are just approximations and if you have enough light, shooting any moving animal at 1/1000 or 1/2000 is advised. Heck, I’ve even photographed flying birds and butterflies at 1/5000 just to ensure that all motion was perfectly frozen.
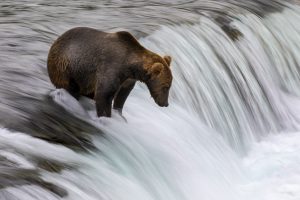
The final thing I’ll mention here is that motion blur…intentional motion blur, that is, can be a photographer’s best friend. Being able to show motion in an otherwise static photo can bring the animal’s behavior to life. It can also help differentiate you as a photographer, because most people don’t think to shoot a little slower to allow for a bit of blur in the, say, swing of the sparring grizzlies arm, or swing of its head.
We’ve likely all seen the silky water effect of brown bears above the Brooks Falls. This is a perfect example of the next-level beauty you can feature when slowing down your shutter. However, don’t stop just at water…think about other movement that can create an alluring motion within your photo.
Well by now you know that grizzly bear photography is something I’m immensely passionate about. What a fantastic animal to have as your subject in an array of nature photo opportunities.
As you can see from this article, there is so much you can do with an amazing area and subject like Alaska’s coastal grizzlies, and hopefully through these tips and ideas you will be able to capture even more spectacular photos if you are headed to Alaska in search of extraordinary brown bear photography.
Cheers, and maybe see you up there!

Court
Leave a reply