Pro Tips on Photographing Alaska
Alaska is a nature photographer’s dream. It’s got it all: expansive landscapes, impressive wildlife and a sense of wilderness unlike virtually anywhere else on Earth.
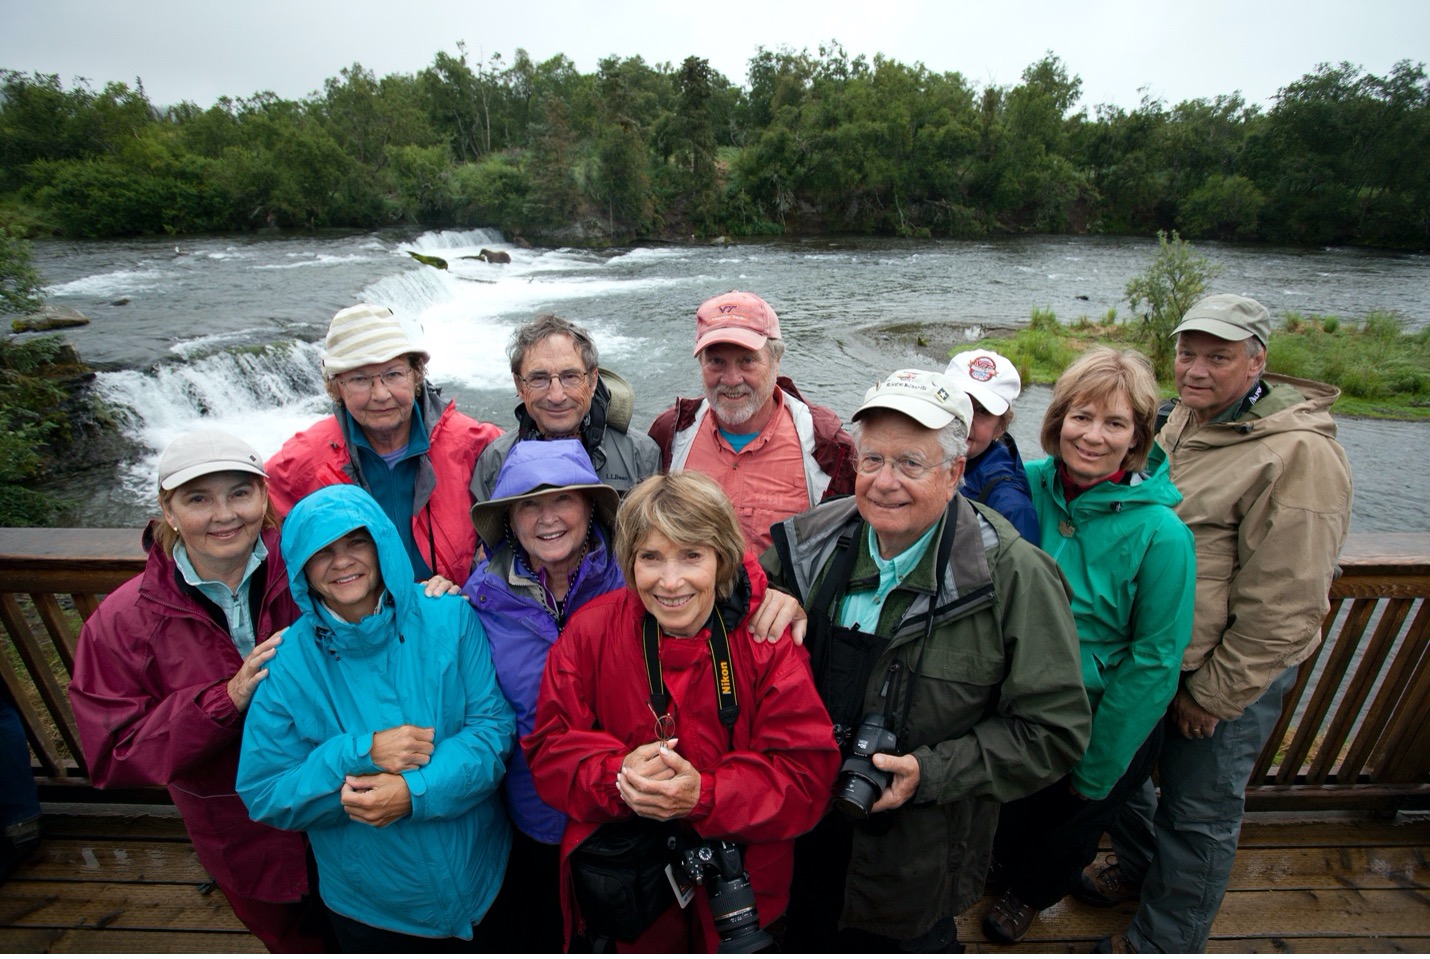
With all this variety, there are many ways you can see and photograph Alaska up close and personal. Whether it’s a specific bear and wildlife photo adventure, an immersive camping experience in prime brown bear habitat, something more marine-focused like a boat-based expedition, or the ultimate Alaska experience that combines it all, your time photographing The Last Frontier will be treasured.
To help get you started, I’ve compiled a list of pro tips that will enable you to get the best (and most) photos, no matter where you’re going in the grandest of states!
Think Versatility for Lens Selection
It’s tempting to think big when picking out your camera lenses for an Alaska photo adventure. While the big primes like 400mm, 500mm and even 600mm lenses have their place and will no doubt provide sensational photos, you may be missing out on some of the best wildlife photography by prioritizing a maximum telephoto lens.
When guiding photo tours in Alaska, I always have at least one zoom telephoto that allows me to photograph up-close wildlife one second and then an amazing landscape the next. Having the ability to zoom out to photograph wildlife in the landscape, versus just filling the frame with the animal all the time, often yields the most impressive and unique photos.
I’m a big fan of the trusty 70–300mm or 100–400mm lenses (equivalent to a 6x or 10x zoom for point-and-shoots), as they’ll get you close to wildlife but have decent abilities at the wider ranges for opportunistic landscape shots as well.
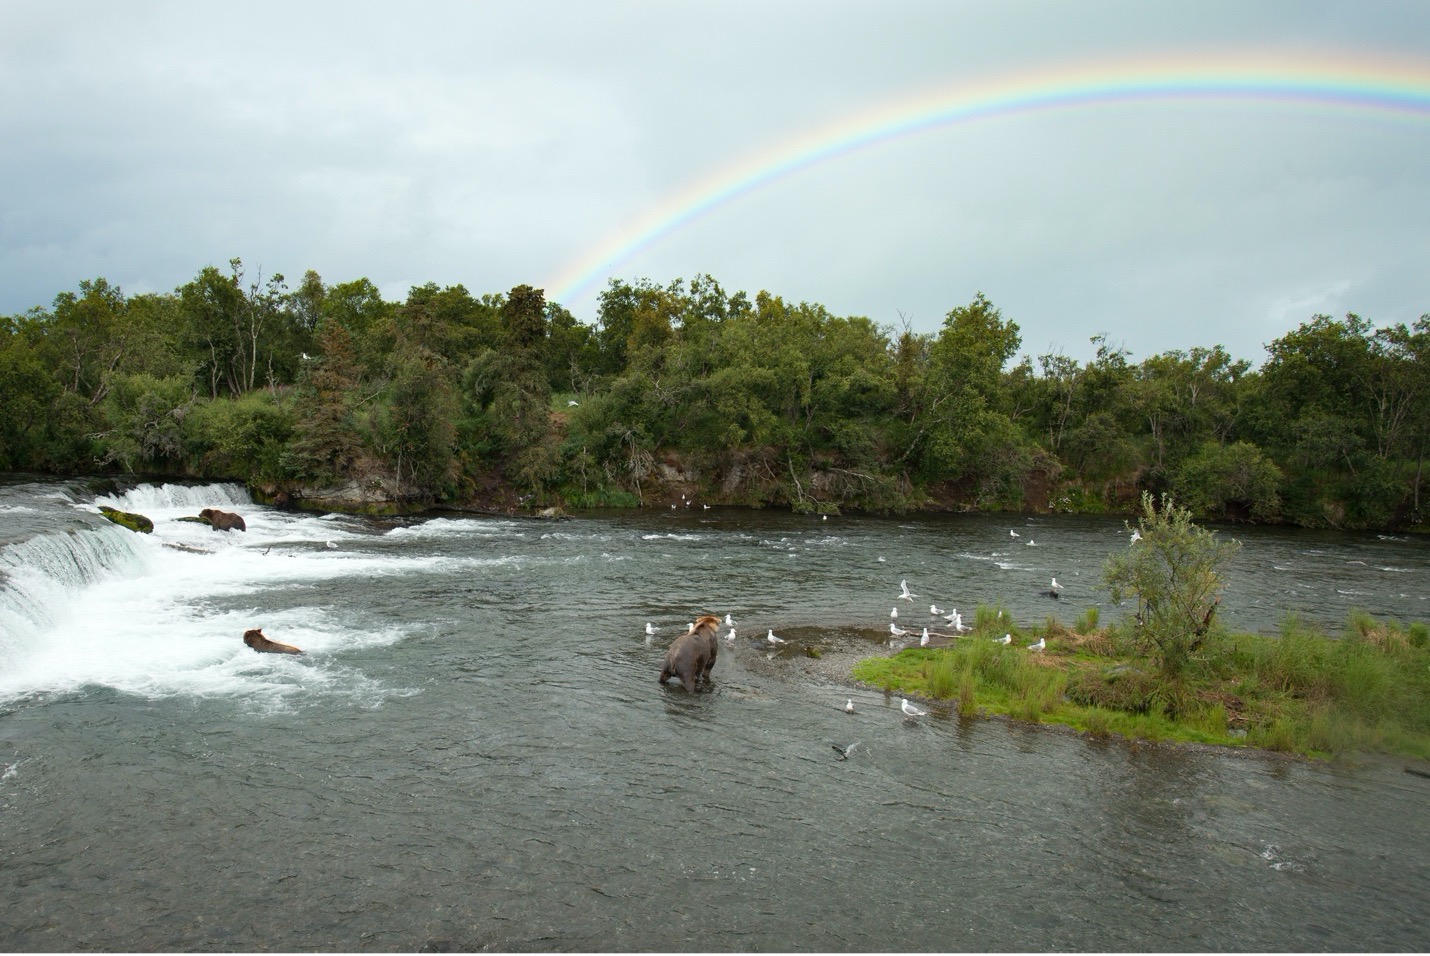
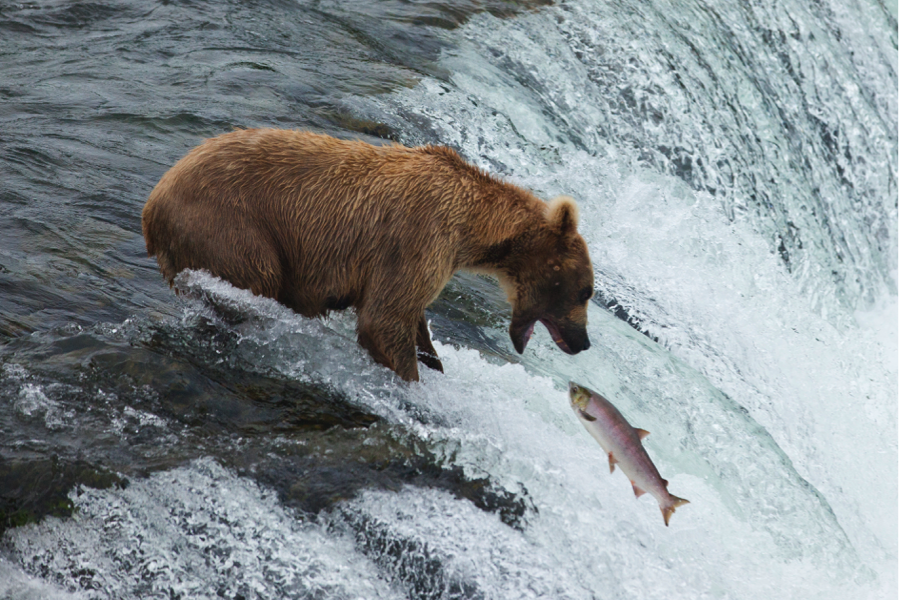
As an example, had I not had the 70mm capability on my camera at the time, I may have missed this unique photo of bears at Brooks Falls, with a rapidly disappearing rainbow overhead.
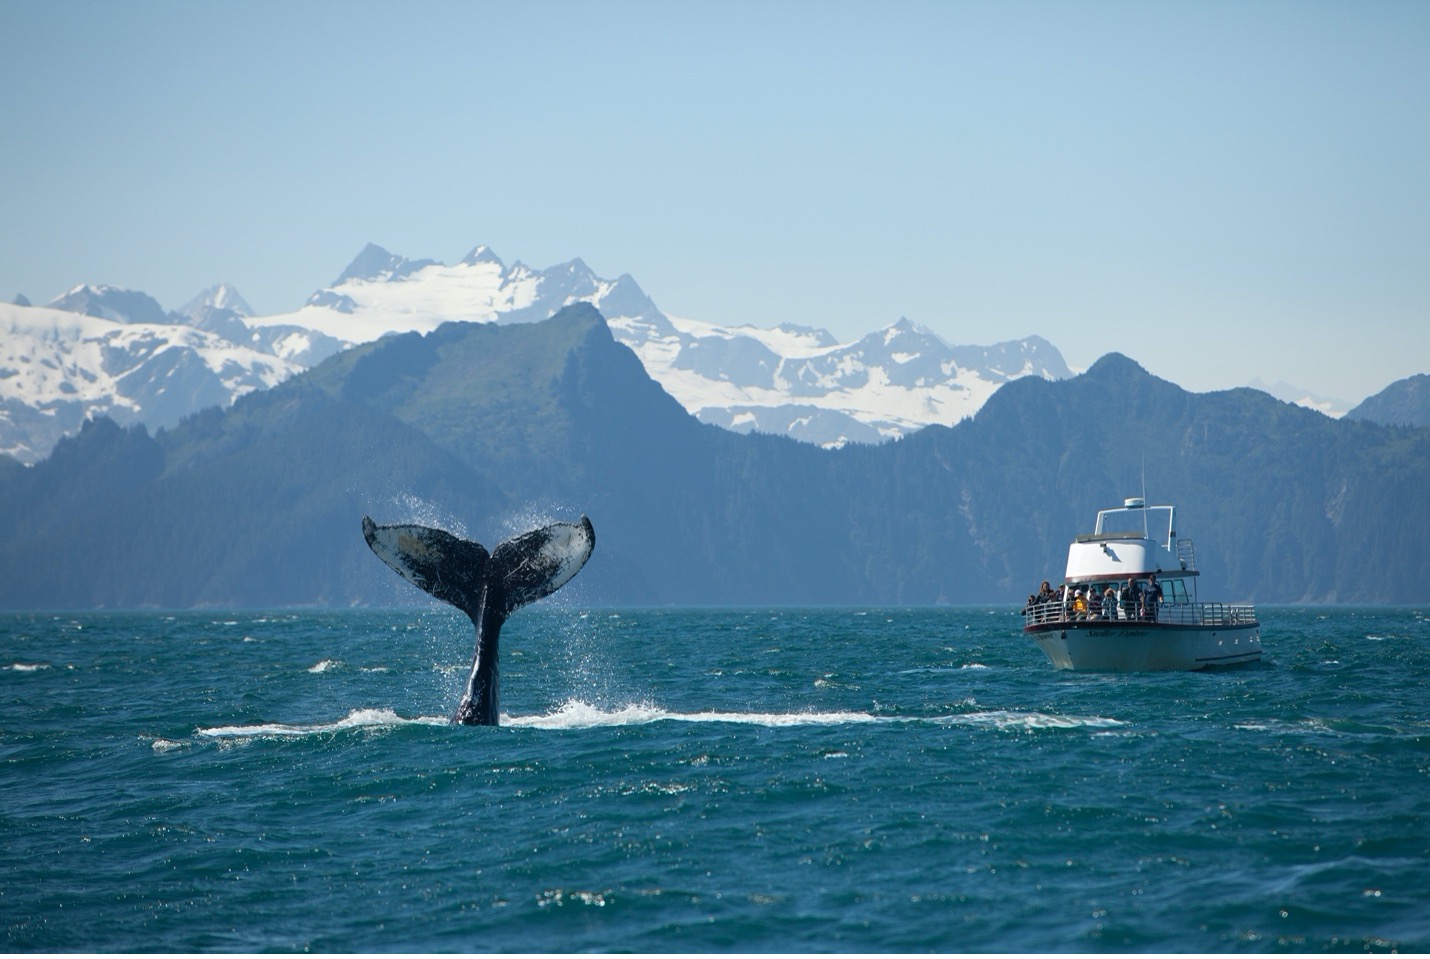
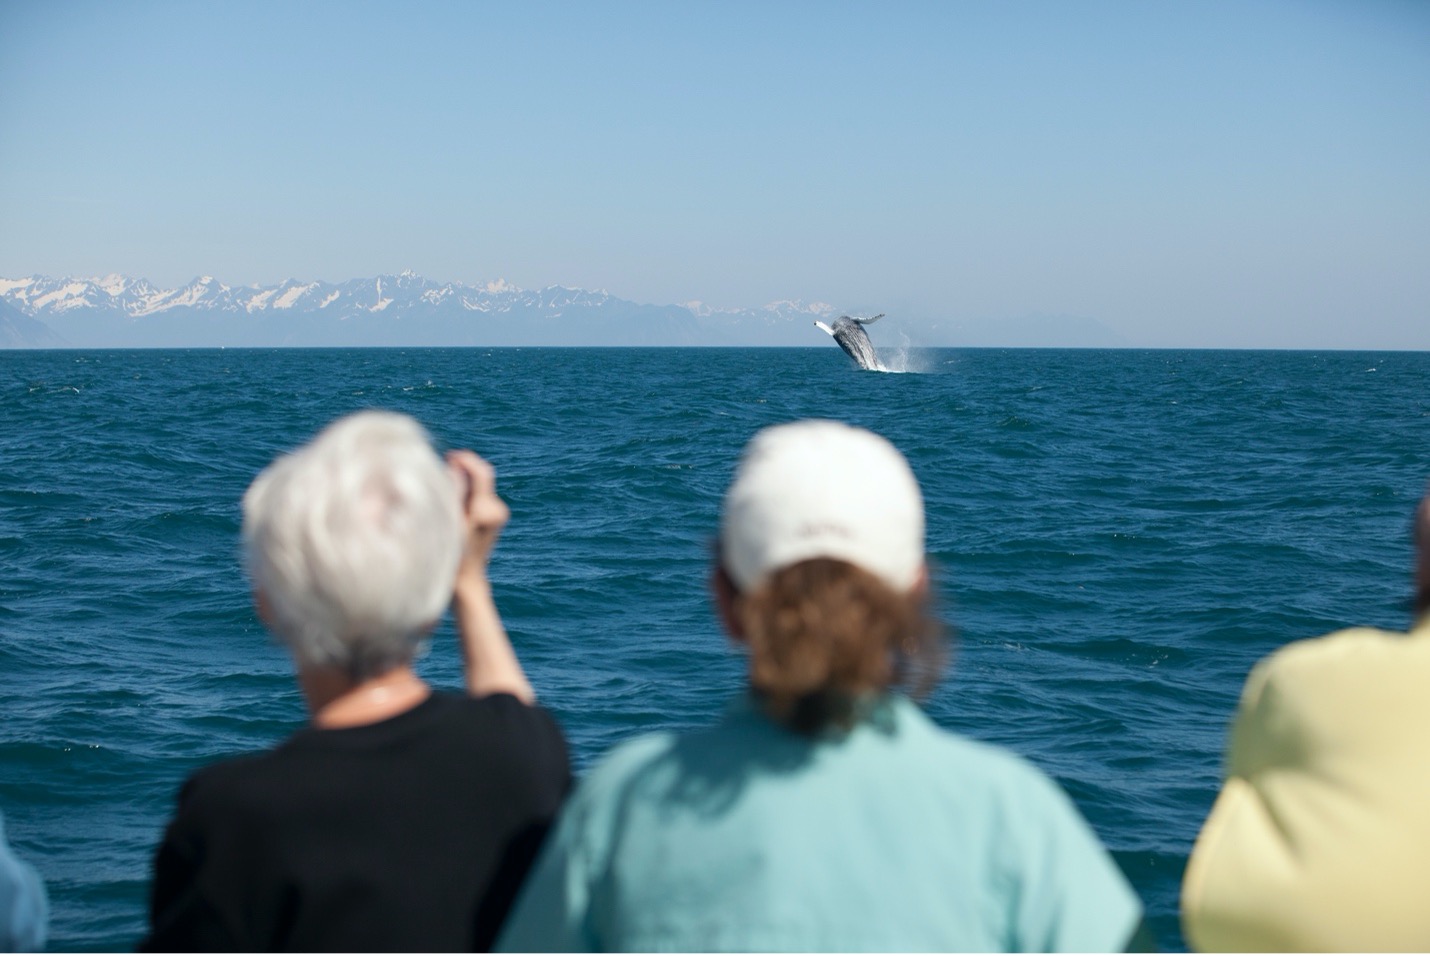
A more classic example is taking that brief pause from filling the frame with the whale’s tail and zooming out a bit to capture the rest of the story—showing the unique viewing opportunity we’re having with extraordinary Kenai Fjord mountains in the background, plus a fellow boat to show scale and give the viewer that “put yourself here” feeling.
Capturing Big Landscapes: Sometimes Less Is More
Alaska has some mighty impressive landscapes. They’re big, wild and infinitely beautiful. However, it’s somewhat challenging to capture the totality of beauty that the eye is able to soak in. As a result, I often suggest that you break your big landscapes into smaller sections, taking several stand-alone photos of the sweeping vista rather than trying to get it all in one ultra-wide photo.

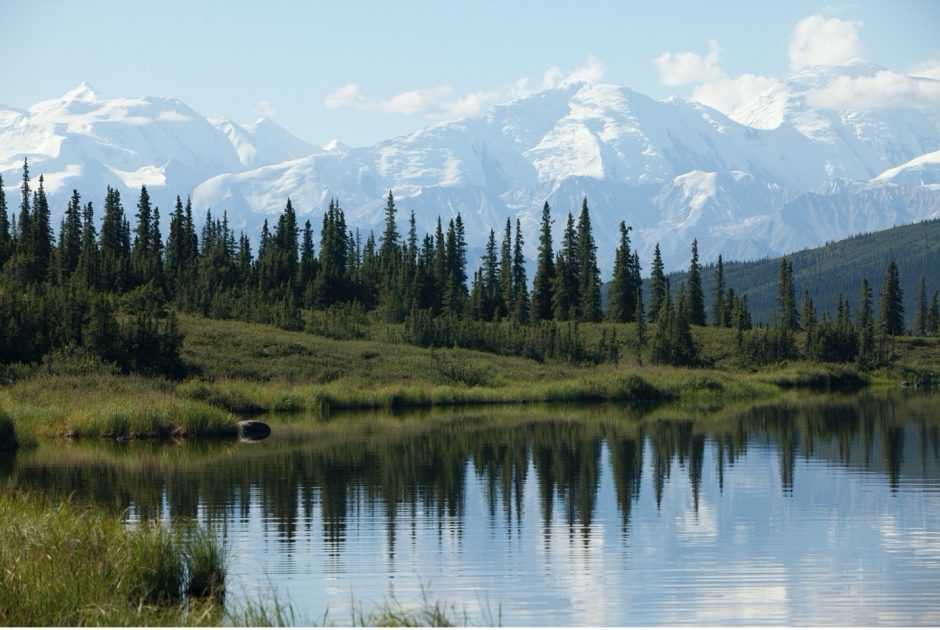
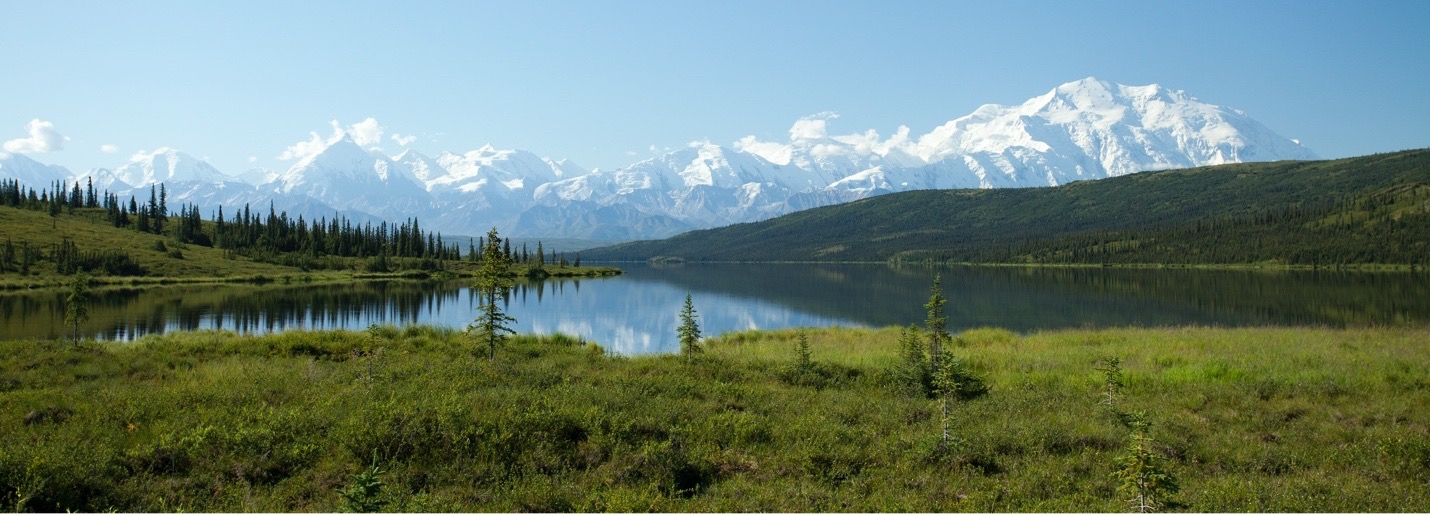
For instance, in the above photo, the mighty Mt. Denali is towering over the range but just out of the frame. Seems weird not to include it, right? However, I noticed these pronounced evergreens, their pleasing reflection, and the soft contrast between the forest and white mountains such that I resisted including the pinnacle of Alaska, even though it was right there. Had I included it, I would have shortchanged the essence of my photo, which is that unique reflection, the stand of conifers and the still-impressive white mountains in the back.
Sometimes less is more.
There are times, though, when you simply must capture the entire scene, and for those times, there is a nice trick I’m happy to share.
Whether it’s a long mountain chain from left to right, a string of fishing villages or a beautiful forest, you can capture the whole picture without dampening the subject material by including too much sky and foreground.
Let me explain…
The photo below is the “before” composition, where I include the entire range, but as you can tell, the normal 3:2 aspect ratio forces me to include a lot of sky and grass. The colors of these are great, but they really diminish my subject material, which is that gorgeous range (this time with Denali in it). They make this 20,000 ft. mountain seem like a small part of the landscape, and let me tell you, when you’re there, this mountain is anything but small!
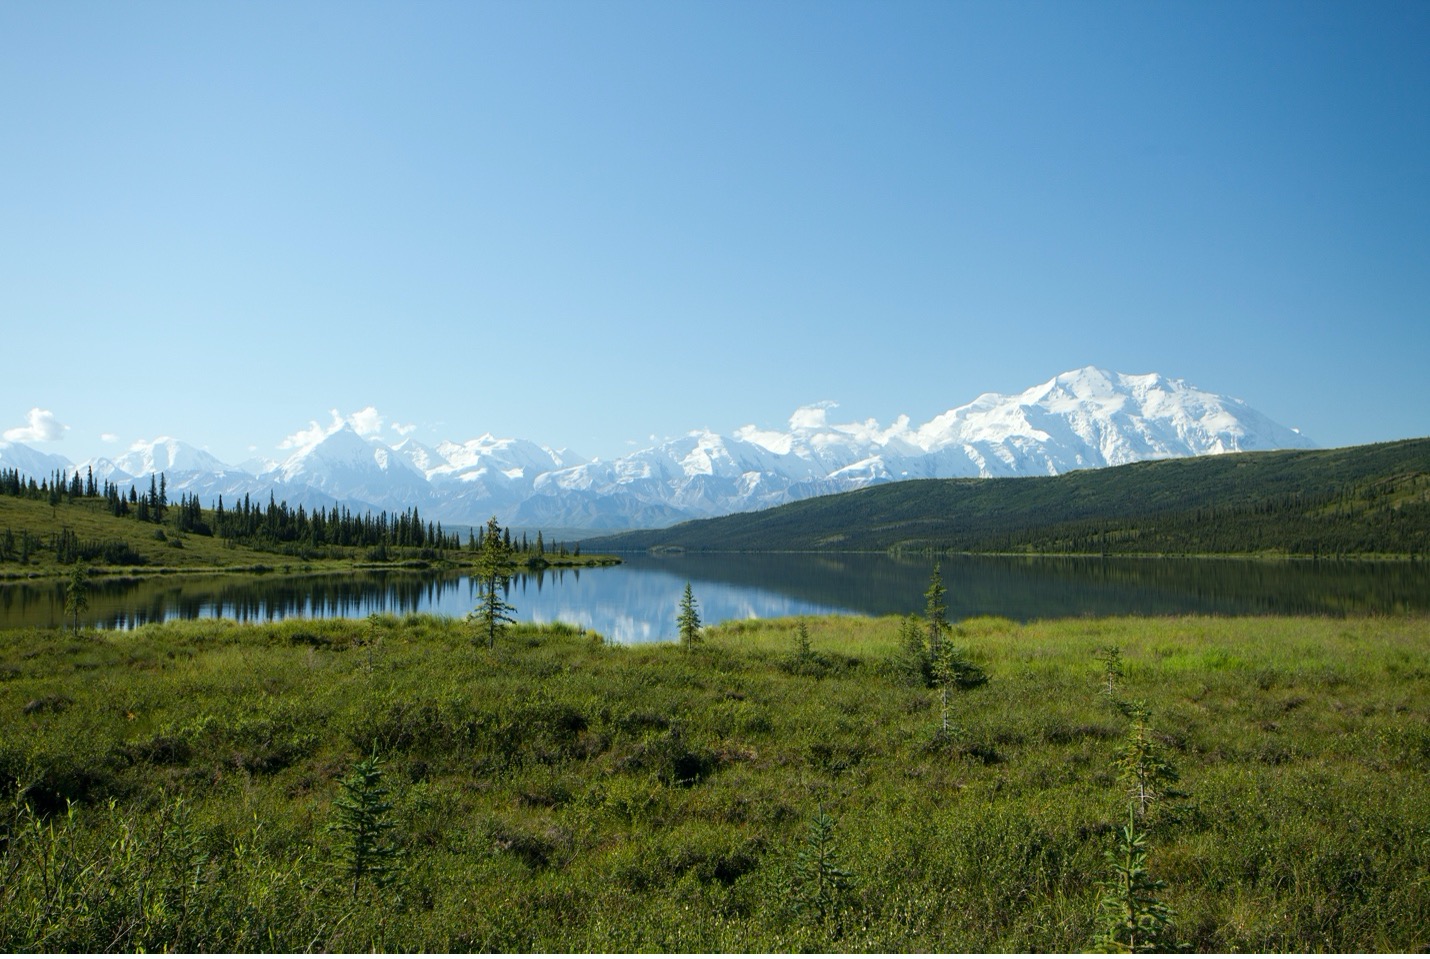
What I’ve done here is simply “shoot for the crop,” where I anticipate cropping the photo afterward to give it a panoramic look. This way, it highlights the full left-to-right range, including Denali, without featuring too much sky or grass, yielding a balanced photo that showcases the mountains themselves.
This technique is nothing Earth-shattering, but it is a good way to adjust your photography for showcasing big landscapes.
Expect the Unexpected When It Comes to Weather
According to my good guide buddy Drew Hamilton, “There is no such thing as bad weather, just poor preparation and a bad attitude.” I couldn’t agree more! In fact, inclement weather can be a photographer’s friend, as it usually thins out crowds significantly, and wildlife and landscape photos can take on an unusually awesome look during a drizzle or in the moments just after a rain.
When gearing up to go on a photo adventure in Alaska, double down on rain gear and double up on a positive attitude. It does rain in Alaska, and you may get caught out in it. If it’s raining for two days straight, you sure as heck don’t want to hunker down in a hotel room, so don the rain pants and jacket, put your weather jacket on your camera, and go out and get some unique photos!
Harnessing Shutter Speed
As you learn more about your camera, you’ll want to pay particular attention to maintaining “the right” shutter speed.
Generally speaking, the proper shutter speed is one that is fast enough to freeze motion and capture a nice, crisp image. If I were forced to put a number on it, I’d say I do this about 19 times out of 20, or 95% of the time. But how fast is fast enough?
There’s a classic rule for shutter speeds that says you should photograph at least 1/your focal length to freeze your own hand and body movement. That is, if you have a 300mm lens, you should photograph no slower than 1/300th of a second to eliminate the movement of your hand (if you’re shooting hand-held, which is the norm, in my opinion). However, this doesn’t take into account image stabilization, which is a very common thing these days.
Typically, image stabilization allows you to shoot about 2 or 3 “stops” slower than you could otherwise. That is, using the above 300mm lens example, 1/300 is “the norm,” while one stop slower is half this—1/150. Another stop is half that, so 1/75. And a third stop is half that, so about 1/40. Thus, if your image stabilization system reports “3-stop image stabilization,” you could effectively shoot using a 300mm lens, handheld, at 1/40 and get the same effect as a non-image-stabilized 300mm at 1/300th of a second.
This is, of course, subjective to how still you are typically able to hold your hand, plus all sorts of other variables, so I wouldn’t take this as a set-in-stone rule for conversion. But, you can see how understanding the math behind all this does give you an approximation for how fast or slow you should be shooting. (Personally, I never use a telephoto with anything less than 1/80th of a second…or I try not to, at least!)
However, there is another more significant dimension to all this, which is that moving people or wildlife don’t care how much image stabilization you have. You can have an 8-stop image stabilizer, but that doesn’t get the bear to stop moving. The chart below is a good way to use approximations for minimum shutter speed and typical movement of the subject in your scene.
A couple of things to note: I am being a bit conservative with the information provided below. You could get away with slightly slower speeds at each level, but the great thing is that you usually have enough light in Alaska during the summer that you can afford to use slightly faster shutter speeds while maintaining reasonable ISOs.
1/125 – general landscapes
1/150 – non-moving wildlife
1/320 – walking wildlife
1/500 – somewhat rapidly moving wildlife (purposeful walking, trotting)
1/1000 – fast movement, like a run, sparring bears, breaching whales, etc.
1/2000 – birds in flight, leaping frogs, etc.
1/4000 – just about anything…
Incorporate Storytelling
There are many, many ways to capture storytelling through photos. In fact, that’s basically the essence of good photography: capturing interesting, meaningful scenes in an aesthetically pleasing way.
Nevertheless, storytelling is such a key part of photography that it is 100% merited to mention and underline here.
One important dimension of storytelling photography is choosing between the classic photo and one that is maybe not quite as good of a shot but is better at telling the story of your adventure.
The above photo is a great example. Before us was this amazing breaching humpback whale. As it lept over and over again, instead of trying to get the perfect breaching-whale photo, I opted to continually set myself up to photograph our travelers in the shot for a “put yourself here” moment.
While this isn’t necessarily a great photo of a whale, and you’d be justified in picking apart my composition and overall layout of the photo, one thing it is doing is showing you a part of our adventure together. This is storytelling!
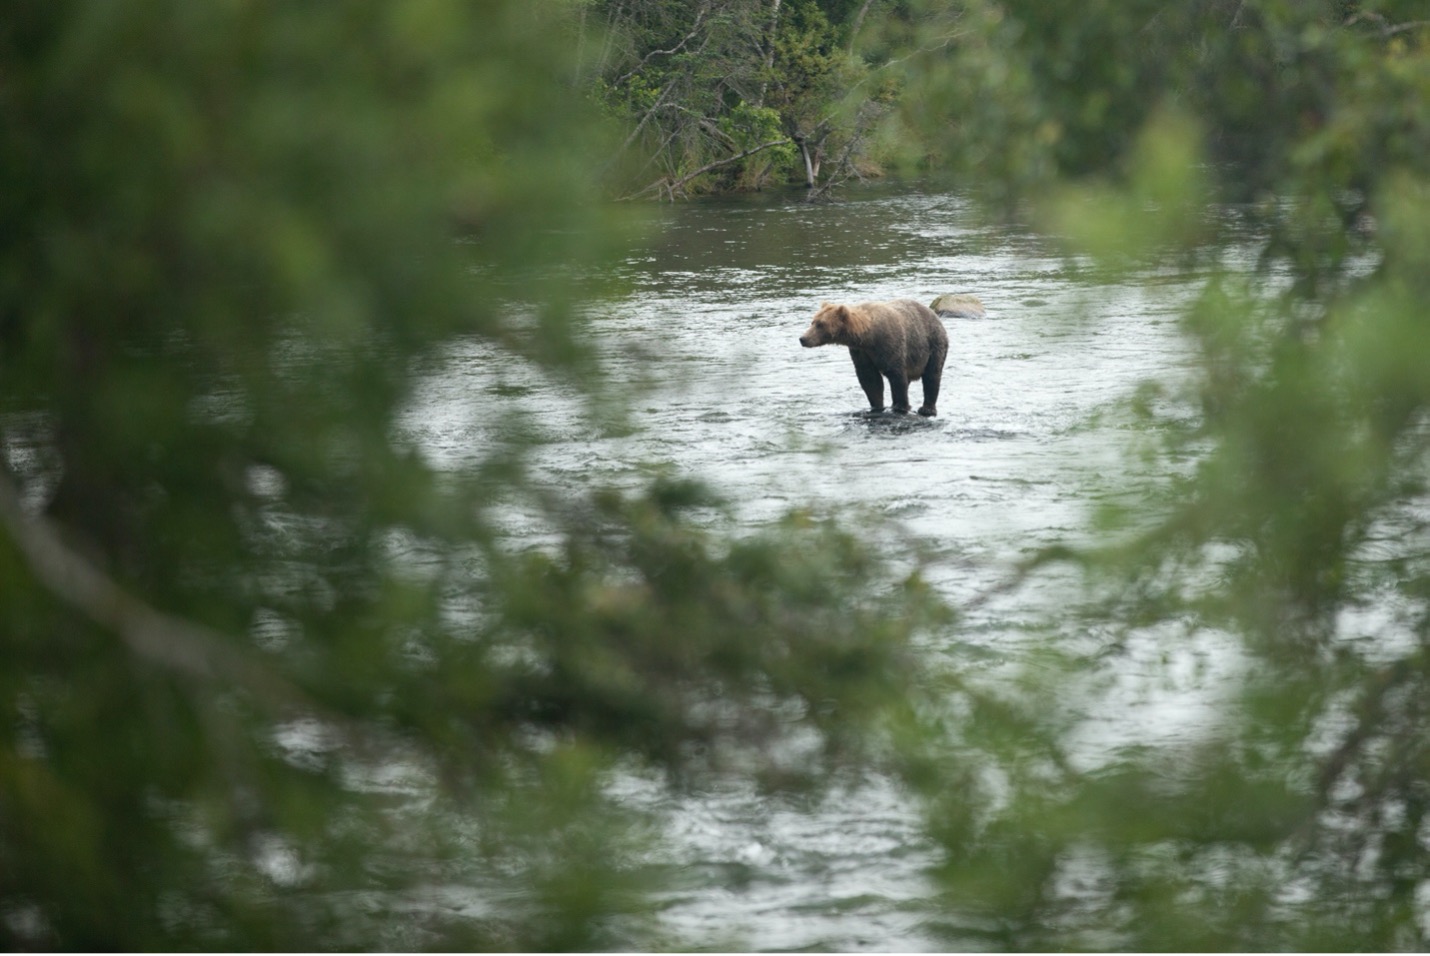
Another technique of storytelling photography I like to look for is the opportunity to showcase the search for wildlife. Even in Alaska, wildlife isn’t always just walking across the bridge toward you. (Although, yes, in some cases, the bears do that!). Thus, if you only photograph the “end product” without detailing the search, the patience you needed, and the keen eye you had to spot said wildlife, you’re missing out on a big part of your story!
A prime example: In the above photo, I could have zoomed in or even moved further down the trail to get an unobscured photo of this bear. Instead, I chose to use some vegetation as framing to illustrate that we’re indeed exploring…we’re on a search for charismatic wildlife.
If you’re headed to Alaska on a wildlife photo safari, you’re going to absolutely love it. And if you’re bringing your camera along (which, of course, you are!), keep these tips in mind to come back with plenty of extraordinary photos that are sure to remind you of your extraordinary adventure for years to come.
Cheers, and be well,

Court
6 Comments

Ron Jensen
April 20, 2021 at 11:24 am

Court Whelan, Ph.D.
May 5, 2021 at 1:37 pm

Brad
April 20, 2021 at 3:23 pm

Court Whelan, Ph.D.
May 5, 2021 at 1:38 pm

Bonnie Layland
April 20, 2021 at 3:26 pm

Court Whelan, Ph.D.
May 5, 2021 at 1:38 pm
Great guidelines for a great place to photograph.
thank you, Ron!
I am just so impressed with your skill and your ability to make it accessible to travelers. You are one talented, smart guy. Thank you.
thank you, Brad! I do what I love :).
Court
Thank you for your informative posts, I read and save each one for reference.
I printed the shutter speed chart. I shoot birds and try to get that perfect shot of hummers frozen in flight. This chart will help me in my quest.
Bonnie Layland
fantastic, Bonnie! I’m thrilled to help!