How to get this shot – Rushing River in Madagascar
When in tropical environments, water can be a central theme to a lot of your photography. Whether it’s photographing the lush vegetation that’s the result of the water and rain, or capturing the essence of flowing rivers, there are a lot of ways you can photograph water.
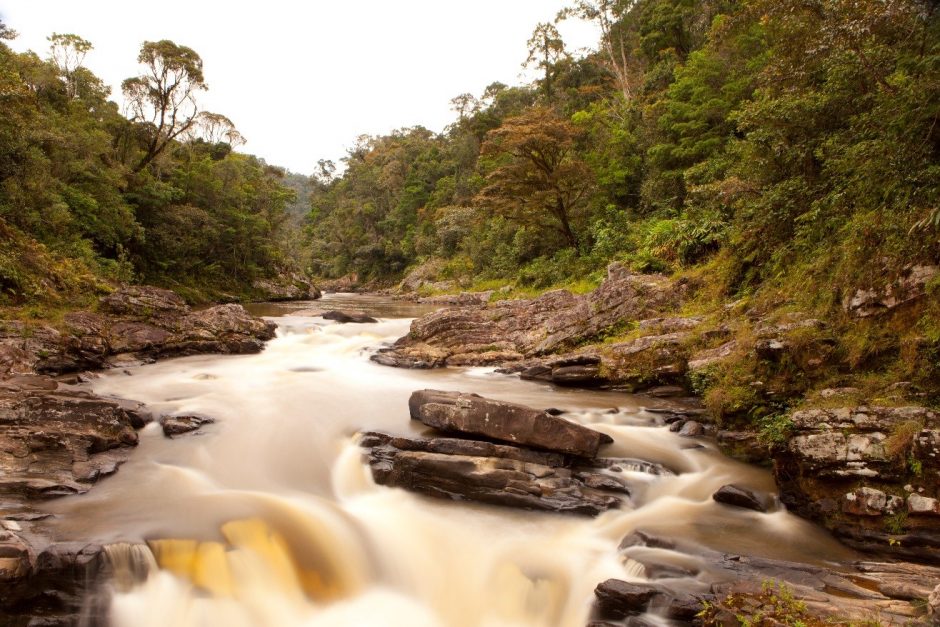
One of my personal favorite techniques is to capture the movement of flowing water via a slow shutter speed. While this article is about this particular river in Ranomafana National Park, Madagascar, you can employ these techniques pretty much anywhere you have flowing water.
- First, of course, you must get yourself to a scene like the above. While you can get neat shots of flowing water in pretty much any riverine scenario, there are some particular rivers that just lend themselves best to this technique. It has to do with a combination of flow rate, surrounding scenery, and access via some sort of bridge or platform. Fortunately, this area in Madagascar is primo, so go with an outfitter that understands the importance of all this on a Madagascar Photo Tour
- Next, you have to get yourself into position. Composition is key, just as always. There is indeed a bridge here, so you’ve got to find that sweet spot where all the landscape and water elements are where you want them. Be extremely deliberate—don’t just pick a random point on the bridge. Ask yourself questions like “where is the tallest tree in my frame”, or “where are the big river rocks in relation to the flowing water.” There are lots of decisions that can turn a great photo into an exceptional one.
- You’ll then need to get your camera settings dialed in. If you’re not familiar with slow-shutter photography, take a look at my page HERE to get a primer on all things having to do with shutter speed and photography. For a shot like this, I want to get at least as slow as 1/25th of a second. But realistically, I will want to experiment with 1/10th of a second, 1/4th, and maybe even 1 or 2 full seconds. Lots of experimentation when you’re ready for the shot…
- The trick now is figuring out how your camera will compensate for this much light entering the sensor. During daytime, you will almost always have to really compensate when you get in the 1/10th and slower shutter speeds. That is, your camera will likely dial in a very high aperture number, like f/22, to balance out the long shutter you’re commanding. Similarly, you’ll have to set your camera on an extremely low ISO, like ISO 100, or sometimes cameras will even let you go to ISO L, which stands for “low.”
- When trying for shutters at 1/4th of a second and slower during daytime, you will often have to compensate by putting what’s known as a Neutral Density filter on your camera. Basically, it’s just sunglasses for your lens, to physically limit the amount of light entering…just like when you wear your own sunglasses. The reason for this is that your camera might not actually be able to get an aperture and ISO combo to limit enough light, and your photos will all be overexposed–sometimes dramatically. ND filters, as they’re usually referred to, come in a variety of ratings, based on how many “stops” of light they can block. I typically aim for something in and around 4, 6, or 8 stops of light. This can be a very complex and confusing topic, so please do leave a question in the comments if you’d like further explanation on this (and maybe I’ll do a whole separate post on this shortly).
- So, now you have your camera settings, position on the bridge, and an ND filter on if needed. How will you stabilize your camera? If you’re shooting slow shutters, you really shouldn’t try and hand hold, or else your entire image will be blurry. The great thing about bridges is that they usually (hopefully) have railings. For this shot, I just braced my camera on the railing and held it as firmly as possible. Of course a tripod is best, but this river happens upon a somewhat lengthy trail, and I just didn’t want to bring a bulky tripod the whole way. Another option is to pick up a GorillaPod, which is a much lighter alternative to a full tripod. Read up HERE for more about tripod selections and their benefits.
- Finally, fire away! The key is to take as many shots as you can. Try different shutter speeds, as they will all blur the water differently. And if you aren’t using a proper tripod, you may get some blurry shots just by accident. Take enough so that you know a few are keeper shots.
Hopefully you will find your way to Madagascar before too long, as it’s a photographer’s paradise. And if you go with the right itinerary, you’ll find yourself in areas like this throughout the adventure.
Now go forward and give it a shot!

Court
Leave a reply