How to get this shot – Majestic Lion in Africa
There is something intensely captivating about lions. For many of us we have “grown up” knowing about them and one day dreaming about seeing their beauty face-to-face. They’re the king of the jungle, featured in countless nursery rhymes, fables, and TV documentaries, and just plain awesome.
If you’re headed to Africa, or dreaming of doing so, there is a very good chance you’ll encounter lions. Make sure you are prepared to photograph them and take home some sensational photos in addition to cherished memories.
Where Lions Roam
Of course getting in front of lions is one of the first steps in capturing the above photo. Fortunately, they are found in nearly all safari-going countries in Africa, like Kenya, Botswana, and in the case of this photo, Zimbabwe.
If you want to take the most photos and have the best vantage points, in addition to plenty of time in front of African safari wildlife, I highly recommend you go with a specialized photo tour, as they are structured to give you exactly all of this—perfect photo vantage points, extra time, and expert instruction.
In terms of exactly where you go, you can’t go wrong with any country that has a focus on wildlife safaris.
The Right Camera and/or Lens
Nowadays, getting fantastic photos like this one can be done via a multitude of camera systems. While the big fancy DSLRs and mirrorless systems with interchangeable lenses will give you the highest quality, a number of other advanced point and shoots are starting to catch the attention of pro photographers around the world.
Fortunately for big safari wildlife like lions, you don’t need top-of-the-line gear and lenses to get the shot. Typically, lions are out in the open, visible in decent daylight conditions, and due to their size, can be photographed with moderate camera power.
If you are indeed photographing with an interchangeable lens system, my top recommendation is something in and around the 100-400mm or 200-500mm range.
There is a saying that you really can never have enough telephoto power, so if you have something even bigger that’s great—I’ve encountered good quality yet affordable 150-600mm lenses that do great for safaris, too. But the key thing is that a multipurpose 12-200mm or 70-300mm isn’t going to quite cut it…especially if you have a full frame camera.
Your Camera Settings
Typically for wildlife portraiture like this photo, you want to be at a low f/number to give you that shallow depth of field.
For point and shoot cameras, or if you simply prefer more automatic settings, look for portrait mode on your camera. This configures all camera settings to give you that shallow depth of field that looks so pleasing. It helps blur the background to minimize distraction, while also making the subject appear sharper because of that blur behind it.
For advanced settings, I typically go for the smallest f/number you can get. Oftentimes this is in the f/5.6 range, but if you can get to f/4 that’s even better. Some of the “super telephotos” these days give you f/6.3 or f/7.1 at their maximum range, which is fine, but you may need to intentionally blur the background in post-processing to really get the effect.
Finally, you will want to set your camera on “burst mode” or maximum frame rate so that you can get as many photos as possible each time you press the shutter button. While this can cause you to get too many photos all at once, I find it rather critical if you are aiming to get a photo of a lion looking right at you. They typically do not look at you for long, but instead lock eyes for a brief moment as they’re scanning the horizon. Thus, you may only have a split second to get the photo. Getting a rapid fire of your shutter is key.
Your Composition
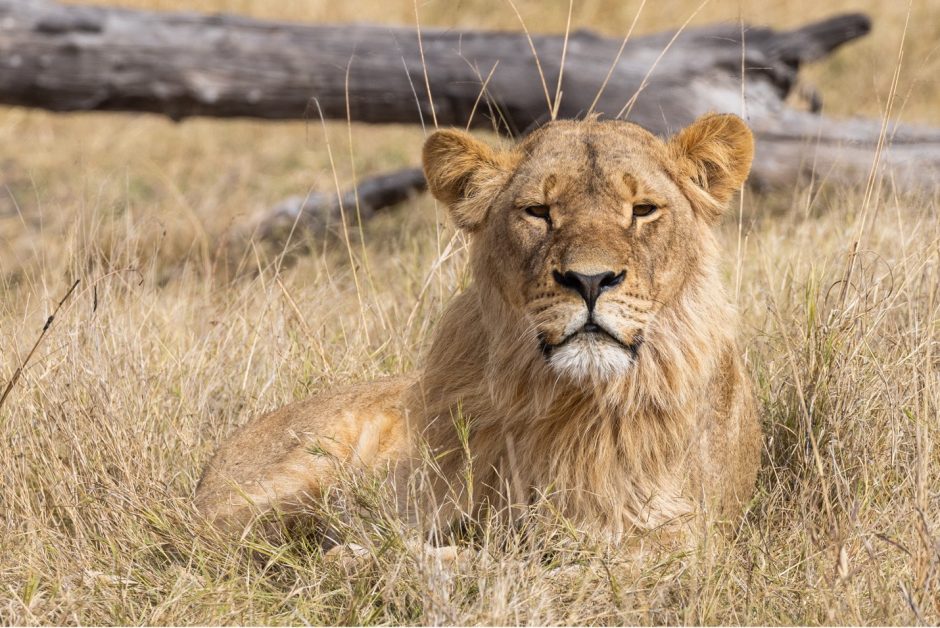
Notice how the lion is off-center? This is highly intentional as I’m following the age-old principle of rule-of-thirds, by putting my subject slightly to one side of the frame.
If you’d like to learn more on this technique you can do so here, but just trust me—it’s what you want 90% of the time.
In addition, you should leave your two-thirds space in the direction the animal is facing. In this case, that means where the legs and body are positioned. Notice how they’re pointed in the direction of the open space, even though it’s looking head-on? This is exactly what we want.
Finally, it’s a bonus if you can add something else into the scene besides the lion and grass. Although the simplicity of just having a lion in tall grass is great, that is a bit of the “norm” and you want to aim for the exceptional.
In this case, the small log in the distance just happened to be perfectly positioned to provide a little background element to the scene. This is absolutely not critical to the scene, but it does add a little extra color, texture, and intrigue. Again, its usefulness is mainly because you do not usually see added backgrounds when photographing lions in the grass. Thus, I’m able to capture something a little different than what most people see and photograph, which is a big goal of mine when photographing.
Snap, Snap, Snap Away!
Because you are often at the mercy of vehicle positioning (a key reason why photo safaris are great), you will want to take many photos. This is especially true if the lion is moving, but also true as your vehicle moves to reposition. While it may seem like you’re taking excessive photos, I always appreciate having the extras when I go to edit them after the trip.
And there you have it—simple steps to nailing the photo and getting a majestic lion looking right at you in Africa! As you can imagine, this technique works well for all wildlife in Africa, so be sure to incorporate these lessons throughout your safari for similar photos.
If you are indeed headed to Africa and doing some photo research ahead of time, I wish you an extraordinary adventure! And if you are in the planning stage of your safari, I hope this helps inspire and inform a bit and I hope you get your dream trip to Africa before too long!
Cheers,

Court
2 Comments

Gina Maschio
June 1, 2023 at 8:36 am

Court Whelan, Ph.D.
June 2, 2023 at 8:48 am
Thanks for all these tips through these blog posts! I’ve been going through some of the older ones as well to help prepare for some upcoming trips (Costa Rica, India, Africa/Madagascar/East Africa, and eventually Antarctica). All these trips will be done through Nat Hab, so I’m fairly confident that my guides will assist in getting us relatively close enough to get whatever shot I desire and assist with camera techniques if not.
Right now I have the budget to invest in one “nice” lens (have been using my kit lenses for years now and while they have served me well, these once in a lifetime trips warrant an upgrade) for my Nikon D500. I’ve been debating between the new 70-200 2.8 and 80-400 4.5-5.6 (I’ll be renting both in a couple weeks, but am already expecting to be overly impressed with the photos I get simply because either is a huge upgrade from my DX glass). Given these planned ventures, that 2.8 is a huge appeal (gorilla treks, rainforests, early/late drives) but the reach of the 400, particularly on my camera body is also key. I’d be giving up weather sealing to get that though (which is also major points to the 70-200 given the less than forgiving environments I’ll be in). So now it’s coming to trying to figure out if that effective 300mm-ish of the shorter lens would be “enough” for my non NatGeo level photographs. I know both are a staple in most photographers kit, so looking for any guidance on which one this hobbyist should invest in(:
Hi Gina, two great lenses indeed! Honestly, although the 70-200 is fantastic, and with the 1.5x crop factor you’ll be at 300mm effectively, I’m just afraid that isn’t quite enough for the slew of trips you have coming up (and awesome slew it is!). Whenever I am in range and can use the 70-200, that’s what I’ll be using. However, there are definitely times that you’ll want more. The 80-400 is a fantastic lens and in many ways is a better one-stop-shop lens.
If it’s at all possible…budget-wise as well as space wise, I’d entertain the 70-200 and then getting Nikon’s lower priced 200-500. I know it’s just more gear and more money, but that combo would be spectacular.
If instead you’re really looking for one single lens to carry you through all these adventures and more, I’d go for the 80-400. It’s a sensational range and a very high quality lens.
Hope this helps!