How to get this shot – Arctic Sunset
Sunsets are fantastic no matter where in the world you get to see them. However, a blazing glow of red, purple, and orange when in the arctic just has something extra-special about it.
In today’s lesson, learn all about my sunset photography technique and do so with this stunning example from Canada’s arctic wonderland.
The time and place for your photography
The timing is obvious, but be sure that you’re in-location about 30 minutes prior to sunset so that you can begin to scout your location. Rushing into this peak photo opportunity will limit your opportunities, as the prime time for sunset photos could be within a relatively large window. Depending on cloud and atmosphere conditions, the best colors and textures could be while the sun is still above the horizon, or it could be best several minutes after it has physically set. Making sure you’re in location allows you to take all the photos and have the best range of outcomes.
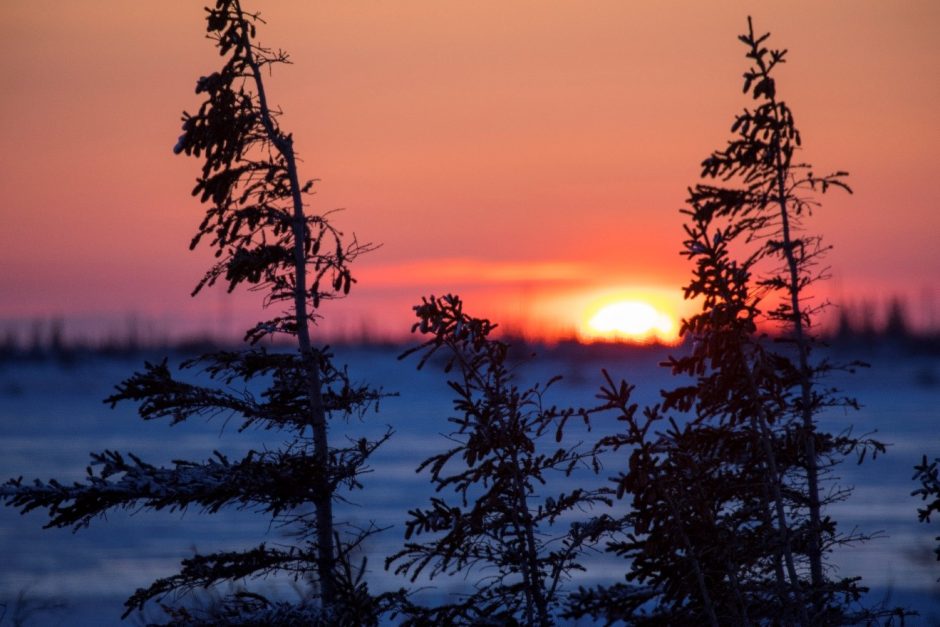
As far as the place, coastlines are usually best for unimpeded views and prime atmospheric conditions. Here, we’re on the coastline of arctic Canada in Churchill, Manitoba. I personally believe the ice and snow has a tendency to make sunsets extra special, but this may be personal opinion.
Decoupling your exposure from your focus
This is the real secret sauce when it comes to great sunset photography. If you can find a nice foreground element, your photo will instantly become elevated. Here, a small stand of spruce trees provides just enough alluring texture to the photo to take it to another level.
However, the key thing is that you want the foreground element in focus, but you do not want your camera to expose for it. Instead, you want tack sharp focus on the trees, but your camera exposed for the colorful clouds in the sunset.
To do so, find your “auto-exposure lock” or “AE-L” button on your camera. Some makes and models have it as a button on the back that actually says AE-L and some denote it with a small asterisk. You may be best off looking in your camera’s manual or looking online to find the exact button for your camera.
Nevertheless, wherever it may be, the principle is the same.
You will begin by hitting this AE-L button while putting your camera’s focusing box over the colorful sunset. If you have a small focusing point (recommended) place the center focusing box right over the most colorful and dramatic part of the sunset.
Then, hit the AE-L button to lock in exposure.
This will lock in your camera’s exposure to the brilliant light and color for 15 seconds (most cameras lock for 15 seconds and then auto-release).
Then, you can use your focusing button (or shutter button, depending on how you auto-focus) to recompose your photo and focus on the foreground. And voila, you get perfect exposure, based on the light and color of the sunset, with tack-sharp foreground elements.
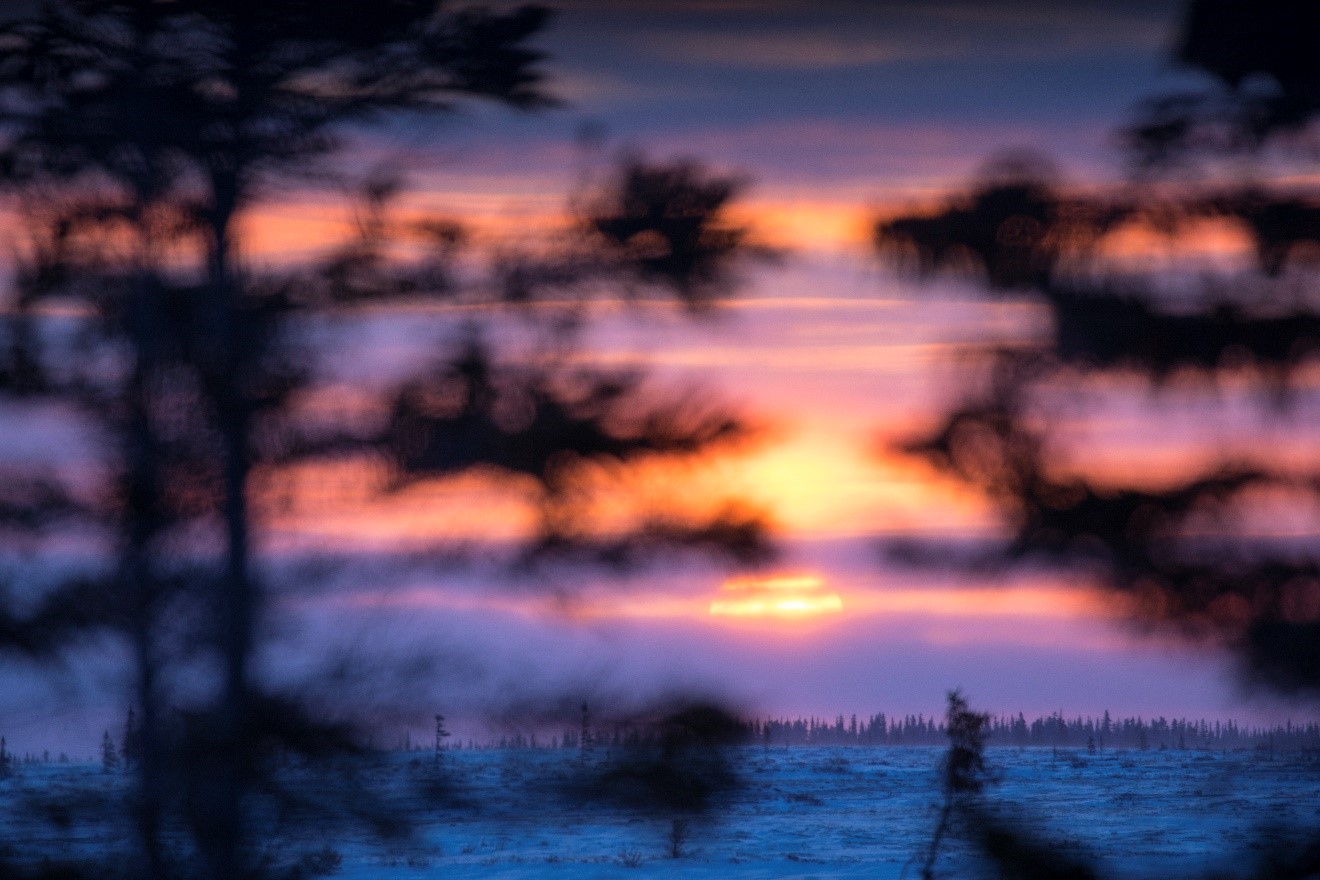
Take a look at the below example of when you do not decouple and instead just focus and exposure for the sunset. Not a bad shot, and interesting in its own way, but it does not get the foreground in focus. Thus, it’s sharply different.
Your recomposition plan
How you ultimately compose your photo has a huge bearing on the overall impression and quality of your final photo. Sure, you can crop and edit in lightroom/photoshop, but the better you get it in-camera, the better your final photo will be.
Be sure to think about things like the rule-of-thirds, golden ration, leading lines, and other compositional tools to compose your photo for maximum aesthetics. Generally speaking, you don’t want your major elements in the dead middle of your photo…think about offsetting elements and grouping in odd numbers (like thirds).
Taking the shot
Once you have your exposure, focus, and composition, start taking photos. There are no “perfect” camera settings, and I’m not going to tell you the key to success is only f/8, 1/200 sec, and ISO 400. Frankly, there are so many variations here that can work…you can range from a wide to a narrow depth of field, both with interesting results. And the same thing goes for shutter speed (although 9/10 times you are just taking a shutter speed to deal with your aperture settings).
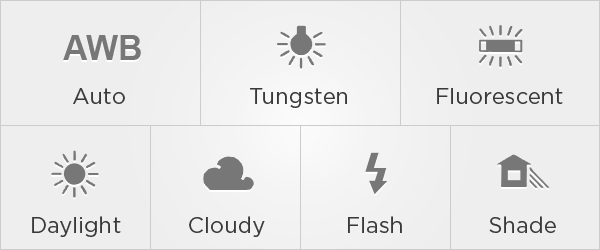
The other key experimental variable to play with is your white balance. This is particularly key with sunset photography, as the colors tend to have dominant warm or cool tones. Try all levels of white balance, including shady, daylight, cloudy, indoors, etc.
The more you experiment the more you’ll learn about what these effects ultimately do to your photo.
To me, I generally prefer either shady or daylight white balance settings as they are the more-or-less extreme versions of cool and warm tones to your photo.
Experiment and use multiple tactics
It’s key to keep in mind that although these tips can be seen as a step-by-step guide of instructions, each step can be employed independently to get great results. For instance, you may want to simply focus on the decoupling of focus and metering for one day and then experiment with different compositions the other day.
On a different day/photo shoot you may want to solely focus on white balance settings, or experiment with time of day.
However, you’ll find that if you’re ample to employ all of these tactics and continually experiment with each of them, you’ll hone your sunset photography dramatically.
If you’re headed to the arctic for some wintertime sunset photography, or simply in your own backyard or local viewpoint, I hope these tips help you get your favorite sunset shots and improve with each photo and each outing.
Cheers, and Happy Holidays!

Court
Leave a reply