A New Series – How to get the Hero Shot
We’re starting a new series today, which focuses on the extraordinary homepage images you’re likely to see on Natural Habitat Adventures’ main website. If you’re already familiar, you may have noticed that every month or two there is a new absolutely stunning image from edge-to-edge on the main www.nathab.com page.
These aren’t your average photos—they’re some of the most compelling, extraordinary photos in the world.
This new series is designed to give you the details on how these shots were captured…the location, the itinerary, the settings, and the creative vision needed for the best of the best.
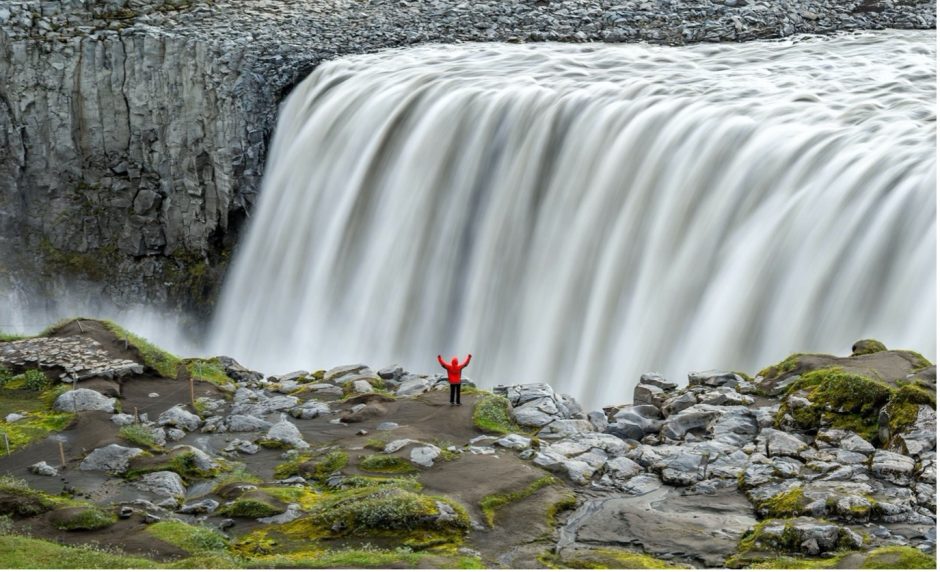
For our inaugural article, we are looking at Natural Habitat’s phenomenal Iceland image of flowing water with a lone traveler taking it all in. This is a classic example of the intersection between top notch landscape and travel photography.

For starters, let’s talk about the destination. Iceland is known as the land of fire and ice, but has some of the most spectacular liquid ice features in the world—that’s right, we’re talking waterfalls.
If you want to picture-yourself-here, and be that person in the red jacket, take a look at Nat Hab’s Iceland itinerary, as it’s the best way to immerse yourself in the splendor of this island nation in a comprehensive and coordinated way.
Now let’s talk about the photo itself…
The first thing to talk about in my mind is that gorgeous, silky water. It’s a common feature to watery landscape shots, but how do you capture this? Well fortunately, it’s fairly easy even with the most introductory of cameras.
Step 1 – You must have a tripod or some other extremely stable surface. You can technically use a rock or a handrail, which I’ve used many-a-times in a pinch. However, for full versatility, a tripod is best.
Step 2 – Set your camera on Shutter Speed Priority mode and then use your camera’s main dial to a 1/2 second exposure. You may need to look in your camera’s manual to see how to do this, as each make and model is slightly different. But usually there is a dial on the top of the camera to set it into “Tv” or “S” mode, and then another dial on the back or near the shutter button, when rotated, changes the shutter speed.
Step 3 – Ensure you have the lowest ISO setting, which is usually ISO 100 or ISO 50.
Step 4 – Take a practice shot. You can focus anywhere for this, as you’re really just trying to get a handle on the amount of blur 1/2 second is going to give you. If you like the shot, then great, proceed to Step 5. If you think there is too much or not enough blur, increase or decrease the shutter speed by small increments.
A common problem at this step is having too much light in your scene. Because you are using a long exposure during the daytime, it’s difficult for even the best cameras to compensate. Thus, a quick and effective fix is to use a Neutral Density Filter. These are inexpensive and vital for shots like this and absolutely worth bringing on any landscape-focused adventure.
If you do not have an ND filter (as they are often abbreviated to), try increasing the shutter speed to 1/4, 1/10, or even 1/40 of a second. This will minimize the silky blur, which isn’t ideal, but it will help if your photo looks “blown out” or overly bright. And fast moving water can still look beautifully silky at 1/20 or 1/40…just not as dramatic…
Step 5 – We’ll get to the nuances of the subject and composition in a moment, but let’s quickly talk about where to focus. In this shot, you can choose to focus on the water itself, or you can find a specific subject.
In this case, the brightly colored traveler is ideal. Thus, focusing on that person is great and you need not do much else. Focus, compose and shoot. Voila!
Let’s talk about the composition and creative elements of this photo…
In this particular scene, we have an explorer in a bright red jacket that we can use as our foreground subject. This is photo GOLD!
Red colors in scenes are spectacular, as they really pop and will get the viewer to direct his or her eye to exactly what you want to feature. Always keep an eye out for red colors in landscape photos, as they are magic.
One thing you’ll notice is that the photographer chose to place the subject very near the middle of the scene. This usually is against the golden rules of composition, but it somehow works here, doesn’t it?
Anytime you have a small subject that really pops in an otherwise grand scene, you can break the rules pretty easily because there isn’t too much emphasis on the small subject.
Similarly, when you have a landscape with a somewhat uniform vibe (like a large, similarly textured waterfall) you can create some intrigue by using symmetry…either laterally, or radially with a center-subject.
Ultimately, it just goes to show you that rules are meant to be broken and when in scenes as spectacular as this one, take loads of photos and experiment with many, many types of composition—the one you least suspect may turn out to be your favorite.
Finally, let’s talk about processing…
Photo processing is becoming an absolute necessity these days for the best results, as the RAW files that come out of the camera are purposefully desaturated, low contrast, and dull due to the way these fancy processors must work best.
But the bright side is you can easily restore all the original contrast, saturation and shadows, and if you wish to spot-edit due to adverse lighting conditions, haze, or simply artistic impression, that’s possible, too.
I’m personally a minimalist when it comes to photo editing, and I believe the photographer here is, too.
I can tell, simply from experience, that there is a little boost to contrast and clarity, and potentially a little decrease in the highlights. There may be a slight uptick to saturation (or it’s smarter cousin, vibrance) but it doesn’t look like much, as greens are notorious for looking fake rather quickly with over-saturation.
And that’s about it! You can see here the real stars of the show are that fantastic silky waterfall, plus the alluring composition of filling the frame with the water. Add in the perfect positioning of the red-jacketed adventurer, and it delivers a wonderful “put yourself here” vibe to the photo.
When you have all those ingredients combined, you get a truly great landscape and travel shot that will make people want to go on an adventure in Iceland!
Cheers, and Happy New Year!

Court
Leave a reply