
How to take an Excellent “Group Photo” during Travel
I don’t believe there is a single person out there that hasn’t ever taken or been in a group photo. When it comes to travel and adventures, they are even more common. I, of course, celebrate this, as it’s a phenomenal way to preserve memories and be able to recollect years later on amazing new friends and people we’ve met along the way.
However, taking a great group photo can be a challenge—especially when out in the field.
Keep reading for all of my tips on perfecting your technique on photographing groups of people while traveling.

Step 1 – Find a Memorable Area
This one may be a no-brainer, but it’s important to have in the list of ingredients. To make a memorable photo, you need to have some main feature. The group can of course be the main feature, but ideally we’d like something else in the frame that helps tell the story of “ya, we were there!”
In the above photo, the iconic Bear Camp sign, positioned in front of Nat Hab’s Alaska Bear Camp does exactly that.
Not only is the sign fantastic and prominent, but the size and shape of it lends itself nicely to have the group surround the sign. Picking features that can be part of the group is a great technique.
As you go through your trip, keep an eye out for these features and don’t be afraid to organize a group photo on the spot!
Step 2 – Nailing the Lighting
This is perhaps the most important step that will level-up your group photography instantly.
Basically, you never want the sun behind the group, and ideally you’d like it behind the photographer and slightly off to their left or right. That is, having a bit of angled lighting is best.
I could go into all sorts of detail about how early morning or late evening light is best, but let’s be frank—when the mood strikes for a group photo you’ve just got to go with it! Waiting for the following morning will just fizzle the momentum. Pivot the group as needed, position them with the right light, hitting them at a slight angle, and voila.
Step 3 – Choosing your Background and/or Sky
You don’t actually get to “choose” here, but you can survey the scene and see what flexibility you might have. That is, if the group can rotate or pivot such that the background is more uniform—either in color or texture—you’re going to get a better photo. If one side of the group has some sort of prominent background while the other does not, it’s going to be somewhat distracting. If you can avoid this by rotating the group (while of course also preserving lighting) it’s wise to at least try.
The key thing is to be deliberate in setting up the group. Although you’ll have to do a bit of managing and directing, the group will thank you for it when they see the fantastic photo!
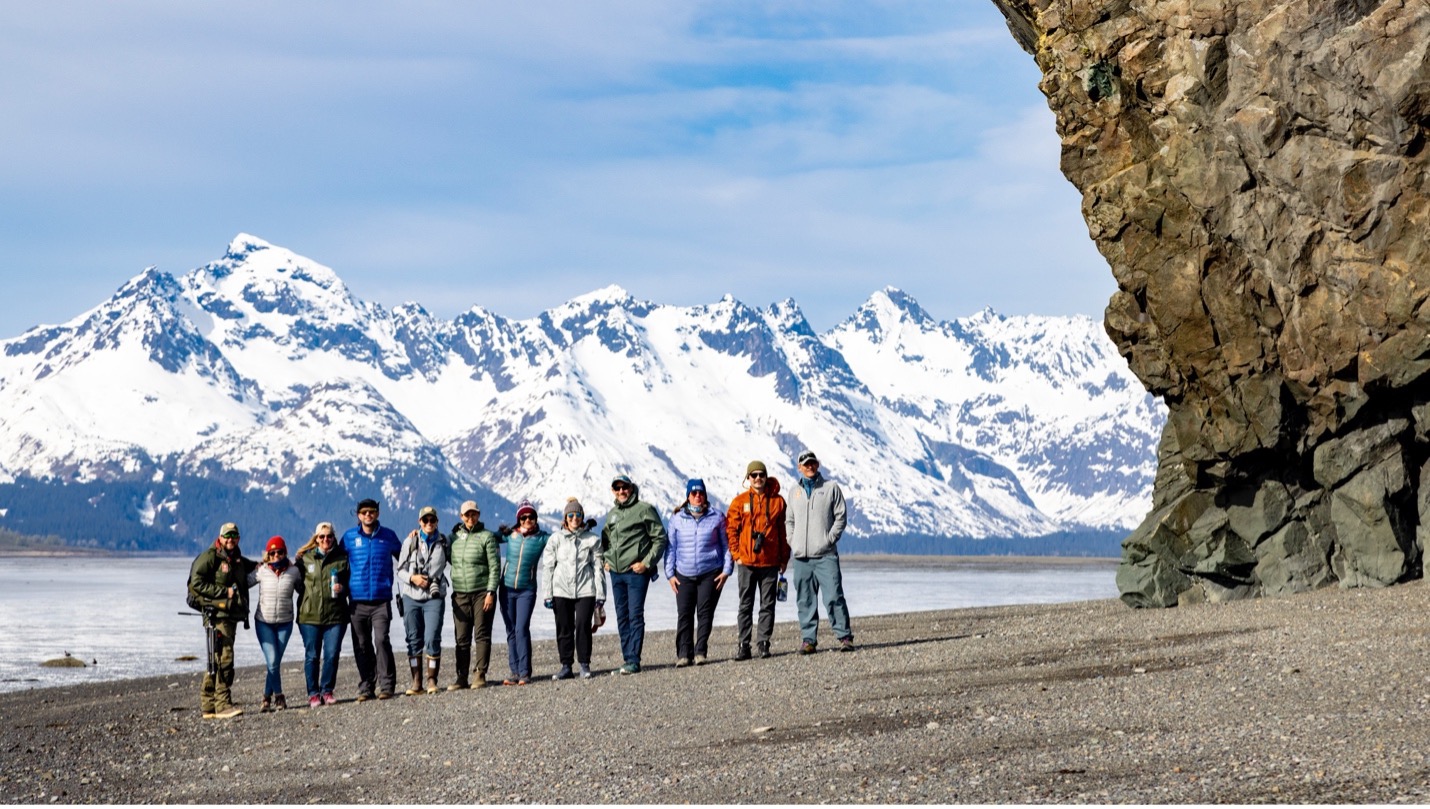
Sometimes the background is just sooo good you have to slightly forego the ideal lighting. In the above photo, the light is quite strong from the left side, but this is the only way to have gotten the shot with those mountains where they are. It’s all about priorities and choices!
Similarly, you can look for elements of the sky that will enhance your photo. Not all group photos will have the sky in them, but if they do and you can pivot your group so that a notable cloud or patch of blue sky is part of the photo, it can really help elevate the shot.
Step 4 – Your Camera Settings
This is the easy part—nothing wild here. Generally speaking, unless you have really special situations, a moderate aperture like an f/5.6 or f/8 will do nicely, and a fast enough shutterspeed to freeze errant motion is helpful—something like 1/250 of a second (people tend to laugh, reposition, or sway slightly as you’re trying to take the shot).
The reason I don’t go for extremes on aperture is that I actually do want the background slightly out of focus. So, I don’t go for an f/11 or f/16.
Similarly, I want all of my people in focus, so I avoid the f/2.8 or f/4 apertures.
When given the option, aim for a low ISO so that you can edit your photo afterwards. More on that next!
Step 5 – Edit for Shadows and Boost Contrast and Vibrance
Telling someone that there is a “perfect way” to edit any shot is like telling somewhat what they should order for dinner. People like different things, and they might even have different preferences on different days. However, my recommendation for the evening is to lighten shadows, as this helps peoples’ faces pop better, especially if they are wearing hats. You may want to tinker with overall exposure, but generally shadows are my target.
I also want to make my group look vibrant, full of life, and maybe even a touch “epic.” By boosting contrast a tad, you can make the photo look a bit more dramatic. By upping vibrance by a few notches, you bring more color into the scene, which usually makes for a more attention-grabbing photo.
You’ll notice that I haven’t really said anything in this article about lining people up—like, from tallest or having two rows vs. three. The reality is that these things do make a difference, but it’s extraordinarily circumstantial and, frankly, not in everyone’s comfort zone to manage a group and tell people where to stand.
The one thing I will tell my group on this front is “if you can’t see me, the camera can’t see you.” This is usually enough to get people to become aware of their positioning and line themselves up in a way that they are mostly visible. Although, this is why I do take multiple shots and may even ask the group to all “take a big step toward me” just so they can all reposition.
And there you have it, folks, some fun and friendly tips on photographing groups during your travel adventures. If you’re headed out on a journey in some far flung corner of the world, do yourself a favor and make sure to get a group shot at some point during the trip. It often feels odd to do so really early on in the trip, but I encourage it as it will bring the group together, and sometimes the best views happen early in a trip—just be ready for them at any time!
All the best,

Court
Leave a reply