
How to Get This Shot – Yawning Lion Cub
As our North American winter approaches, here in the U.S., the green season for Southern African safaris is just kicking off. For photographers, this is a wonderful time to visit safari destinations in the southern hemisphere like Botswana, Namibia, and Zambia. Although technically considered the low season because of summer temperatures and an increased chance of rain, photography can be exceptional with billowy clouds, colorful sunrises and sunsets, and…baby animals! That’s right, this is one of the birthing seasons, so young animals are more common.
Follow these steps to get an “action” shot like the one above
- As you can imagine, this shot is mostly about timing. To get that exaggerated yawn, with tongue hanging out, teeth exposed, and head slightly tilted, it was that one moment where it was all possible. Thus, you need to take several photos in quick burst mode to get the one keeper photo. If you’re not familiar on how to set your camera on high speed burst mode, take a peek at your camera’s manual and look in the table of contents for “high speed shooting” or “burst shooting”, or if you have a photo guide alongside, they’ll know!
- Next, you’ll need to have the right combination of camera settings. High speed photos are great, but if you aren’t taking them with high shutter speeds, you’ll get blur from the moving animal. There are two ways you can go about this. The first is to find the “sports setting” icon to force your camera to prioritize for a fast shutter speed. Typically it looks like a little running man. However, if you are comfortable setting your shutter speed manually, you can turn your camera’s dial to “Shutter Speed Priority”, usually demarcated by an “S” or “Tv” symbol. This allows you to then dial in a custom shutter speed, and your camera will choose the appropriate aperture to facilitate this. As you can imagine, not all animal movement is created equal. If you’re trying to freeze the motion of a cheetah in full stride, that’s different than a yawning lion cub. For this photo I used a shutter speed of 1/250th of a second. Frankly, that’s not that fast. But it worked. Keep this number in mind and adjust as needed.
- The other key consideration is your depth of field. This photo was photographed at f/2.8, which gives it that nice blur, or bokeh, in the background. It helps isolate the subject and actually makes it appear sharper because of the considerable amount in the scene out of focus For many lenses, this is the smallest f/number they’ll go to, and in fact, many will only be able to go to f/4 or f/5.6, which doesn’t provide as much blur. Nevertheless, going to the smallest f/number will be your best bet on animal portraits like this one to help isolate the subject and blur everything else.
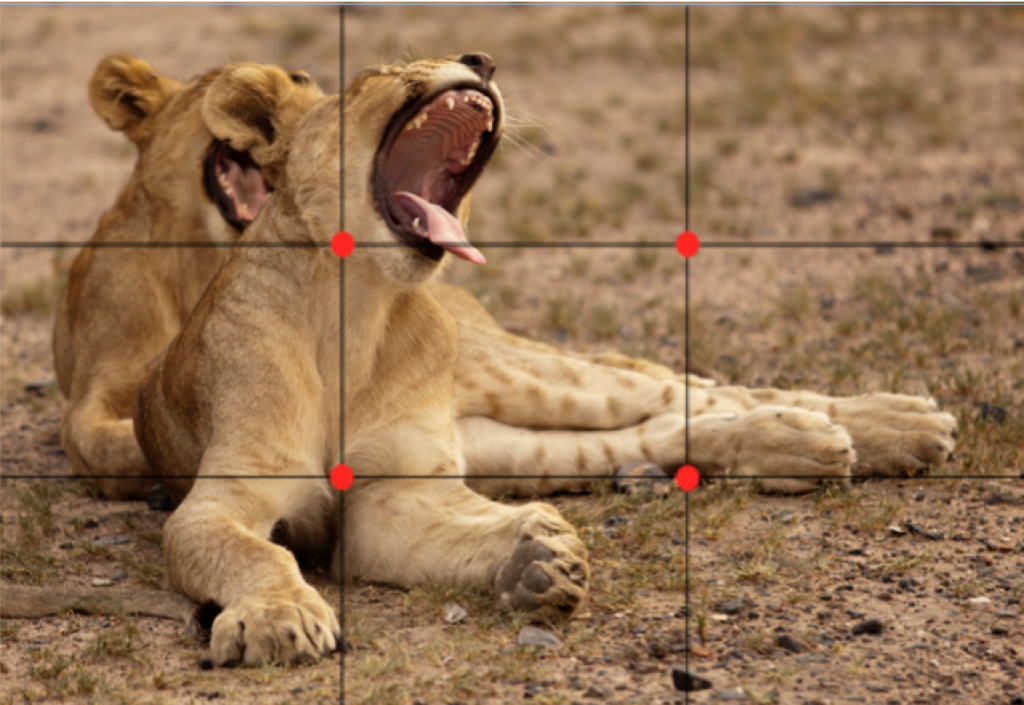
- As with all photography, composition is key. No matter if you’re photographing an amazing sunset, waterfall, or wildlife behavior, it’s got to have descent composition. As you’ll see in the below rule-of-thirds grid overlay, it works pretty well. To be honest, with the lion’s mouth being the main focal point of the photo, it might be a little off. However, it’s pretty close and for the sake of this tutorial it works just fine. Just remember, try and partition your scene into thirds, and use those intersecting red dots as focal points where most of the “stuff” is happening.
- Last, we come to actually taking the shot. Your settings are dialed in, you have the scene in front of you, and things are happening. Whether it’s a yawning lion, a sparring polar bear, a pouncing cheetah, or a diving penguin, the technique is actually quite similar. You want to anticipate the action as much as you possibly can. Now, of course, this isn’t always easy. However, to get the shot, you must start photographing before it’s actually happening, or else you’ll just get the tail end of the behavior and not the “climax” moment (simple reaction speeds and camera speeds). Once you have focused and are pushing that shutter button, don’t let up. Take 15 photos if you need in 3 seconds. You can delete them later. By doing so, you’re able to sort through a range of moments and are likely to get the exact shot you want.
This technique is a valuable one to learn for many instances of wildlife behavior…
…and truth be told, photographing wildlife behavior is at the core of wildlife photography. Thus, if you want to get a shot like the one above, start getting very familiar with the settings I’ve gone over so that you can dial them in within seconds. With the right technique, the right opportunity, and a bit of luck, you’ll no doubt get the shot you’ve always wanted.
Now go forth and give it a shot!
Court
Leave a reply