
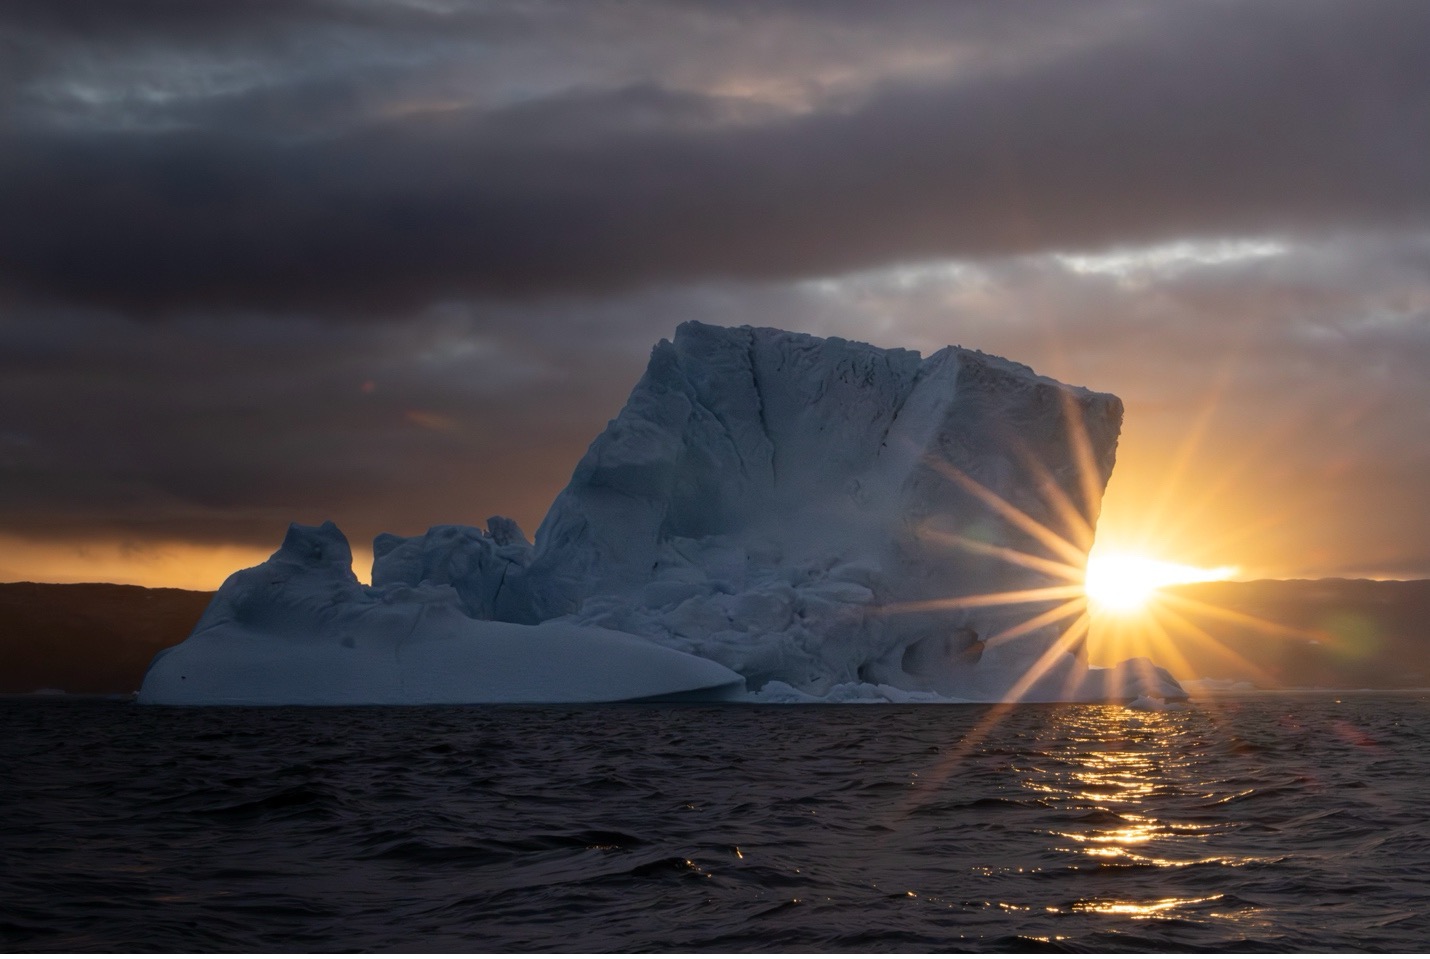
How to Get this Shot – Sunset Sunburst with Iceberg
Photographing icebergs in front of sunsets is just a winning combination. But then you get some moody clouds and nail the iconic “sunburst” with it? Well, that’s what great landscape photography is all about!
If you’re headed to a place with glaciers and icebergs like East Greenland, where this photo was taken, study up on this technique and come home with dazzling photos to commemorate your adventure!
Getting into Position
A shot like this requires some very specific ingredients. First, you need to get in front of some icebergs, of course! Sermilik Fjord in East Greenland is one of the best places on the planet to do so, and a Basecamp Greenland Photo Expedition is one of the surest ways to combine these elements into one photo trip.
Being in such a place is the first step in stacking the deck in your favor, but you’ll also want to keep your eye out for big icebergs and a sun close to the horizon. As the sun sets, you can get some fantastic lighting, but having the sun just touching the horizon is critical to maximizing the sunburst effect.
Shot Settings
Aperture is going to be your biggest consideration here, as you’ll need a remarkably big f/number to get the sunburst effect. While classic landscape photography usually necessitates apertures like f/8 or f/11, sunbursts require even more. You’re going to want to dial your aperture all the way to the biggest f/number (aka smallest aperture) to get those sun rays to pop.
I’m shooting this one at f/32, as this is the minimum aperture of my 70-200mm lens, but f/22 with a 24-70mm is just fine.
You’ll quickly realize that such an aperture drastically limits your light. Normally, from a stationary ground, this isn’t a problem because you’ll be shooting into the sun, and a “normal” shutter speed is fine—like 1/200 or 1/320. However, the best shots of icebergs in Greenland are typically from Zodiacs, so you’ll need to think about your own movement seriously when choosing a shutter speed.
I opted for a rather fast shutter speed here to minimize any blur I might get from the bobbing boat. I went for 1/800th of a second.
Combining this with the f/32 aperture, I had to shoot at a relatively high ISO—ISO 8000 to be exact. While this used to be considered a desperately high ISO some years ago, mirrorless cameras these days are capable of shockingly high ISOs (especially full-frame cameras). This is especially true when you can use de-noising software built into Lightroom, Photoshop and Topaz.
Composing your Image
The thing you’re going for with composition is balance. I often start with the rule of thirds, but I don’t hold myself to it rigidly. Sometimes I may adjust if I want some reflection in the water, or if there are other attributes to the photo that help with balance, I’ll pivot. In this case, I wanted to get a bit more sky than water.
The shape and size of the iceberg also has an effect on how I place elements in my scene.
A trick I use when I’m not exactly sure of what my final composition will look like is to shoot wider and plan on cropping on the computer afterward. If you set up the photo to be perfect in-camera, you may find that you have used too much telephoto and wish you had a little room for flexibility afterward. Shooting wider is the solution.
Editing your Image
Cropping usually isn’t the only thing that I will adjust when editing my photo.
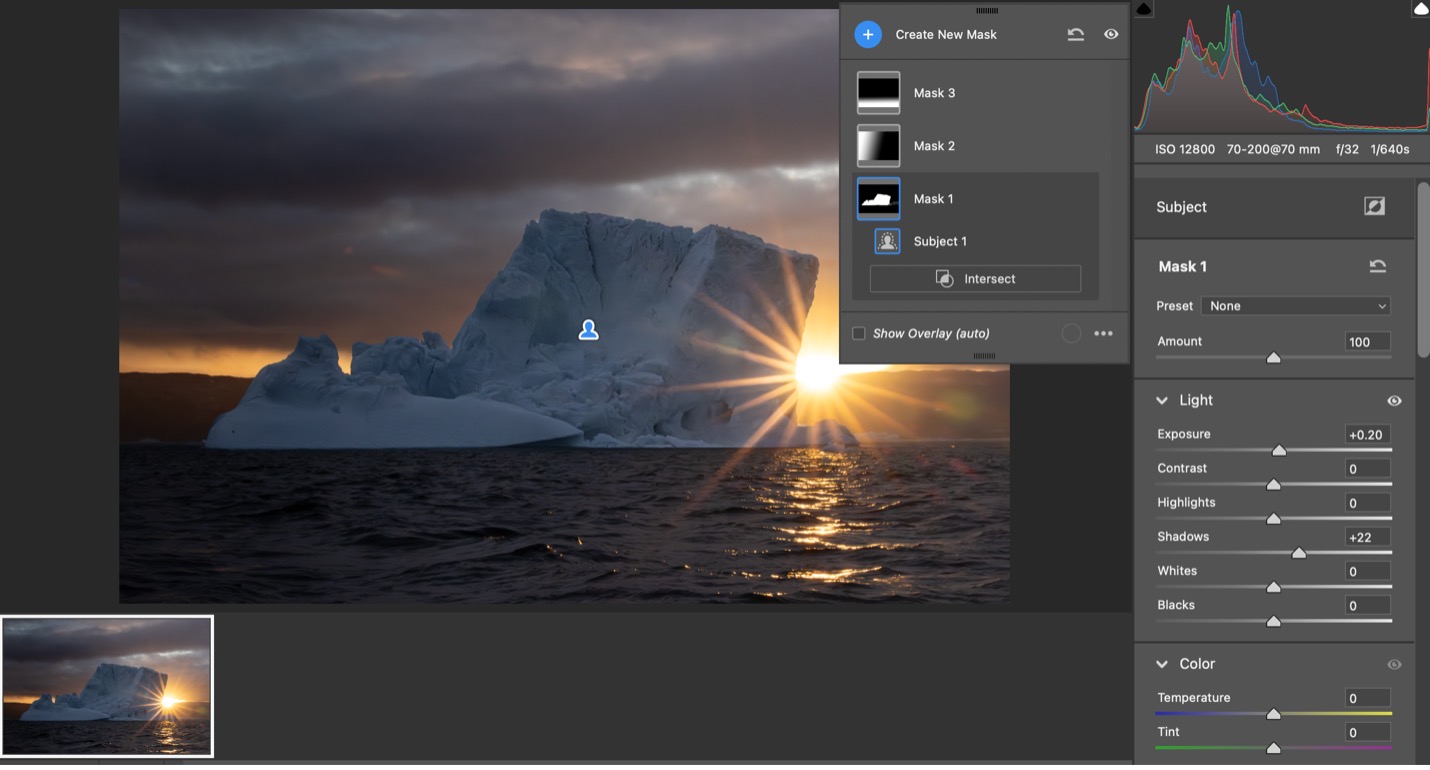
In this specific example, you’ll see from the above screen capture of my editing pane that I added several masks. First, I selected the subject (the iceberg), reduced shadows and increased exposure slightly.
I didn’t need to go to extremes—just a touch of lightening did the trick. If I were to lighten it much more, it would begin to look fake. Definitely not what I’m going for!
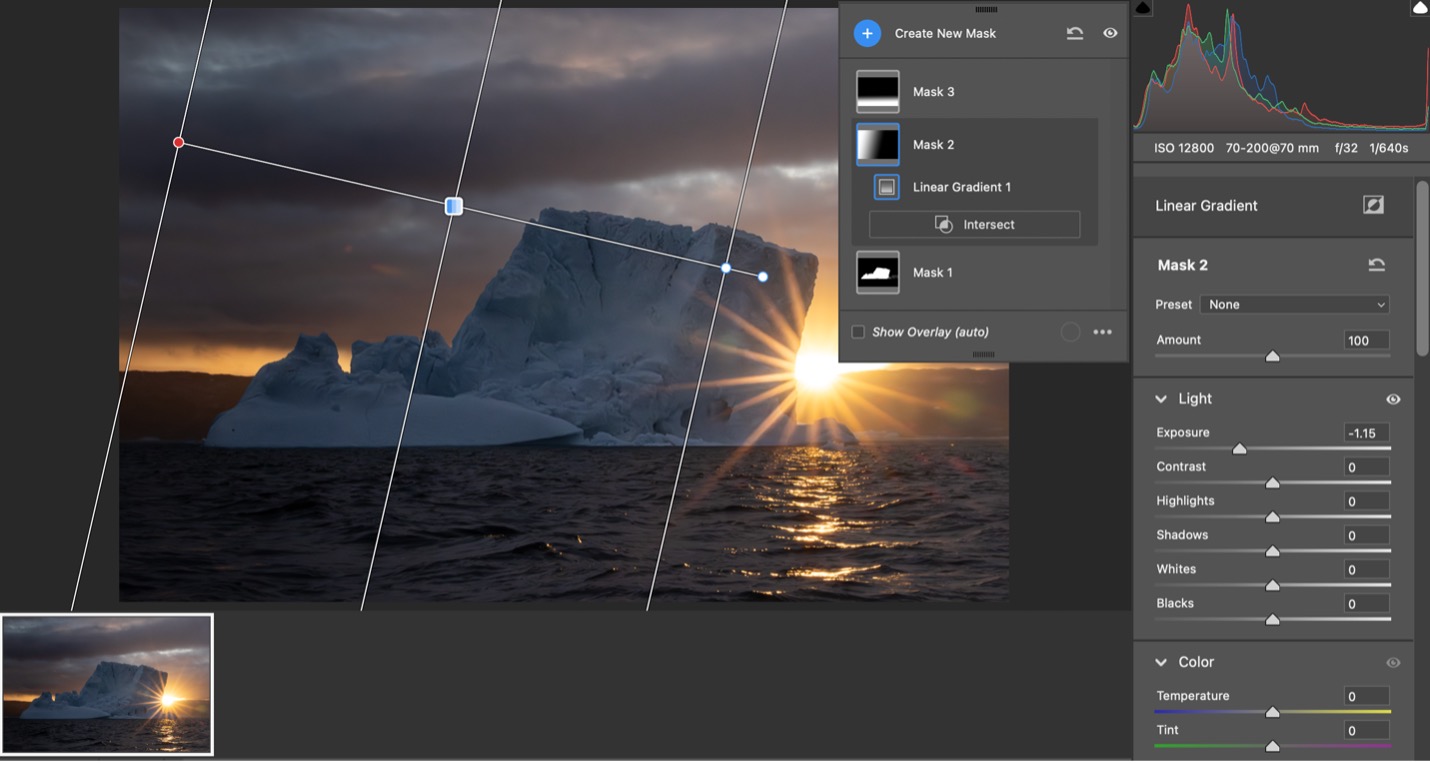
Then I opted to create a gradient mask to darken the left side of the frame. I actually underexposed this by a bit more than 1-stop in order to draw attention to the bright, right side to add emphasis to the brilliant sun.
This isn’t a required step, but I find gradients to be very natural and minor adjustments that help you add or subtract emphasis according to your artistic vision.

Finally, I ran a de-noising program to reduce the amount of grain in the shot. Had I not been striving for the sunburst, and subsequently using f/32, I probably could have been at a more reasonable ISO, but 8000 truly needs some de-noise to remove the grain. In other words, f/5.6 or f/8 would have let in loads more light and I could have probably shot at ISO 800. But the sunburst requires that big f/number.
Final Notes on Capturing a Brilliant Sunburst
While this would have been a nice shot regardless, the sunburst really makes it for me. To maximize the sunburst effect, you really want to have the sun partially blocked. In other words, the fact that it was just behind the horizon and just a hair behind the iceberg allowed the sun’s rays to really lengthen and pop.
Thus, when in a boat and in a setting like this, it pays to take multiple photos, as the power of the sunburst can change markedly from one moment to the next. Keep shooting and you can always cull your images later!
And there you have it—a step-by-step guide for the alluring combination of sunburst photography with dramatic scenery.
This technique actually applies anytime you have a dominant subject with a partially blocked sun behind it. But as you can see, there is something quite special that comes together when your subject is a city-block-sized iceberg in the wilderness of Greenland!
If you are headed on a photo trip to Greenland I hope you encounter such a scene! And with these tips and tricks, I’m confident you’ll be able to capture a similar photo no matter what iceberg may be in front of you for this dramatic end-of-the-day photo session.
Cheers, and see you out there!

Court
Leave a reply