How to get this shot – Misty Morning in Borneo
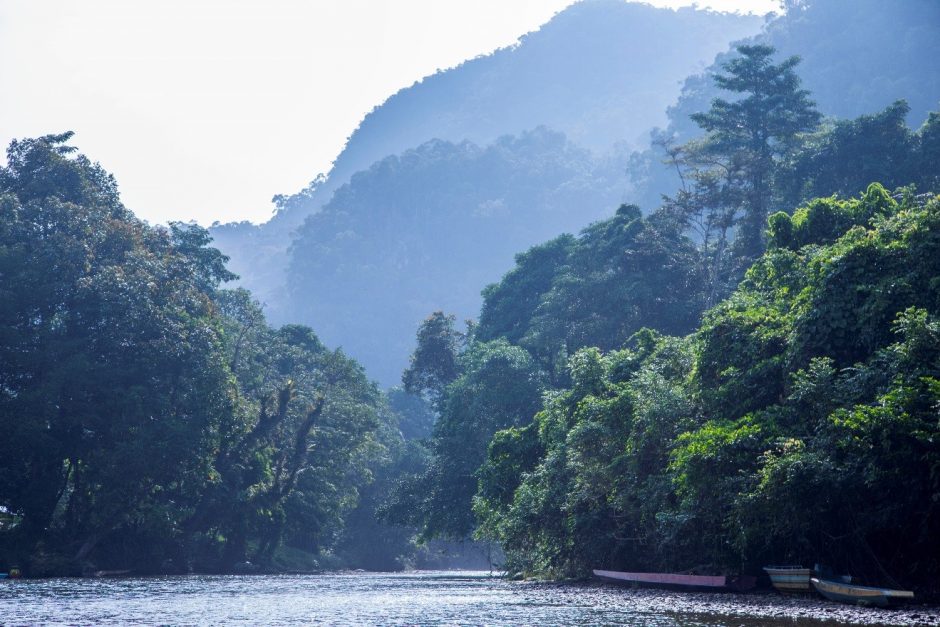
When it comes to tropical jungles, the cool misty mornings are not only some of the best times to spot wildlife, but also great times to photograph the landscapes, too. In the above photo, taken on one of my Borneo Expeditions recently, I was able to capture the “coolness” of this particular morning, along with showcasing the textures and depth of the forest via a very specific set of steps.
Follow along to get your own misty morning shot the next time you’re in Borneo’s jungles!
- Get yourself there! For a stupendous scene like this, you certainly need to be in the right place at the right time. Fortunately, Borneo is very generous to we photographers, so long as you get yourself there on a top notch adventure. Do your homework and make sure you’re setting yourself up for success.
- The next consideration is how you’re going to see this type of scene. In order to get a proper coverage of water and that unique tunnel view down the river, you either need to get yourself on a boat or on a bridge across the water. Shots from the bank just don’t quite cut it. Fortunately, most great outfitters know this and at some point you’ll likely have the opportunity for both.
- If you’re on a boat (preferred), you’ll need to think rather soon about your shutter speed–because boats are moving. If you’re moving quickly while taking the shot, you’ll need to have a fast shutter speed in order to offset any blur that could find its way into the shot. Fortunately, river scenes like the above are usually quite bright. However, as you probably can tell, this is also earlier in the morning, so the sun isn’t quite overhead. Thus, I’m making sure that my shutter speed is as fast as possible…hopefully 1/800th of a second and faster.
- But there is another part to the equation. In a photo like this you’ll also want to get a reasonably wide depth of field in order to showcase all the texture and vibrant contrast of the scene. In an ideal world, I want something like f/8 and above. However, you can’t always have your cake and eat it too, as these bigger depth of fields, which allow for more focus in the scene, also require a lot of light and slower shutter speeds. Thus, I’m looking at one final component to get this shot to work—ISO. For this photo, I know that I need to shoot with a high ISO to get everything else to work. And knowing my camera, I can go to ISO 1600 and still get a great shot. Thus, the steps are as follows: 1) set my camera to ISO1600, 2) dial my aperture to f/8, 3) take a test shot to see what shutter speed my camera gives me, and 4) adjust either my ISO or my aperture until I’m shooting around 1/800th of a second. For this particular shot, I ended up finding a nice compromise at ISO1600, f/7.1, and 1/800th of a second.
Now that you have your settings, you can focus on what really counts, which is the composition and white balance
- For composition, traditional rules apply, especially the rule of thirds and leading lines. Notice how the boats in the bottom right are pointing towards the flow of the water…through the trees? This is deliberate and helps direct the viewer to specific components of the shot. Also notice how the right side of the photo is a bit heavier…it has more elements. It actually contains most of the foreground and background. This represents about 2/3s of my photo, with the left 1/3 being ancillary to the rest of the shot.
- For White Balance (often denoted on a camera as WB) I chose “Full Sun”, which injects a bit of a “cooling” effect. That is, more blue into the photo. Back in the day, this was done via filters, but now you can do it digitally with White Balance Settings. If you’re not familiar with them, spend a little time practicing as they’ll open up a whole new world of possibilities for you.
- Finally, you must choose your focus point of the shot. Even though I was able to get a rather wide depth of field at f/7.1, I wanted to layer the shot a little so that the very far background was slightly blurred. I did so by focusing on the immediate foreground on the right. Thus, this part is in crisp focus, and then the layers of forest in the background become slightly blurred…showing the immensity and depth of the jungle itself.
As you can tell, a simple photo can actually become quite complex when you dissect it into its components. While the camera settings are somewhat non-negotiable, there are some creative elements that help take the photo to the next level.
If you’ve found anything more to this shot that you’d like to comment on, or ask me to clarify please feel free to leave a comment below!
Go forward and give it a shot,

Court
Leave a reply