How to get this shot – Cool Blue Night in Antarctica
Antarctica is teeming with legend, lure, and amazing stories of adventure. That’s why I love any chance to continue that tradition, like on an exclusive and adventurous Sailing Antarctica adventure throughout the famed Antarctic Peninsula.
Not only is it astonishingly intimate, but you have a great chance to get on the peninsula itself at peak photographic hours for unique light.
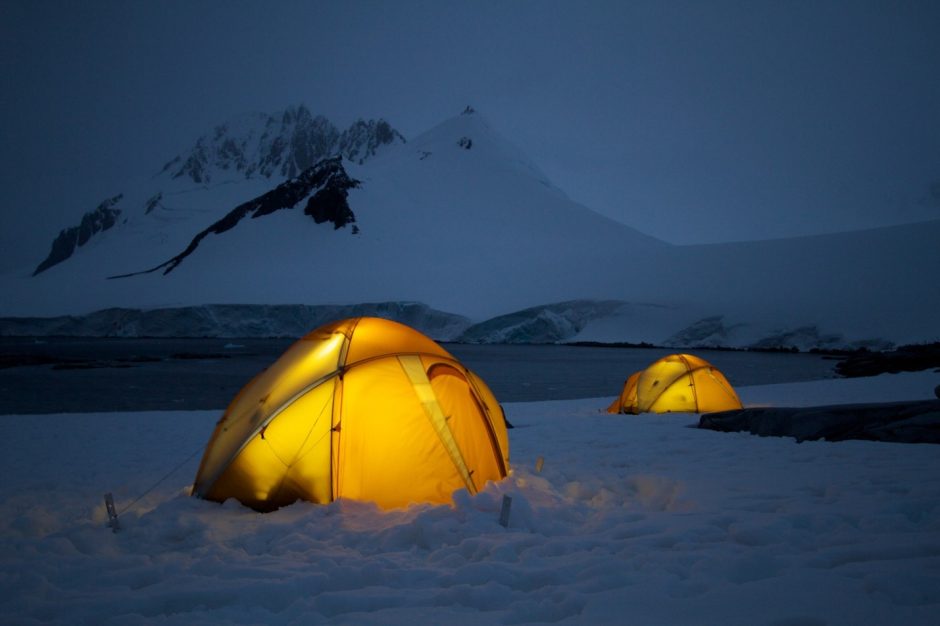
If you’re headed to Antarctica, and have the chance to camp out in this surreal environment, chances are you’re going to get a photo opportunity like the above.
Take a look at the steps below to see how I got this shot and you can get one of your own!
- First, you’ll of course need to get yourself into a scene like this. There are many ways to experience Antarctica, and they’re all sensational. However, when working with your adventure outfitter, ask about the opportunity to go camping during the adventure. While the actual experience of camping is no doubt fun, and a once-in-a-lifetime experience, what it really gives you is the ability to be on land for long exposures at the “blue hour.” Simply put, long exposures don’t generally work well from boats, as there’s just too much movement.
- Next, you’ll need to have the right gear with you. A wide angle lens and tripod are essential. Nothing too fancy, but something in the range of 18mm or 24mm at the wide end is ideal. Having the ability to zoom is great, too, so that you can frame your shot and get the right composition in-camera.
- Timing is important, too. The blue hour isn’t an exact time on a clock, like 8pm every day. It varies with the latitude, altitude, and region. However, generally speaking, it’s the hour right after the sun goes down and dusk turns into night. Oftentimes the camera picks up more blue than your eyes, so don’t necessarily rely on seeing the blue hour. Instead, focus on the time of day you want to prioritize and take into account how much time it may take to set up your shot. You’ll want to be fully ready by the time the sun goes down.
- Composition is key. You will have ample time to look around, spot foreground elements, and frame your shot accordingly. Always start with the rule of thirds or golden ratio for alignment, and if you need to break the rules, be able to justify why.
- Camera settings are critical and you can go about this in a few different ways. I generally discourage folks from using full auto in these cases. What you’ll notice is that the camera is injecting far too much light into the scene. What you really want is to deliberately take a darker photo. I personally find the best setting to be Aperture Priority. Because I want everything in focus, I’ll set my camera to either f/8 or f/11. And then I’ll start with a modest ISO of 400. The key is that I’ll UNDERexpose my shot by anywhere from -1 to -2 full stops on the exposure meter.
- Focus on the foreground subject. You’ve got to focus somewhere, so I recommend focusing on what’s closest to you—in this case it’s the closest tent. Then, if you’re using autofocus, I recommend switching to manual focus to “lock in” the focus. This way your camera doesn’t have to continuously refocus for each resulting shot. It’ll save you lots of time and lots of grief for having to refocus and recompose each and every time.
- Take a test shot. This is going to tell you how much you need to adjust your above settings. Review your photo. Is the photo too bright, too dark? Adjust the exposure compensation accordingly. Is your camera giving you way too long of a shutter speed…like 30 seconds or longer? In that case, you’ll need to let in more light. You can do so by either dropping the aperture down or increasing the ISO. Just remember, the higher the ISO, the grainier the photo becomes. And the lower the f/number, the shallower the depth of field, so part of the scene may become less in focus.
- Now that you’ve adjusted your settings, continue taking shots until you nail the right settings for that rich color and the lighting you like best.
- Monitor the environment and move around! Because the sun is still technically setting below the horizon, you will progressively lose light. Thus, you may get different photos and/or have to adjust your settings as time goes on. Do this while you move around to get different angles of your scene. Once you have the settings dialed in, you’ll only need to make minimal changes to adjust for different angles or decreasing light. Thus, you’ll be able to take many more photos with a lot less set up time!
As you can see, it’s a fairly lengthy setup process for a shot like this. Anytime you’re shooting at night you’re going to have the same issues. However, as you’ll also see, the resulting photo can yield stunning results. With the right Antarctica expedition, and patience, you’ll get the shot of a lifetime that tells the story of your adventure.
Cheers,

Court
Leave a reply