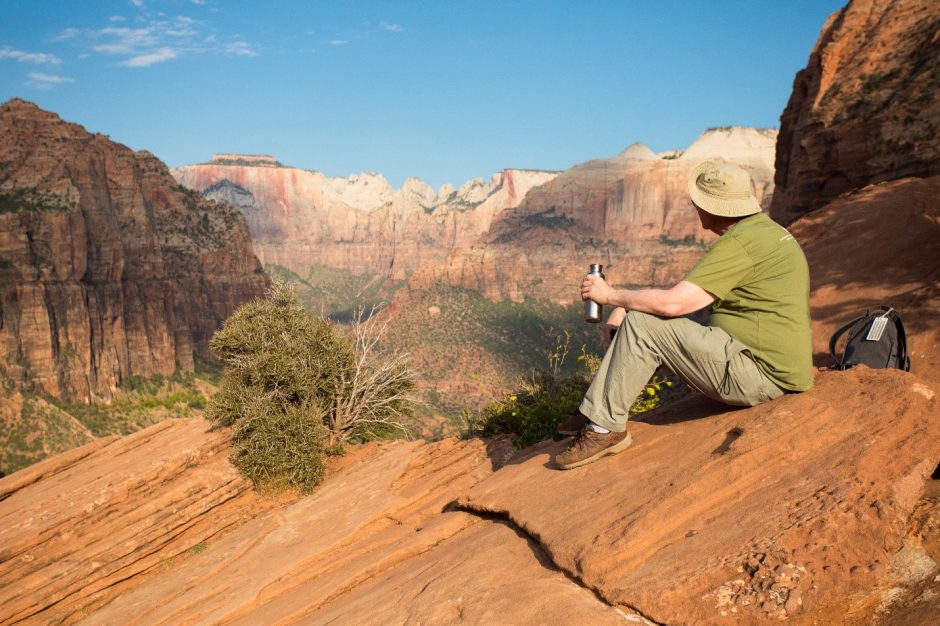
How to get this shot – Canyon View
Travel photography and landscape photography can often be blended together to create an image that really immerses the viewer into the scene. I’ll often teach that having people or vehicles in photos can actually be quite helpful, as they provide important context to what’s going on in the photo. In the above shot, it’s of course a beautiful canyon view, but there’s something next level about having a traveler gazing out into the wilderness, being the main subject of the shot. It’s your classic “put yourself here” kind of image and it’s a key component of a well-rounded trip portfolio.
If you’re keen to get a shot like this, follow these steps and get out there!
- Of course the first thing is that you have to find other-worldy scenery like this. Fortunately, it’s surprisingly accessible in the various National Parks of the west. This one in particular is from Zion National Park, as part of a Canyons of the SW Photo tour I lead, and if you like amazingly colorful rock in all patterns, sizes, shapes, and sizes, Utah and Northern Arizona is the absolute best. Get yourself there, whether on your own, or with a good outfitter that can do photo tours, and find some lesser known trails for a bit of seclusion for your photo sessions.
- Next, you’ve got to think about your camera settings. And specifically, I mean aperture. For a shot like this, I didn’t want the background to be too blurred, or else you wouldn’t be able to see the definition in the distant rocks. Thus, I’m shooting at f/11, which is normally pretty high (most shots are between f/2.8 and f/8), but look at that blue sky—all the light I could ever want. At a very modest ISO of 400 I was able to shoot at f/11 and 1/100th of a second. Pretty good! If instead you had less light (e.g., cloudy day, dawn, dusk, etc.) try to dial the ISO up a little before potentially trying f/8 or f/9. The trick is to have a big depth of field so don’t go too low on the aperture. F/11 is really a good starting point.
- Once you have your settings, you’re just about set. But you need to pick a focus point. It may not be immediately obvious given the above photo, but I did indeed focus on the man so that he was in tack sharp focus, and the background slightly fuzzy. Although the background should be in focus at that wide depth of field, it’s just hard to have your cake and eat it too when it comes to distant backgrounds like this. Even at f/22 it wouldn’t be much sharper. However, if I instead had focused on the background, and the man was blurred, the photo just wouldn’t look as good…the blurred subject would be quite distracting. Thus, always focus on the foreground or subject. Now, all rules are meant to be broken, so feel free to experiment, but if you do choose to focus on something other than your foreground, you’ll need to be able to justify why (artistic impression, foreground didn’t have any distinct elements, etc.).
- Finally, because you’re working with a model, you’ve got to figure out what you want them doing. Most people often go for the “staring at camera” photo, which is fine. But I find that there’s something intriguing about having someone looking into the distance. It helps prompt the viewer to do the same, which is helpful, and it also puts the viewer in the subject’s shoes so they maybe can feel what it’s like to be on that rock looking out. You’ll also need to think about lighting. This photo has nice light coming from my back, so everything’s nicely illuminated. But, it pays not to be lazy, and think for a little bit and plan out the shot. Angled light can also be really great, too, where the light is hitting the person from the side. But, rarely does back-lighting look good, which is when you’re photographing into the sun, even only at a slight angle…that’s where you get problems.
- So now you’re ready…camera is set, model is posed, you’ve thought about the light, fire away! Take a number of shots and use this opportunity to advise the person to shift positions, and potentially even try different camera settings. That’s the great thing about landscape photography—the scenery isn’t going anywhere fast.
Go forward and give it a shot,

Court
Leave a reply