
How To Get This Shot: Yellowstone Bison With Snow-White Background
Bison symbolize so much about the wild spaces of North America. Not only are they literally on the U.S. National Park Service logo, but they are also wildly charismatic and photogenic. There’s also a unique and compelling conservation story surrounding them, which you may learn more about when on a specialized Yellowstone Winter Photo Adventure.
But for now I want to concentrate on this style of photo, as it works very well for bison and other wildlife in snowy landscapes. Read on for a step-by-step guide to this technique, which combines core tenets of wildlife portraiture with unique exposure methods.
Finding the Right Bison to Photograph
Bison can be virtually anywhere in Yellowstone National Park and what we often refer to as the GYE, or Greater Yellowstone Ecosystem.
But what we’re really looking for is bison at a relatively close distance and in a plain, white, snowy landscape.
The close distance is so that we can really emphasize that beautiful background blur, the definition of the bison’s face, and the snowy landscape. This allows us to “blow out the highlights” and make it look almost as if the bison were photographed in a studio, creating a level of focus and intrigue that draws attention to the minute details, textures and charisma of this extraordinary animal.
The Right Lens and Camera Settings
The lens is the easy part, as you really just need a telephoto lens that gives you the reach you need. Something like a 300, 400 or 500mm usually does the trick. If you have a lens that gives you a “fast” aperture, like an f/4 or f/2.8, which can also give you the reach you need, this is certainly preferred.
However, if you don’t have a special lens like the venerable 300mm f/2.8 or 400mm f/4 (pretty rare to have, and usually at a professional price point), then set your aperture at the lowest f/number it can go, which usually is something like f/5.6 or f/7.1. This will produce a similar effect but with less blur than a lower f/number.
Shutter speed and ISO will largely depend on the conditions—whether the bison is moving, whether this is early morning or late evening, etc. However, bison are usually quite slow, so a 1/250 or 1/400 shutter speed can be plenty.
I personally have my camera set on “manual” but with Auto ISO. This gives me the ability to change the exposure compensation to quickly increase or decrease exposure and the camera adjusts the ISO to compensate.
This is one of the most important steps to the photo, so we’ll cover this in its own section next.
Setting Exposure
Perhaps the most important aspect of this photo—and maybe the least intuitive—is that you should plan to overexpose your shot considerably. What we’re trying to do here is to somewhat drastically overexpose the snow so that it becomes almost too white. This is what creates that isolating effect of our subject here.
The other thing the overexposure does is help bring out light in the shadows of the bison. Bonus points if the bison is facing away from a light source (i.e., the sun) so that you can really overexpose without overexposing the bison.
So what are we talking about with overexposure? Well, usually it’s quite subjective to your own preferences and artistic vibe, as well as conditions. However, a +1 to +2 range is a good rough estimate.

Composition Considerations
A great way to address composition and give yourself maximum versatility is to “zoom out” a little so that you can crop in later and experiment with some unique composition. For instance, this photo positions the subject pretty close to the dead middle—rather atypical in the world of wildlife photography, as the rule of thirds tends to produce the most aesthetically pleasing images.
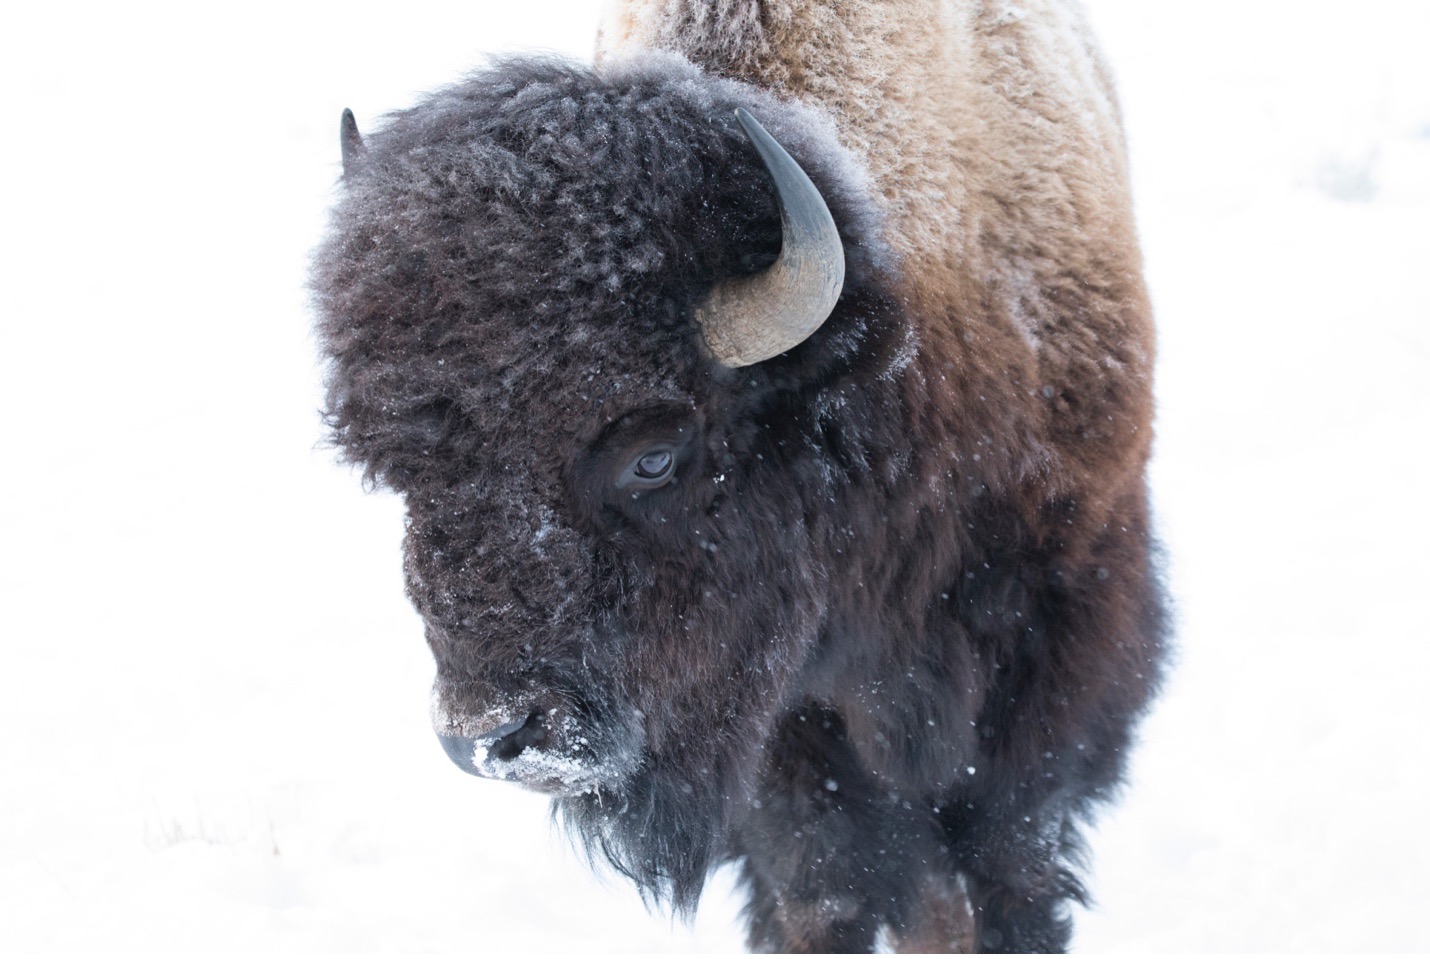
However, because we have nearly no background color or texture, the middle positioning helps give even more prominence to the subject. It also creates a nice simplicity that complements the very simple background color and texture.
An offset bison is just fine, too, and maybe even better, but if you only get to take a couple of shots, a great trick is to zoom out so you can re-compose on the computer later.
And there you have it: some simple techniques to get this unique snowy portraiture of wildlife when photographing in the winter brilliance of Yellowstone. Ready to get started? Check out Nat Hab’s winter Yellowstone photo tours: Yellowstone: Ultimate Wolf & Wildlife Photo Expedition and Yellowstone Wolf Quest Photo Expedition.
Go forward and give it a shot!!

Court
Leave a reply