
How to get this shot – Motmot in Costa Rica
Within the greater realm of wildlife photography, bird photography tends to set itself apart. First of all, it requires specialty gear, which usually boils down to a considerably bigger lens. And then there’s technique, which usually requires extreme patience when seeking your photo subjects. However, when it comes to the actual camera technique, the settings for a “classic bird photo” like the one here aren’t all that different from other wildlife portraiture settings.
Follow these simple tips below to come home from ANY wildlife photo adventure with some stunning bird photos.
First, you’ve got to get yourself on some amazing birds
Fortunately, birds are found virtually everywhere there is nature, and even in some places far away from pristine nature like cities. Thus, the options for bird photography are endless. However, if you’re a generalist like me, you’re probably going to want to prioritize the charismatic, showy, and colorful birds if possible. For these reasons, I tend to opt for guided photo tours in places like Costa Rica, Galapagos Islands, and throughout the continent of Africa. Let me stress, there are some AMAZING birds outside of these areas, but if I’m going for those birds sure to please any viewer of my photographs, I’m starting in the tropics of the world.
Next, be sure to have the right gear
The RIGHT gear can be rather subjective. You’ve got to balance between telephoto power of your camera and lens, along with the size, weight, and even cost of the equipment. And all this is in direct relation to what birds you’re trying to go photograph. This is another reason I like the places I mentioned above–they tend to have bigger and more colorful birds, lessening the need for massive bazooka lenses that will drain your wallet and give you a crick in your neck from carrying them.
Personally, I recommend getting a generalist lens, like a 80-400, 100-400, 200-400, or 150-600. Although the “big primes” like 500mm f/4, 600mm f/4, or 400mm f/2.8 are some of the best for bird photography, they are fairly cost prohibitive for many, and they are the size of a full-sized suitcase. Thus, I always prefer a little less quality, or telephoto power, for the ability to hand hold and travel easily with it. My top pick (because I’m a Canon guy) is Canon’s 100-400mm mark 2 lens. But rest assured, all camera manufacturers make EXCELLENT lenses in this category. And some 3rd party outfits like Tamron are coming out with 150-600mm lenses that are small, lightweight, and quite good!
Be ready with your settings
Unless you’re going on a hike to spot a certain bird (i.e., nothing else to see that you might photograph), you ought to remain flexible in your settings. That is, you don’t need to walk out the door each day with these settings dialed in, but you should be able to get to them quickly when the right bird at the right time presents itself to you.
To me, I generally like to start with the smallest f/number, to give me a faster shutter speed. While this bird here was sitting perfectly still, you want to anticipate and capitalize on any movement the bird might make, as sometimes a quick wing beat or head turn can blur your photo otherwise. Not to mention, some of these movements and positions can actually turn out quite neat if captured at the right time.
A typical set up might look like f/5.6, 1/320 shutter, and ISO 1000. The ISO is going to be the wildcard. Here in Costa Rica, birds are often found under the dimly lit forest canopy. Thus, to get a reasonably fast shutter speed in low light, I need a high ISO, like 1000 (or even higher).
The reason I start with f/5.6 is for a few reasons. One, I like the background blur it yields…jungles have lots of textures and if you don’t blur that out, it could compete with the bird for the viewer’s attention. The other reason is I want to let in as much light as possible. The lower the f/number the more light coming in through the aperture. And lastly, I want to be careful that my depth of field isn’t TOO shallow, or else the bird won’t be in perfect focus. In a photo like this, you definitely want the entire bird in focus, otherwise it’s going to look sloppy.
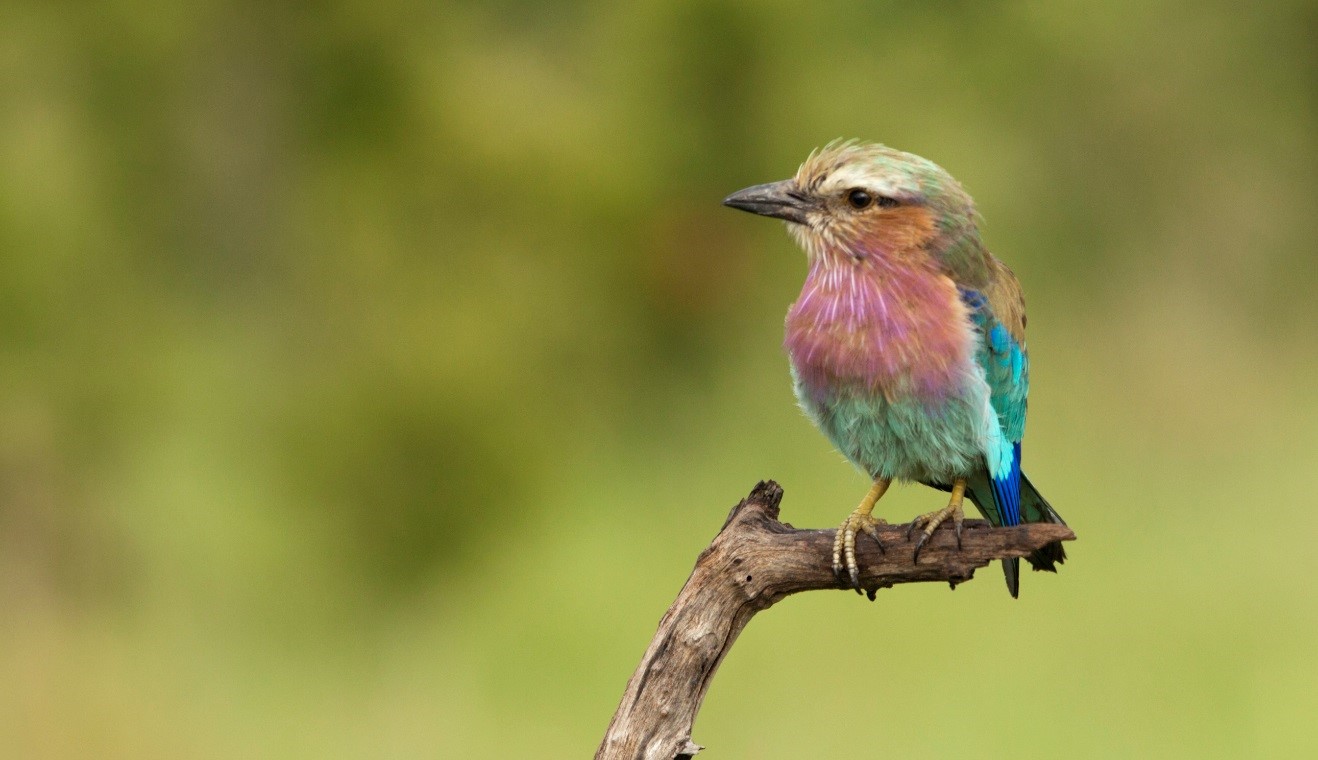
If you can experiment, try lowering your ISO or increasing your aperture to something like f/8. Both of these of course decrease the amount of light you’re letting in, so it’s very scene-specific. In the below photo, I was in full daylight in Kenya, so decreasing ISO AND increasing my f/number gave me the photo I was looking for of a lilac-breasted roller.
Find your best vantage point
This is actually one of the most important lessons here. It’s important for all wildlife photography, but particularly important for bird photography. You must ask yourself…what does the background look like? What color is the background? What texture? Am I in a position to showcase the bird’s amazing qualities? Stepping a few feet left or right can make a MASSIVE difference in your resulting photo. Remember, you are the artist…do you think the background would look better with that brown tree trunk in the distance, or the vibrant green of the forest? Do you want to photograph the bird head-on, from the side, or showcase it’s brilliant plumage elsewhere on its body?
There is no right answer–it’s entirely subjective. However, it’s the difference between a good photo and a great one.
Take lots of shots!
Birds move a lot, so getting that perfect shot that displays and showcases the bird exactly as you want can take time and lots of photos. I recommend putting your camera on burst mode, so that you can take many shots in a rapid succession as you keep the shutter button held down. This is the case with most wildlife photography, but again, bird photography is something a little different, and small changes in the birds position can yield big differences for your photo.
As you can see, there are some special considerations for bird photography, but frankly, these things can help improve ALL your wildlife photography, too. If you’re headed on a photo adventure to somewhere with great birds, be sure to practice up a little so you’re ready for the field. With practice, a bit of luck, and a great photo guide, I can promise you you’ll come home with some stunning photos of spectacular birds.
Go forward and give it a shot!

Court
2 Comments

James Wiesner
September 16, 2021 at 2:38 pm

Court Whelan, Ph.D.
September 23, 2021 at 9:27 am
Very interesting point about the guided photo tours, and I agree. Can you recommend some good photo tour companies in the various countries you mentioned? Or even in the United States?
The one I most recommend is Natural Habitat Adventures, which does specific photo tours (with guided photo instruction), in addition to general wildlife observation tours (you still get GREAT photos, but no photo instruction). I’d check out http://www.nathab.com/photography-adventures/ and see what catches your eye!