Shot Setting Tips for River Hiking Photography
When in the Canyons of the Southwest, one of the highlights is surely getting into the canyons themselves and photographing the mysterious corridors that appear all around you. Some are home to ancient rivers, some are simply remnants of these waterways, existing as dry fossilized river beds today. Either way, when in this part of the USA, be sure to have your cameras ready as it’s truly a show for the senses. Here are some tips for photographing rivers in the Canyons of the American Southwest.
- Obviously the first thing is to get yourself there. The most photogenic canyons can often be lesser known and off the main tourist trail, so you’ll want to do your research or go with a reputable outfitter.
- The second obvious thing here is to make sure you have the right gear. When photographing landscapes a tripod can be quite helpful, especially when in waterways and deep canyons. If the light is less than ideal, or if you wish to take long exposures, you’ll need a stable surface on which to place your camera for the photo. If you don’t have a tripod, plan on balancing your camera on a handrail or rock to get the stability needed. As far as lenses, you’ll want a good wide angle lens, somewhere in the range of 18-55mm, 24-70mm, or 24-105mm. If you happen to have an ultra-wide, like a 10-22mm, 12-24mm, or 17-40mm (on a full frame), these will be very helpful, as narrow canyons can often necessitate an ultrawide for the “full picture”.
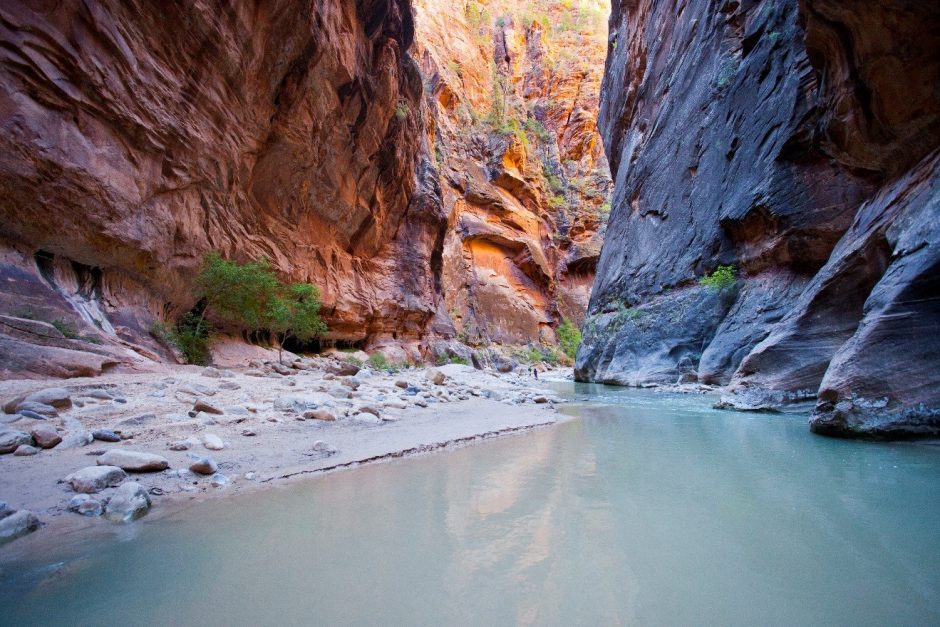
- Next, you’ll want to pay special attention to the composition of your photo. While getting to areas that others simply can’t access or don’t know about it great, it’s not always that easy. Thus, the impetus is on you to really nail the composition. Take this photo as an example and visually overlay a “rule of thirds grid”.
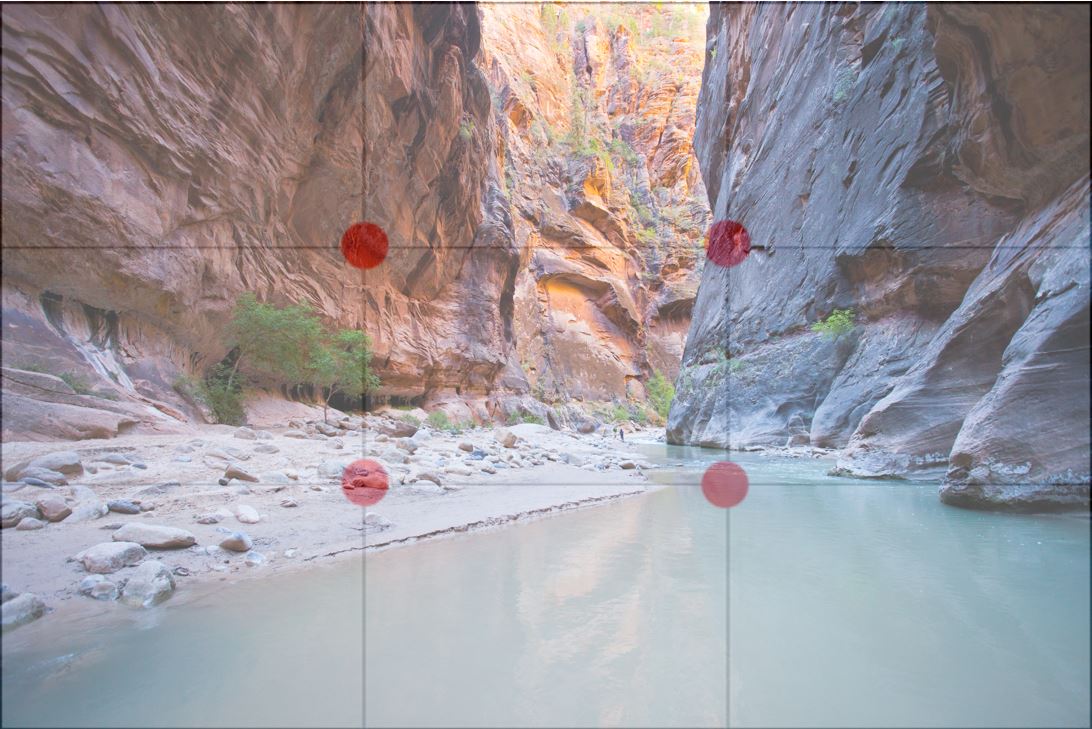
In my humble opinion, the bottom right intersecting point (red dot) is the most important, as it’s what the viewer’s eye goes to first. It’s located right on the edge of the distant water’s edge. With the viewer’s eyes following the river, alignment here is key.
- With canyons photography, lighting is also key. What you want to avoid is needlessly harsh shadows or highlights (ie, really bright spots). In the above photo you can see that while there is brighter and darker areas, none of these are overdone. It can sometimes be challenging to find these special areas, where no overly dark or light zones exist, and this is part of the real art when photographing in canyons. Sometimes intense shadows or sunlit areas can be evocative and quite pleasing, but just be careful as they can also be distracting and a bit harsh to the viewer.
- Lastly, you want to try and nail the colors. It’s always surprising to me how much color is in a desert. Oftentimes they can be markedly more colorful than even a tropical rain forest. But, it takes a deliberate eye to find the colors and proportion of colors for a shot you’re happy with. In the example photo above, there are just a small handful of truly dominant colors…the blue of the water and orange/yellow of the sunlit area in the distance are most obvious. But there is also a striking dark blue-gray color on the left and a nice rusty orange-red on the left that also jump out. Sometimes colors can be most effective when they are simple and moderate in number. Having dozens of distinct colors in a single shot can often be overwhelming, so keeping it to a select few proves that quality over quantity can be your best friend in shots like this.
Go forth and give it a shot!
Leave a reply