How to get this shot – Mysterious Winter Wonderland
It happens every year – winter is coming. And being based out of Boulder, Colorado, I have wonderful access to places like Rocky Mountain National Park, Summit County, and a thousand places in between for enjoying a variety of winter wonderlands.
Whether you plan to visit or live in Colorado, Yellowstone, or any number of wintery mountainous places in the coming months, follow these steps to get an evocative winter shot like the one above.
- Well of course first of all you need to have a reasonable guarantee of getting snow to take a proper winter wonderland photo. Heading to the mountains is about the best bet you can make, and there’s nothing better than Colorado’s Rockies, or Wyoming’s Grand Tetons.
- Although you can’t really do much about planning the weather, you do have to hope for a blue sky day. While white clouds are good in the days preceding, as they’ll deliver that beautiful snow, to get that proper contrast and juxtaposition of color, you’ll want a rich dark blue sky.
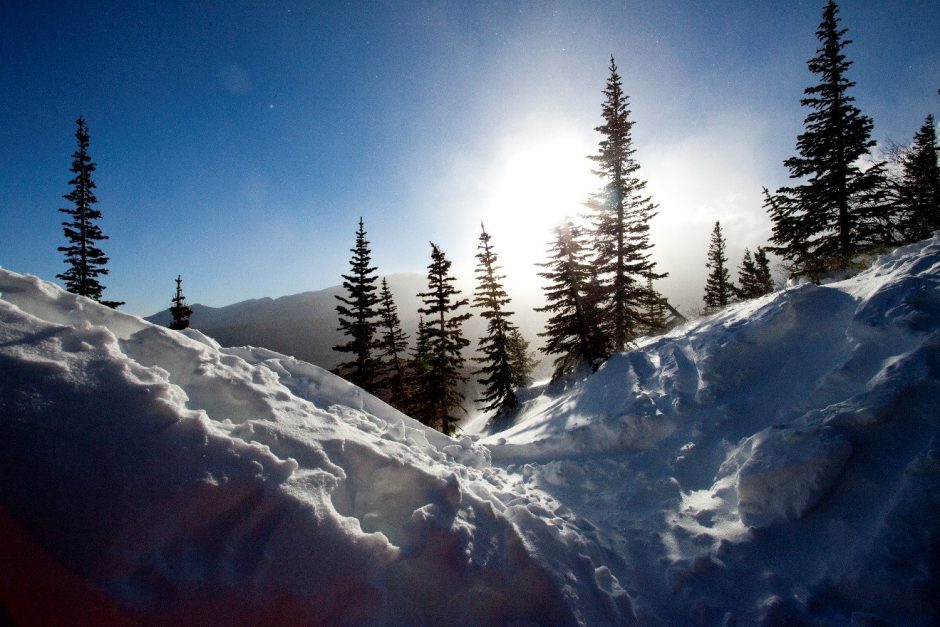
- Next, get yourself into position. For this shot here, I made use of the wind that was creating a good bit of airborne snow and ice. What this allowed me to do is to shoot directly into the sun…something not normally feasibly if you don’t have some clouds. Although there were no actual atmospheric clouds, the small puff of snow blocked just enough light to get that neat effect seen here. Thus, I was able to underexpose and darken the rest of the scene, while still having some good quality light right in the middle.
- Perhaps the biggest decision and question is how do you meter your camera. Obviously you’ll need to focus on the foreground, but what about how to get the right light? You have a lot of factors here, between reflective snow, bright sun, dark trees, and saturated sky. You’ll no doubt want to be ready to experiment a bit. However, for starters, you’ll want to meter on a mid-tone in the scene. That is, something that’s not too bright, not too dark, but juuuust right…a Goldilocks of lighting.
- In this scene, I focused and metered (by focusing with modern cameras, you also meter at the same time) on a moderately shadowed patch of snow in the foreground. Since it was about zero degrees this day, I wasn’t really in the mood to experiment for too long, so knowing that this technique would allow me to focus on what I needed to focus on, and get the right metering, this was all I chose to do. However, we can’t always get lucky with this. If your resulting shot is too bright (usually happens if you focus and meter in the shadows), manually underexpose for the next photo. OR, choose something a little brighter and see how it goes until you get it just how you’d like.
- What we’re really looking for in this photo is a darkening effect. Thus, I personally recommend you err on the side of focusing and metering on a patch of snow that’s a little too bright at first, and that will give you this really need dark sky, silhouetted tree, and moderately shadowed snow look that makes this such a neat shot.
So, as you can tell, a lot of the above is about metering your camera to get the right shot. There are many more lessons in composition or depth of field I could discuss, but I think challenging shots like this can become great opportunities to make magic out of interesting light. If you are keen to learn more about lighting and exposure, check out my Exposure & Light page, and then practice, practice, practice.
Now, Happy Thanksgiving folks, and hope you enjoy your start to winter wherever in the world you may be today!
All the best,
Court
1 Comment

Sandy Smith
May 15, 2018 at 11:10 am
This is a great post!