Top 3 Skills for Getting the Right Light in your Photograph
Plain and simple, light is a deal breaker when it comes to photography. You can have the most incredible view of the grand canyon, leopard in a tree, or view of a glacier in Antarctica, but without any light, it’s just a blank screen. Thus, the presence of light is paramount. Here are three skills to know about when photographing to make the most of lighting conditions.
1) Finding light
It’s certainly an obvious one, but nevertheless it’s critical when trying to get the best photo you can. This is true, whether you’re photographing a sunrise or sunset (which is pretty much ALL light), or animals on the plains of Africa (and everything in between). The reason that most photographers will choose to get an early rise, or stay out a bit later is that the color, angle, and overall quality of dawn and dusk light is superb.
Light at an angle illuminates your subject in a far more evocative and photogenic way than mid-day light that is pounding down straight from above. Try and you’ll see. Take a photo of a friend of family member outside when the light is hitting them at different angles. You’ll see that side lighting is the best.
The color of light is also a big one…is it being filtered by a sunrise or sunset with strong hues of yellow, orange, or even red? If so – great! This color will work wonders with your scene, turning even a photo of the tree in front of your house into a potential work of art. Similarly, is the sun obscured by clouds, lessening the intensity? Great, as well! While blue skies are always nice, oftentimes the best photos of wildlife can be had on overcast days when mid-day shadows are lessened by the softness of clouded light.
2) Exposing your camera to the light
When light is your main subject of a photo, like sunrises and sunsets, you need to capture it correctly. When it comes to exposing your camera to light, it’s difficult to have your cake and eat it too. That is, it’s virtually impossible to incorporate a beautiful sunrise/set with an evenly lit foreground. That’s because the light coming from the horizon is much brighter than your foreground. Now, there are always times when the sunrise/set is physically lighting the foreground, and this offers fantastic photo opportunities. These are not always achievable, though.
What this is all getting at is that as a photographer you’ll have to choose which part of your scene you want properly exposed. Do you want that beautiful tree or sea lion in the Galapagos to be well-lit at the expense of an overly-bright sunset? Or, do you want the sunset to take center stage, resulting in a darker foreground? Most often I will choose in favor of the well-lit horizon (sunrise/sunset) because it’s easier to lighten the foreground in photoshop than it is to darken an overexposed sunrise/set.
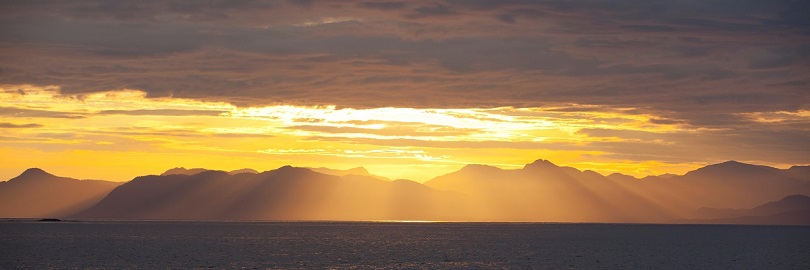
Notice in the below photo of a sunset in the Solomon Islands that the sailboats are a bit darker than we’d like, but the colors and textures of the horizon and clouds are fantastic. Oftentimes it’s a balance.

3) Physical and digital workarounds
Fortunately, there are a few ways you can coerce your camera into working with you when presented with challenging lighting.
The first is with a graduated neutral density filter. These are basically filters that split your lens into half of a sunglass and half perfectly clear. Thus, you can position the tinted part of the filter on the overly bright part of the scene and effectively darken it so that it’s more even with the darker part of the scene. The only limitation is that this light/dark juxtaposition is a straight line, so if you have jagged mountains or similar, it won’t work perfectly.
Notice in the below photo that there is relatively even lighting between the bright horizon and darker rocks. This was achieved using a graduated ND (neutral density) filter.

Then, there is always photoshop. As much as I don’t like to alter photos too much, I will use it liberally if a) it helps me portray the scene more like what I’m actually seeing with my eyes and b) if it works – that is, it doesn’t look fake or grainy. There are several ways to lighten in photoshop, but I personally like the “paintbrush” tool, such that you can paint which parts of the scene you want lightened, instead of just brightening the entire photo without precision. The key thing to keep in mind is that it’s more effective/realistic to lighten a darker foreground than to darken a lighter horizon.
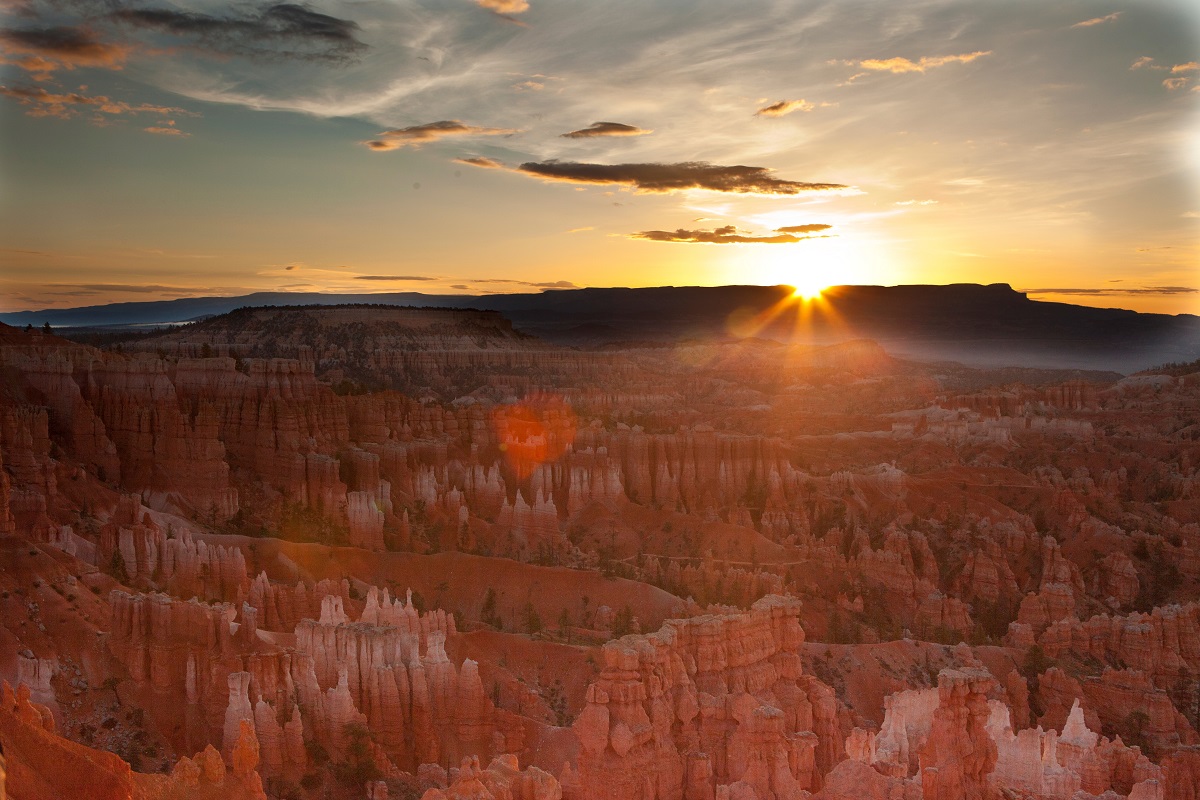
The below photo was shot properly exposing the sun, resulting in a very dark foreground. The foreground here was lightened in photoshop (with restraint) to get a little bit of the color and light to show up as my eye saw the scene during this early morning sunrise on our Canyons of the Southwest Photo Adventure.
Lastly, there is High Dynamic Range (HDR). We’ll dedicate an entire section to this in a future post, but essentially what this does is through a series of three photos you will take, one under exposed, one evenly exposed, and one overly exposed, computer software will “merge” these all into one photo. The computer uses fancy programing to decide which parts should be light or dark, but you also have a little bit of leeway through various controls, pre-sets, and sliders. Personally, I’m not a huge fan of this style of photography, which peaked in popularity several years ago. Now that it’s relatively mainstream, most folks will quickly recognize what you did to achieve this unique look, ultimately devaluing your efforts and creativity. Certainly not fair, as it requires just as much work and vision as any other photo, but it can quickly be passed off by the discerning eye as surreal.
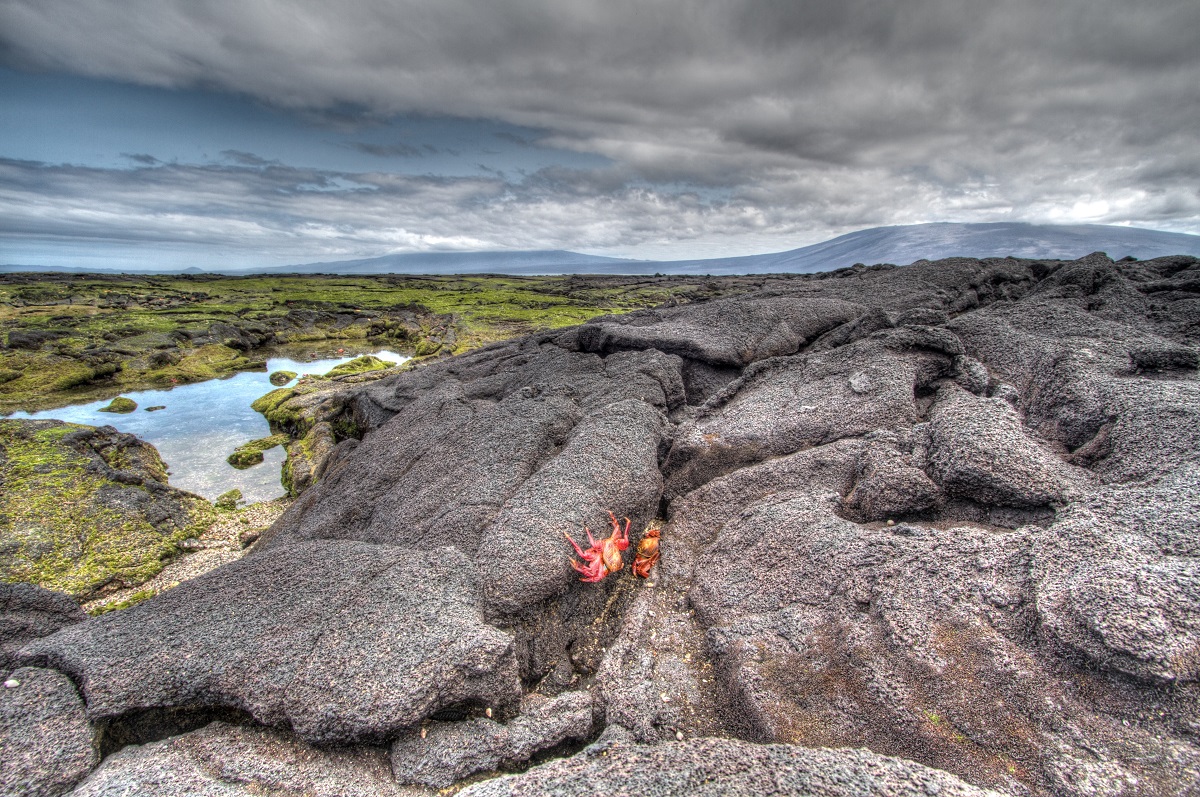
Notice in the below photo that the sky, black lava, and green algae are all very well balanced for exposure. While this attempts to capture more of what our human eye sees in real time, it has a certain look that can border on being surreal.
There is much more to the science behind lighting in photography, but if these topics addressed here are new, or not yet in your routine considerations when taking photographs in nature, go out and practice. Once you begin to “see light” in from a camera’s perspective, there is no doubt you’ll be happier with the resulting photos.
Go forward and give it a shot,
Court
Leave a reply